


Blended Fade Technique

4 Materials
$200
2 Weeks
Advanced
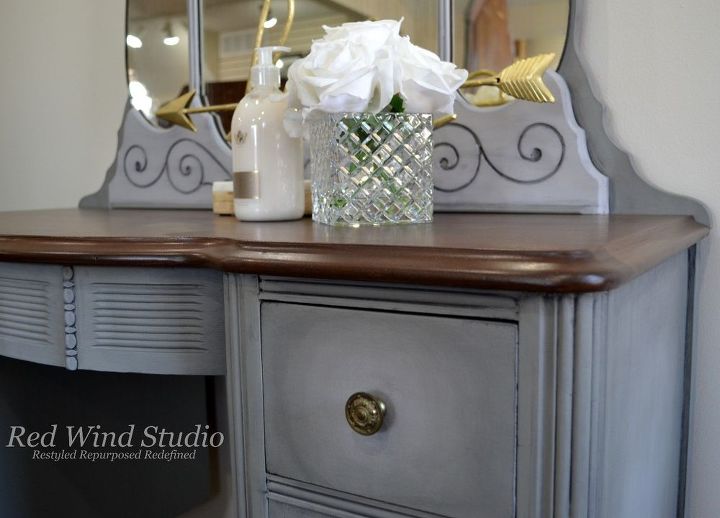
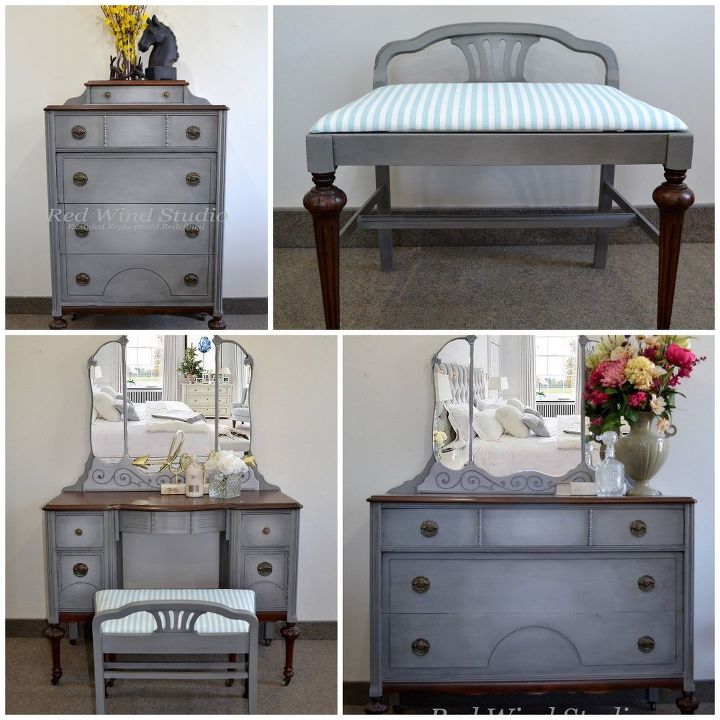
A custom vintage bedroom set styled specifically for my clients
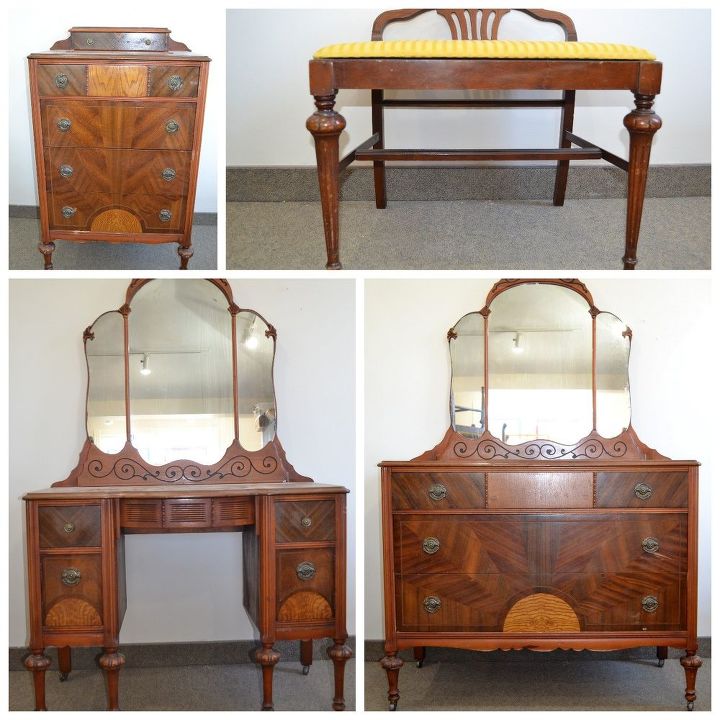
It has been quite some time since I have done a blog post so bare with me if I stumble a bit. I recently completed a bedroom set for clients of mine. They were looking to have a technique done that I had not attempted yet. I have certainly seen it often and was excited to give it a shot for them. I think it turned out quite well if I do say so myself. Here is what I started with.
The requested look was not an ombre where the colour either fades or darkens from top to bottom. They were looking for the colour to fade from a slightly darker grey Greysful on the outer edges to Pewter in the centre (both part of The FAT Paint Company’s pallet). Now to explain how I achieved the finished look. See the picture below.
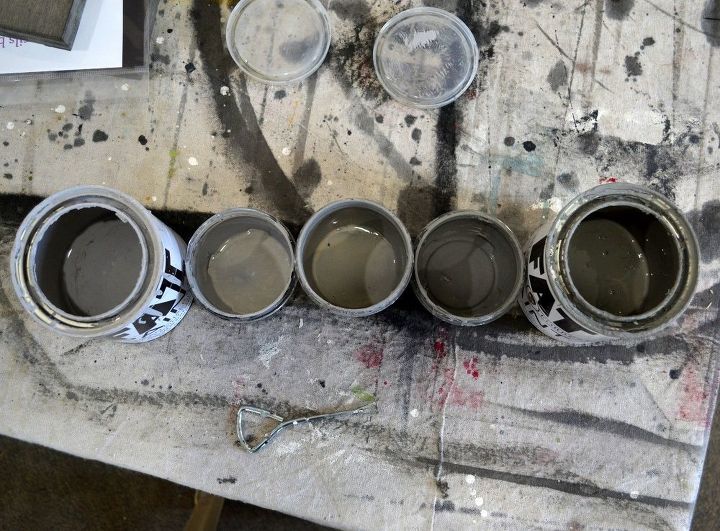
After stripping, staining and applying satin Varathane to the wood areas I painted the edges/corners of the pieces in Greysful. The drawers I painted two good coats of Pewter to have solid base to work over. I used 5 shades in total to graduate from Greysful to Pewter. I mixed equal parts of each colour for the mid tone and more Greysful for the mid dark tone and more Pewter for the mid light tone. See the picture below. Sorry the one colour was all used as taking this picture was an after thought. From Left is Pewter and far right is Greysful.
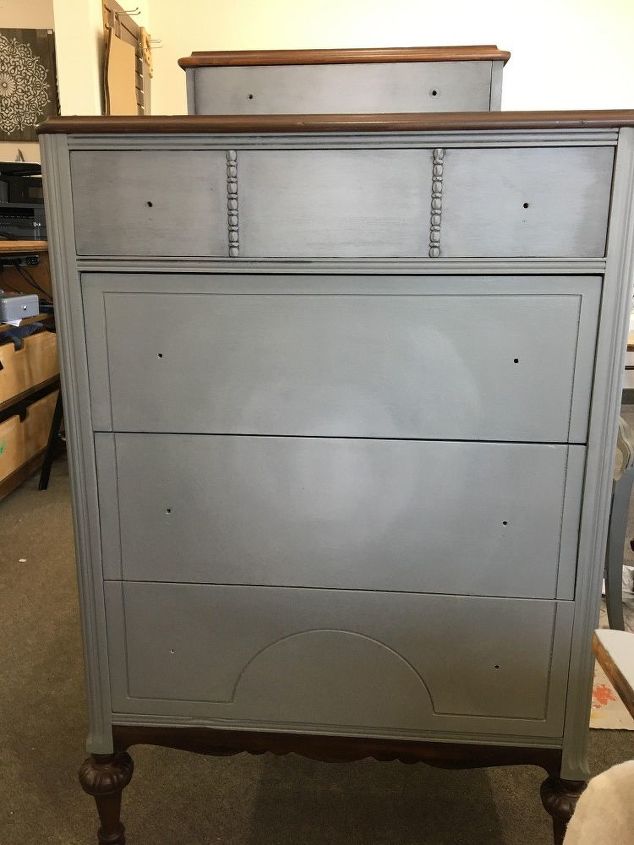
I let my base coats dry over night to help prevent them from re-emulsifying since I would be working with a spritzer of water and the paint. I made sure to have 5 brushes at hand and a small spritzer bottle of water. I started in the center with Pewter and brushed on a fairly thick amount but not so thick as it would run. I lightly sprizted it with water then immediately got my next brush and dipped into my next shade working quickly. I didn’t immediately put that colour right up next to the Pewter but out a little bit then worked it into the Pewter to blend the two shades together. I continued doing this on all the drawers and sides of the pieces. The picture below gives you an idea of what it looks like without the dark wax. Since my clients wanted the antiquing I new the blending didn’t need to be prefect as the antiquing would also help blend the shades.
Once I repeated the blending procedure on all the surfaces including the bench I lightly sanded all the surfaces with 220 grit sandpaper. I then used a very slightly damp cloth to remove the dust from sanding.
The next step was to wax. I waxed all the painted surfaces with natural FAT wax and lightly buffed to create a slight sheen. To create a blended antique look I use a chip brush rather then my round wax brushes. I did each section then moved onto the next. I initially get a decent amount of wax on the tip of my brush and drag it along the edge/frame of the sides of the units. I then use feathery strokes pulling the wax towards the centre. If I don’t have enough wax on my brush I will dip in and get a bit more but make sure I thoroughly scrape the brush along the side of the jar so I have very little wax on the brush. You want to do long light feathery strokes to apply the wax.. Once I have covered the section I am working on I then lightly wipe with my rag removing excess wax.I will then dip into my natural wax and carefully rub any areas where the antique black is too dark and heavy. I do this to each side and all drawers until I am complete, as you can see it is now nicely blended and the details are more evident.
I am always happy to answer any questions you may have so ask away. You may message me through Face Book, Instagram or info@redwindstudio.ca


Any price and availability information displayed on [relevant Amazon Site(s), as applicable] at the time of purchase will apply to the purchase of this product.
Hometalk may collect a small share of sales from the links on this page.More info
Comments
Join the conversation
2 of 35 comments
-
Beautiful color. Great job.
-
this Is absolutely stunning!!! You have done an amazing job of blending !! Beautiful!!


Frequently asked questions
Have a question about this project?
i have a vanity like your pic, it's from Panama and it's approx. 250 to 300 yrs old. do you have any idea what it might be worth? and should something like this be painted? thanks, nancy
WaaWasthe done paypathwayslippery at all in the winter with the sealer?
How and WHY would you paint something SO BEAUTIFUL?!?!?!?