what suggesestions do you have for lightening up this wall BESIDES painting it. please ignome the mess on the couch. We are in the middle of a remodel. Furniture will be replaced later. For now, I’m focusing on the wall.
That's really neat how you were able to 'add' decor items to the original picture. How were you able to do this? Is it from a special program that you have downloaded?
You could use a pickling stain which is applied then wiped off. Repeated wiping lets more and more of the original color and wood grain show through. It's similar to paint, though, so I'm thinking your hubby won't like that either.
The only other option is a wood bleach. Oxalic acid is often labelled as wood bleach, but is too mild for significant lightening. A two-part bleach is what professionals use, but the process is neither easy or quick. And don't forget you will need to bleach the beams on the ceiling, too. If this option is also vetoed I'd say your husband likes the paneling as it is, and you should go with Nancy's suggestion to use white furnishings against the walls.
Things You Will Need
Plastic sheeting
Sandpaper, 3 coarse to fine grits (between 80 & 220)
Soft cotton cloths
3 plastic bowls or buckets
Plastic or wood spoon or stirrer (optional)
Two-part wood bleach
Synthetic sponges or brushes
Vinegar
Spray bottle (optional)
Soft-bristled scrub brush
Steps
Lay plastic on the floor below area to be worked on, and tape it down or use heavy items to hold it in place. Cover the floor wherever you will be walking to prevent tracking.
Sand the wood to be bleached to remove any protective finish. Use a medium grit (80 to 120) initially, then sand with a fine grit (150 to 180) for a smooth surface. Wipe down the sanded wall with a clean, lightly damp cloth to remove any sanding dust.
When dealing with these products always use plastic or wood to hold or mix the components; NEVER use metal. Be sure to wear gloves, and READ THE INSTRUCTIONS COMPLETELY.
Some two-part bleach instructions will have you mix parts A and B before you start applying them. If that is the case, do so now according to package instructions. Mix up only what you think you will need. Other brands may have you apply part A, then come back and apply part B. If your instructions are for applying the parts separately, pour 2 to 3 cups of part A into a plastic bowl.
Dip a synthetic brush or sponge in the solution, then wipe off or squeeze out extra so as to minimize drips. Apply to the wall starting in a corner and working across and down. Apply quickly and evenly to get the most even results.
Wipe down the wall with a clean, damp cloth to catch drips and help even out the application. Then allow the wall to sit according to the instructions. Some brands will have a short wait time, while others may require a full day.
If your instructions split the application of parts A and B, it's time to apply part B. Pour the required amount into a clean plastic bowl and use a clean brush to apply it in the same manner as part A. Part B solution may bubble when it reacts with part A, so don't worry about that. When the entire wall has been covered wipe down the wall with a damp cloth as in Step 6, then allow the wall to sit for a while.
If your instructions split the application of parts A and B, examine the color after 2 to 3 hours. Apply an additional coat of part B if the color is not light enough, but never apply 3 coats. After application wipe the wall with a clean damp cloth, then wait another 2 to 3 hours, or as the instructions dictate.
Once waiting time is complete, in a clean bowl or bucket mix 2 parts water to 1 part vinegar. Pour the mixture into a spray bottle or use a clean sponge to apply it to the wall, scrubbing the wall with a soft-bristled brush to get the vinegar and water into the wood pores. Blot dry with a clean cloth. Wait 30 minutes then repeat this process with a fresh water and vinegar mixture to ensure neutralization of parts A and B. Failure to neutralize will allow continued lightening and prevent the application of a sealer.
After 24 hours of drying time you will need to lightly sand the wall again using 220 grit sandpaper. The bleaching and neutralizing processes roughen the wood surface, and the fine sanding will remove any roughness. But sanding too much will remove the bleached wood and allow the darker wood below it to show. Wipe the wall with a tack cloth to remove sanding dust. You may then seal the wall with whatever product you prefer.
Paneling won't bleach like regular wood. Painting is the only option. The pickling effect like Mindshift mentions is similar to painting. Like a whitewash.
I was wondering if you could help me with something -- I have an entirely oak kitchen. I know it's the rage now to paint or gel stain cabinets. I've been considering ...
See more
I don't want to sound like a total "hater", but am I the only one who doesn't like distressed furniture? I see so many beautiful pieces of furniture that would look o...
See more
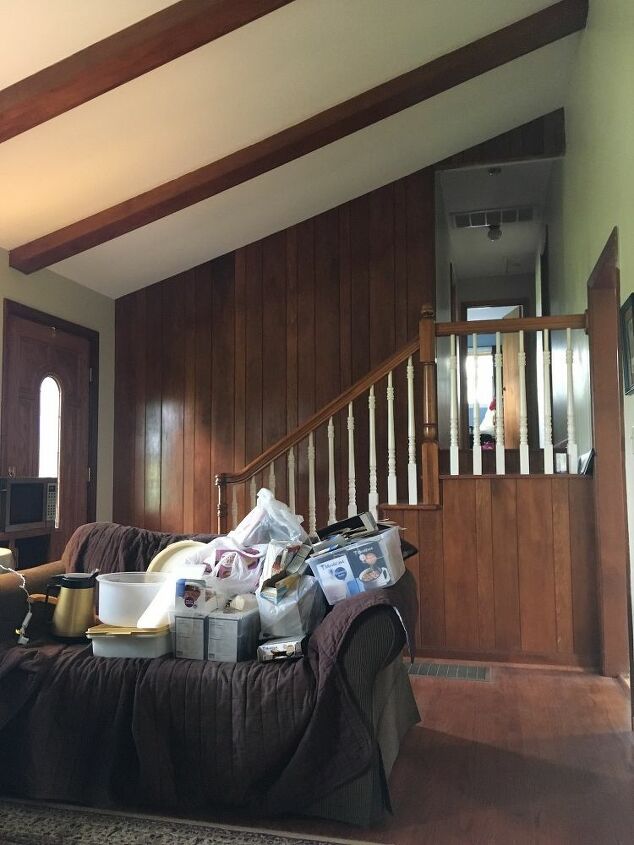

Add lots of white!
you can sand, prime and paint it a light color.
You could use a pickling stain which is applied then wiped off. Repeated wiping lets more and more of the original color and wood grain show through. It's similar to paint, though, so I'm thinking your hubby won't like that either.
The only other option is a wood bleach. Oxalic acid is often labelled as wood bleach, but is too mild for significant lightening. A two-part bleach is what professionals use, but the process is neither easy or quick. And don't forget you will need to bleach the beams on the ceiling, too. If this option is also vetoed I'd say your husband likes the paneling as it is, and you should go with Nancy's suggestion to use white furnishings against the walls.
Things You Will Need
Steps
Paneling won't bleach like regular wood. Painting is the only option. The pickling effect like Mindshift mentions is similar to painting. Like a whitewash.
It’s an app for doing interior design boards but I use it like photoshop from time to time. It’s called Morpholio for iPad and it’s free.