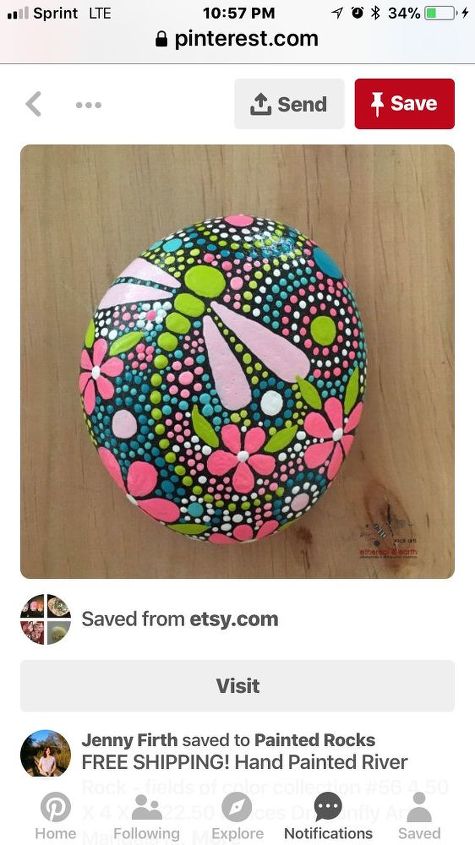
It's copyright infringement to paint something exactly like someone else painted it so my suggestion is, use the idea but make something of your own. Find a simple pattern and trace it onto your rock with carbon paper, paint the main items and then fill in tiny dots of paint around it.
that is incorrect information!! You can copy anything you want! If you try to MARKET / SELL it as original - then maybe - but you can paint / copy / mark ANYTHING for yourself with no repercussions!! Do some research before you spout lies.
I do know that it is easiest to paint on the dots with the tip of the handle of your small paint brush, & Not with the bristles of the brush. It is a little know technique that I learned in Rosemaling painting. The size of the dot that you want will vary. It all depends on the size of the brush handle that you use. ( Smaller tip handle = a smaller dot / The Larger brush handle tip = a Larger dot ). Etc.
You just slightly touch the end of the brush into your paint & gently center & hold it to the area where you want to apply your dot. I count to 3 while holding it in place & then carefully pull the handle away for object. Hope this helps!
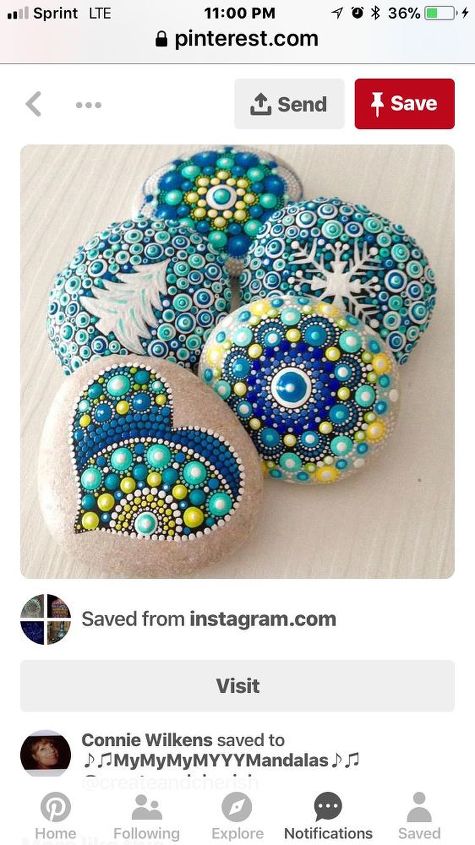
Check at Wal-Mart or Sally Beauty in the nail polish section and pick up a set of dotting tools. Mine are a set of 5, plastic kind of like sticks, and on each end is a different size round tip that are used to dip in nail polish to put polka dots on finger nails. You can use the different sizes to paint the dot designs on the rocks. I bet you could find them on Amazon too. Good luck. Hope this made sense.😊
People put things on Pinterest assuming others are going to do the same thing, or something similar. That's what Pinterest is, for inspiration! Any of the above ideas are great! Where to get the steady hand and patience, I don't know!
Amen!!! You may want to start out on paper to get the feel of the dots before you do the rocks! Never think you can’t do something until you give it an honest try!!! And your art work is just as special as a professioaks! Who knows, it may have taken 2 or 3 dozen rocks to get ONE that looks so “perfect”. 👍😍
regular yellow no. 2 school pencil erasers are awesome dotting tools and the best part is you can use a regular handheld pencil sharpener to shave down the sides of the eraser. The pencil sharpener bevels the sides of the eraser so it still has the dot in the middle it. And presto ... The end result is a set of custom made dotting tools of various sized dots!!!!
I was wondering if you could help me with something -- I have an entirely oak kitchen. I know it's the rage now to paint or gel stain cabinets. I've been considering ...
See more
Hi. I just bought my first home at the age of 59. I would like to paint the front door made of metal and glass, and security door a weathered copper. I don’t mind a...
See more


With a very steady hand! See if these sites get you started!
https://colormadehappy.com/best-painting-rocks-supplies-guide/
https://rockpainting101.com/how-to-paint-rocks-top-questions/
https://paintedrocklife.com/index.php/2017/04/13/how-rock-painting-works/
https://goo.gl/images/XQbhzf
With more patience than God gave me!
It's copyright infringement to paint something exactly like someone else painted it so my suggestion is, use the idea but make something of your own. Find a simple pattern and trace it onto your rock with carbon paper, paint the main items and then fill in tiny dots of paint around it.
I do know that it is easiest to paint on the dots with the tip of the handle of your small paint brush, & Not with the bristles of the brush. It is a little know technique that I learned in Rosemaling painting. The size of the dot that you want will vary. It all depends on the size of the brush handle that you use. ( Smaller tip handle = a smaller dot / The Larger brush handle tip = a Larger dot ). Etc.
You just slightly touch the end of the brush into your paint & gently center & hold it to the area where you want to apply your dot. I count to 3 while holding it in place & then carefully pull the handle away for object. Hope this helps!
Mary
Artistic talent, a good pattern, a good eye and practice - then MAYBE - POSSIBLY you can duplicate this! Good luck!
Check at Wal-Mart or Sally Beauty in the nail polish section and pick up a set of dotting tools. Mine are a set of 5, plastic kind of like sticks, and on each end is a different size round tip that are used to dip in nail polish to put polka dots on finger nails. You can use the different sizes to paint the dot designs on the rocks. I bet you could find them on Amazon too. Good luck. Hope this made sense.😊
Mostly that would be done with a dotting tool, but you can use the end of a paintbrush or toothpicks to create the same look
Looks like puff paint was used to make dots
People put things on Pinterest assuming others are going to do the same thing, or something similar. That's what Pinterest is, for inspiration! Any of the above ideas are great! Where to get the steady hand and patience, I don't know!
Dotting tools are great, toothpicks and straight pins are good for different sizes dots too
regular yellow no. 2 school pencil erasers are awesome dotting tools and the best part is you can use a regular handheld pencil sharpener to shave down the sides of the eraser. The pencil sharpener bevels the sides of the eraser so it still has the dot in the middle it. And presto ... The end result is a set of custom made dotting tools of various sized dots!!!!
Check out this.... https://diycozyhome.com/how-to-paint-stones-and-pebbles/
Thank you 😊
poiant the woieiws and fix's woillios hoieuis freleels
pp