


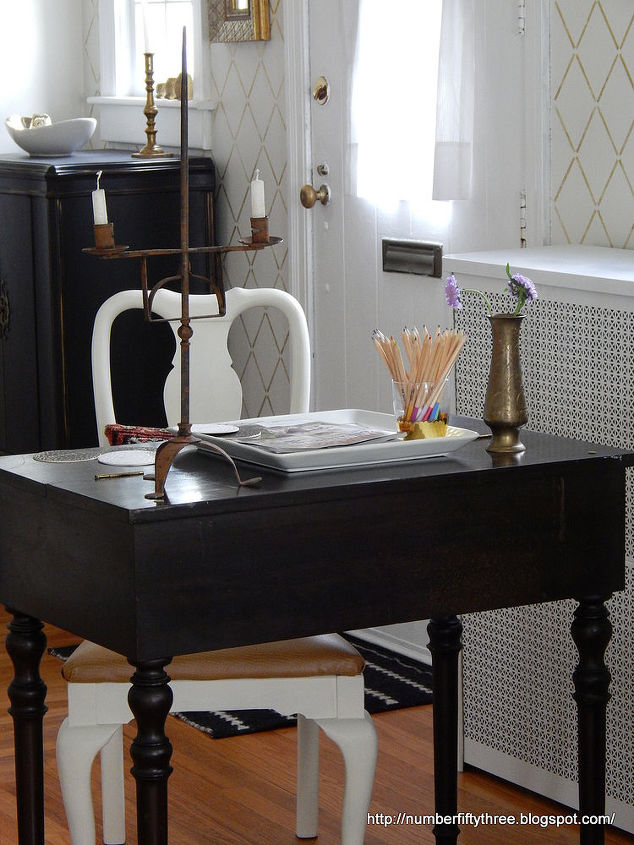
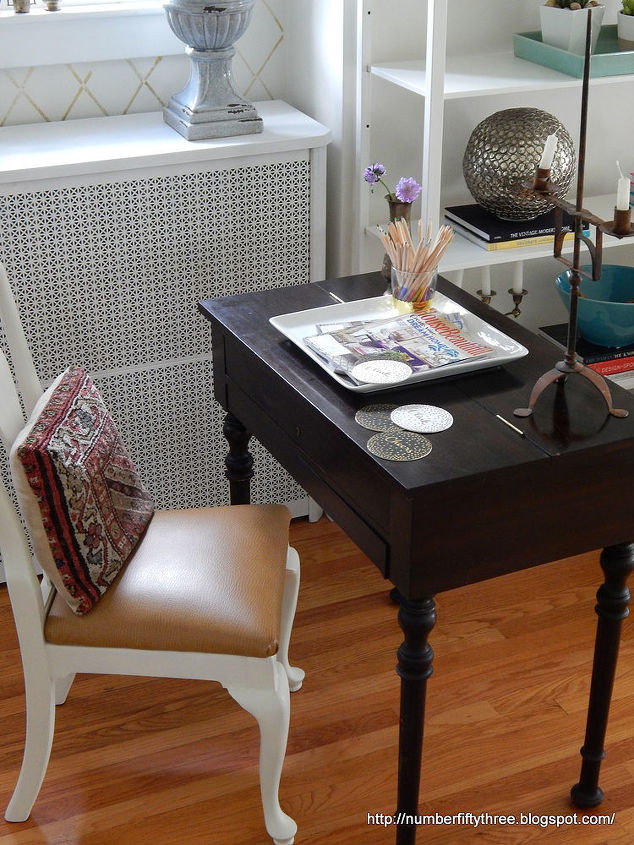
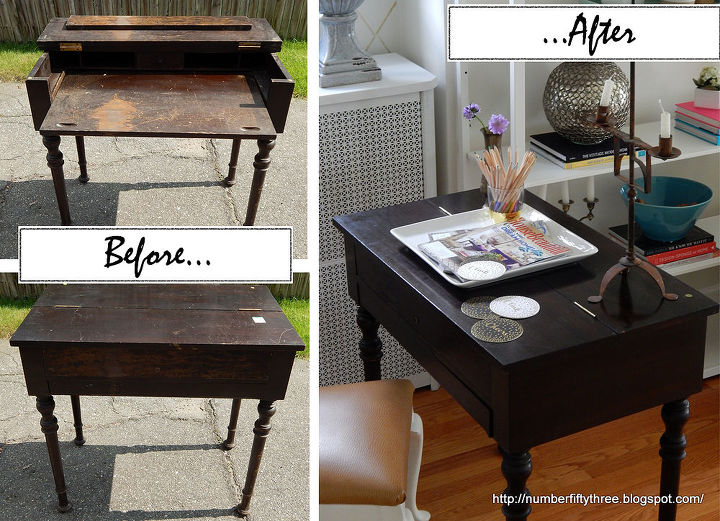
Restored Antique Spinet Desk
I'm so super excited to share with you all the latest addition to our home. For months and months, I had been looking for a spinet desk to use as my little office.
I'm always scouring flea markets/antique stores/craigslist, etc. anyway, and have never, ever seen a desk in this style to purchase.
Guess where I ended up finding it...the thrift store! It was all closed up and stuffed underneath a shelf, but I recognized it immediately. And I may or may not have squealed with delight. OK. I did, in fact, squeal and then proceed to drag it out into the aisle. All the while some other patron looked at me like I was crazy. (Which by the way I could care less about since I have spent my fair share of time in thrift stores and I have seen some crazy/questionable/shocking things). So a little excitement over a desk is nothing in the grand scheme of thrift store behavior.
The good news was that other than a couple of screws to reattach the hinges it was structurally perfect. (BTW--when I was replacing the screws the holes were too big. I good tip to correct this is to stuff the hole with broken toothpicks and then screw the hardware in. Works every time!) Anyway, the bad news was that the finish was seriously worn and scratched. Since I knew I didn't want to paint it (I like a mix of painted and stained furniture in our home and I didn't want to detract from the overall value of the piece) I knew that restoration was the way to go.
My method definitely isn't going to lead to a perfect finish, but it will dramatically change the look of an antique with very little money and effort. First, I started by washing the desk with a damp cloth (definitely a necessary step since it was filthy). Once it is perfectly clean, I dried it off. Then, I lightly sanded a couple of spots. There were a few areas where the stain was flaking off and a few spots where the legs had gotten banged up by bumping into something white. (I carefully used a sanding sponge and did not overdo it.) Once any necessary spots were sanded, I gave the desk another good cleaning. Finally, using another clean and lint free cloth, I wiped the entire piece down with Restor-A-Finish and then rubbed the excess off. If you haven't used this stuff before, I urge you to. It is amazing what it can go to an old piece of furniture. One note of caution...it stinks, so you might want to use it outside!
Don't you think the finish look so significantly better now? Like I said, restoring the piece this way will not lead to perfection, but it will remove years and years of wear and abuse.


Want more details about this and other DIY projects? Check out my blog post!
Comments
Join the conversation
2 of 31 comments
-
I have this desk. I bought it several (probably 12) years ago; but the legs are not the same. I love the desk and would like to someday find the 'right' legs for it. You did a beautiful job in keeping it true to it's design.
-
Looks so good. I like the lighter finish on the chair for the contrast and blending in with the woodwork trim. So glad you didn't paint the desk.


Frequently asked questions
Have a question about this project?