


Laundry Room Renovation Reveal: 9 Step-by-Step Tutorials
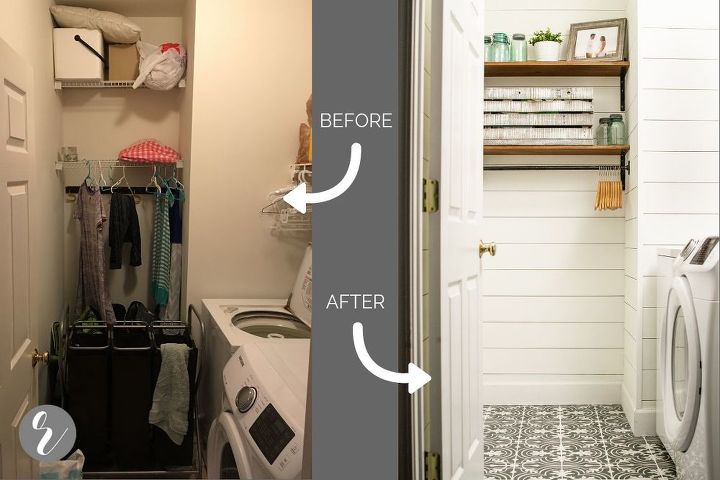
When we first bought this house, the laundry room was easily one of our least favorite spaces. It had lovely white but also kind-of-yellow walls that we’ve heard referred to as “builder beige”. It had rickety, wire shelves. (You know, the kind that all your cleaning products fall over on? And we didn’t have enough storage space for everything we needed to have on hand so the overflow just got “stored” on the floor.) It also had this beautiful, yellowing linoleum flooring. Can you sense the sarcasm? It. Was. Ugly.
THE FLOOR & WALL DESIGN.
First things first, we knew we wanted to tile the floor for a more durable finish. So we started looking at photos of laundry rooms and bathrooms we liked, searching for the perfect statement tile. We found some photos of spaces with bold, black and white, vintage-looking patterns and we were swooning. After choosing our tile, we made a mood board for the laundry room. Because the tile is so bold, I knew I wanted a neutral wall that had a little texture / interest. Shiplap would work perfectly.
THE CANVASES.
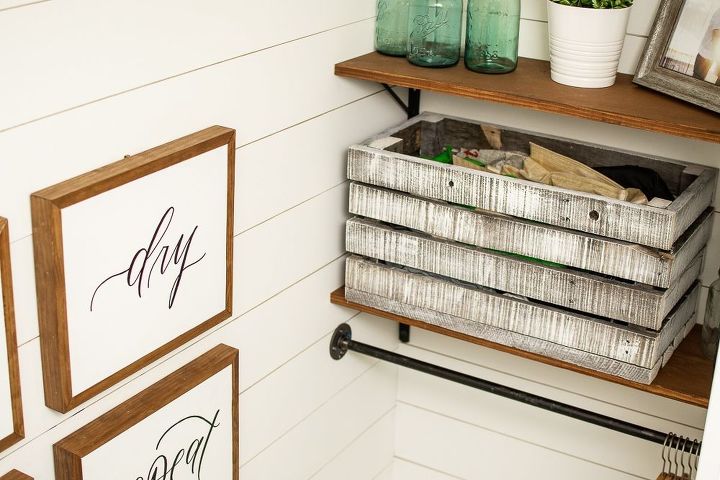
I saw some inspiration photos with these sweet little canvases that just simply said “wash”, “dry”, “fold” and “repeat”. Austin jumped in and made the plywood canvases (tutorial below) and our sweet calligrapher-friend penned the script. I love the beautiful simplicity of them.
THE SHELVING & STORAGE.
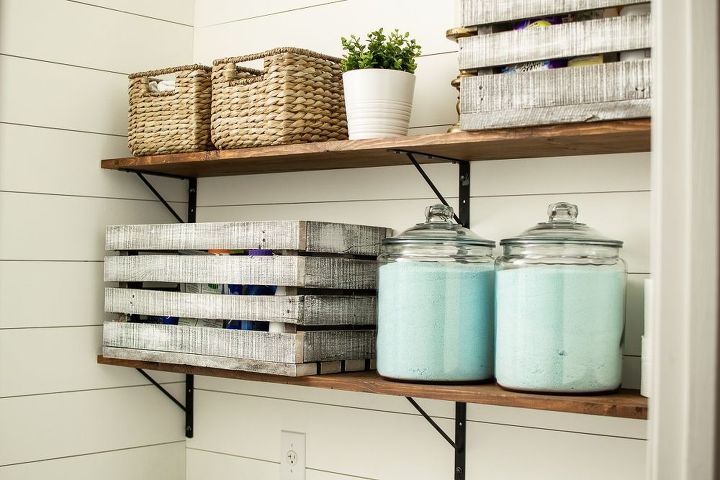
Since we had so much black and white in the room, I knew I wanted to warm it up a little with some wood tones. We made some wooden shelves that are way more sturdy (and way more beautiful than the flimsy wire shelves from our old laundry room.)
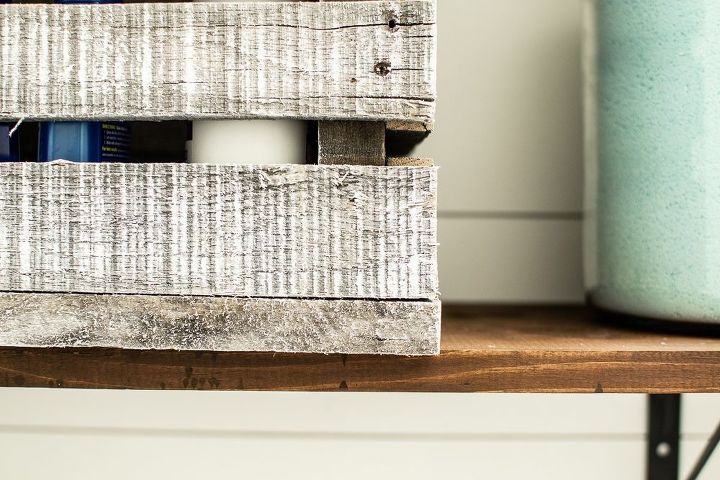
Hidden storage is kind of my love language. I like to store a lot but hate clutter. This is why we chose to make the wooden crates. I have all of our reusable shopping bags stored in one crate and all of our cleaning and laundry products in the other. I can easily pull the crate out and grab what I need, but all you see when you look in my laundry room is rustic wood.
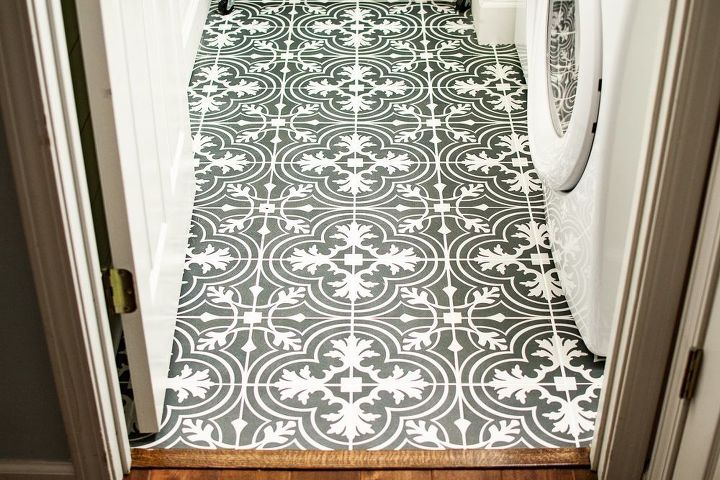
BRAND NEW TILE. HOW TO DIY INSTALL FLOOR TILE.
Other than carpet removal and laminate install, tile was one of our first real renovations. Considering a flooring upgrade? It makes such a visual difference! It can take your room from shab to fab. Not to mention possible ROI for resale.
Not sure you can handle doing it yourself? Tile really is a great beginner project. You’re not going to flood the house or light the attic on fire. The biggest risk is installing a piece of tile with a gap of mortar underneath it, allowing it to break with sufficient pressure. The only true quality mistake you can make is not installing the tiles flatly. Easily avoidable – glad to offer our tips & tricks.
We LOVE the look of handmade, bold-patterned cement floor tiles. But we do NOT like the pricetag. With modern farmhouse walls in our laundry room, we opted for a pop of personality on the floor. Home Depot has a Merola Tile brand ceramic tile that happens to be identical to the custom-made alternative. And for a fraction of the price.
Need a tiling run through? Check out our tutorial. We’ll walk you through every detail.
All the credit goes to the awe-inspiring Joanna Gaines. And really old homes before drywall existed. And dilapidated barns. And trees. Your walls would look AMAZING with some horizontal boards slapped up on ‘em. Is it time for a small-scale renovation?
Such a quick and easy way to create that wow-factor in your space. Take your room from plain walls to a textured farmhouse or cottage-y aesthetic over a weekend. Don’t settle for a coat of paint. Create one of many conversation starters in your custom-designed and beautifully decorated home.
After we demo’d our laundry room, there were gaping holes in the walls from the wire shelving drywall anchors. Everywhere. Why spackle your life away when you can simply cover it with sleek wood slats? So we did. But we weren’t pleased with the price of pre-made shiplap. All materials would have cost us $409.31. The homemade shiplap we ripped from plywood and painted ended up costing us $176.70, materials included. Definitely worth saving $232.61. You can easily make your own using our step-by-step guide.
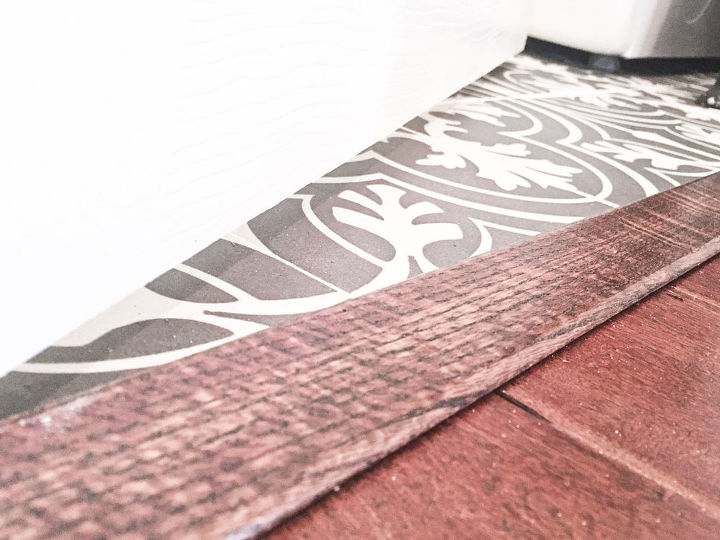
THE DOOR TO FIT. HOW TO SAW YOUR DOOR BOTTOM TO FIT OVER THE THRESHOLD.
This is that frustrating moment when you renovate a room in your home, only to find that the door won’t close over the new floor and threshold transition piece. Not a problem. Just show that door who’s boss and saw the bottom off with your circular saw. Or purchase your first ever circular saw and christen said handheld saw with a door-cutting party.
We MUST be able to close our laundry room door. Our wildly curious toddler usually ends up in the least ideal areas of our house within about 11 seconds of turning our heads the other direction. “Little manzini, where are you?” Giggles erupt from the entryway area of our house as dirty clothes are flung onto the floor. And I don’t know about you, but we’re not crazy about all of our guests getting an eyeful of dangling undergarment when they walk in the Rez.
If you door won’t close, or your door closes properly but gets caught on the threshold – it’s time to take it outside. Here’s our detailed overview for your sawing pleasure.
SHELVES. HOW TO MAKE & INSTALL DIY STAINED WOOD SHELVES.
Your walls are more bare than a potty training 2 year old gone rogue. The moment they discover how to effectively remove the diaper, it’s over, friends. However, there’s no need to fret about the naked walls or the sudden decorative addition of pee on the floor. DIY makes everything more glorious.
Have you considered adding custom shelves to that open wall, nook or room? Stop considering and go for it. Open shelves are both pretty AND practical. Choose a wall color that contrasts the stain or paint on the wood to make them stand out. Use them for storage to alleviate clutter, rectify the disorganization, and preserve your rippling lower back muscles (from holding all the children, let’s be honest).
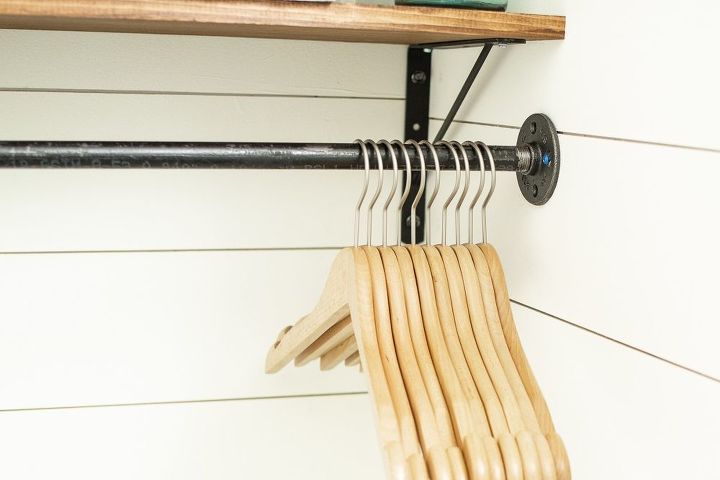
The laundry room previously used wire shelving to store all of its accoutrements. We decided to improve the overall design aesthetic with custom wood shelves. Plus we almost double the amount of wall storage space. The white shiplap contrasts our mid-tone brown wood stain. The super strong brackets used to support the open shelves are black to tie in the overhead light fixture and black metal piping used to hang wet clothes.
Interested in trying your hand at something similar? Read through our DIY wood shelving tutorial for inspiration and a comprehensive instructional guide. Can’t wait to see what you’re building.
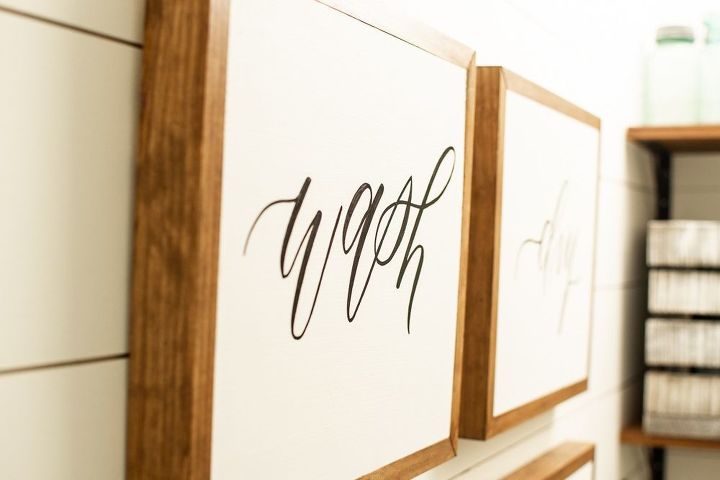
WALL DECOR. HOW TO BUILD DIY PLYWOOD CANVAS WITH STAINED WOOD FRAME.
Needing another solution for those plain old walls? I guess shelving can only satisfy so much empty space without turning home into a retail antique shop. You love pictures, but there are only so many humans you can post up on your drywall or brick. Landscapes may be captivating, but you’re looking for a little variance. And more of that farmhouse vibe. We feel that.
This plywood canvas is perfect for your space. Completely customizable. Hire a local calligrapher or artist to make something unique out of it. Paint the plywood canvas a similar color tone to the wall you hang it on. Stain the wood frame an entirely different color tone to provide visible contrast. This technique will ensure that your calligraphy or art will show up very clearly, along with accentuating the frame.
We choose to paint the plywood white to compliment the homemade white shiplap on the walls. The frame is stained with Varathane’s Early American wood stain, a mid-tone brown to match the stain on the custom wood shelves. Our favorite calligrapher scripted “wash”, “dry”, “fold”, “repeat” so perfectly. Check her out on Etsy!
STORAGE CRATES. HOW TO MAKE CRATES OUT OF WOOD PALLETS.
Is clutter wildly frustrating you? You could use some storage containers. But not the big plastic ones – that might not enhance your overall interior design vibe. Why not make your own crates for a shabby chic look? Reclaimed pallet slats are extraordinarily cheap ($0), readily available and offer such rustic beauty.
Storage with style. But what are you needing to organize? We use pallet wood crates for our shoe bins, a family room side table, lots of our sons’ toys and our recycling bin. Also perfect for storing magazines, records, your Nintendo 64 equipped with Mario Kart, books or collectables. Our laundry room crates are filled full of cleaning products and placed on our custom shelves.
Not sure how to break down a pallet to turn it into a storage crate or design piece? We’re glad to help. Dive into our in-depth article on making crates out of pallet wood.
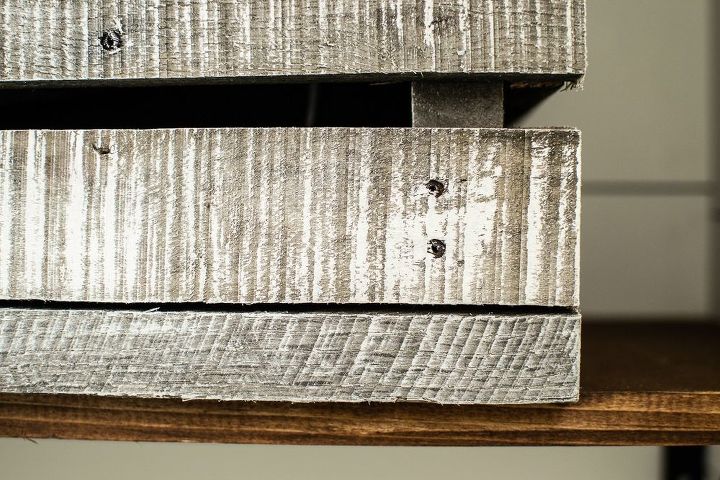
BRUSHED THE CRATES. HOW TO DRY BRUSH RECLAIMED PALLET WOOD WITH PAINT.
Is your furniture or decor piece a little bland? One fast and foolproof way to upgrade the finish is a technique called dry brushing. Add the desired paint to your paint brush, wipe it off on a scrap piece of wood or cardboard and unevenly apply the remaining paint with quick, light strokes. The completed aesthetic can be considered a form of antiquing, where the piece appears to have naturally worn away a lot of the original coat of paint.
Our laundry room DIY pallet wood crates definitely needed a little visual differentiation. The rustic patina was blending in to the custom wood shelving Early American stain. To better show off the sawmill chatter (wood texturing from a massive saw cut), we opted to dry brush the outer-facing pieces of the crates with white paint. The finished product yields a streaked brown & white wood with high visual interest. It’s neutral, but it still stands out from the clean white shiplap AND the brown-stained shelves.
Need a walk through? It would be our honor. Dive into our dry brushing tutorial. Another wood finishing technique in your bag of tricks.
Where do you hang your freshly washed clothes? On the built-in wire shelving? On a separate stand-up rack that crowds the room? Perhaps you’ve take our age-old approach of utilizing every available door handle within a 50 foot radius. Not exactly ideal.
We needed a clothes hanging setup that beautifully matched our brand new, modern farmhouse laundry room aesthetic. Black shelving brackets, custom black calligraphy on our framed plywood canvases – it made sense to use black pipes to tie into the existing high contrast vibe.
PIPES, EH?
Why pipes? A little industrial-chic design inspired us. Not to mention some serious durability. Our toddler grabs and forcefully pulls everything he sees. E.g. Magazines, books, cups, cabinets knobs, toilet paper, the garbage bin, my chest hair, wifey’s ear, my neck skin. I guarantee that homeboy will go Tarzan on these clothes hanging pipes at least 7 times before either of us catch him. A very practical reason to put solid metal pipes into studs with screws. Otherwise, they might explode off the wall in a powdery, drywall dusted cloud of toddler tears.
HOW TO MAKE OUR CLOTHES HANGERS.
Here’s how to make our black pipe clothes hangers. For a single flat wall application, buy a ¾” black metal pipe from the hardware store at the length you desire. Ask a store associate to cut the pipe if the length is too long for your wall space. Consider spacing the pipe to hit studs instead of just drywall.
Buy (2) 90º elbows at ¾” thick, along with (2) ¾” black steel nipples AND (2) ¾” flanges. Choose the length of your nipples based on how far off the wall you want the bar to be positioned. Screw the elbows onto each end, screw the couplers into each elbow and attach the flanges to the couplers. Use your stud finder to locate wall studs. Attach your pipe apparatus to the wall with lag screws, hex head screws or drywall anchors if necessary. Install one screw on one side, level the bar, and install a screw on the opposite side to ensure that your bar is perfectly level.
If you’re attaching a pipe clothes hanger between two parallel walls, here’s what you need. (1) ¾” black metal pipe AND (2) ¾” black metal pipe flanges. The measurement of the black pipe is CRUCIAL. The length of the pipe should be ¼” less than the distance from wall to wall. Why? To allow the pipe flanges to sit over the end of the pipe threads by an ⅛” on either side. If the cut pipe isn’t perfect, you’ll be able to adjust the flanges to perfectly fit the wall gap.
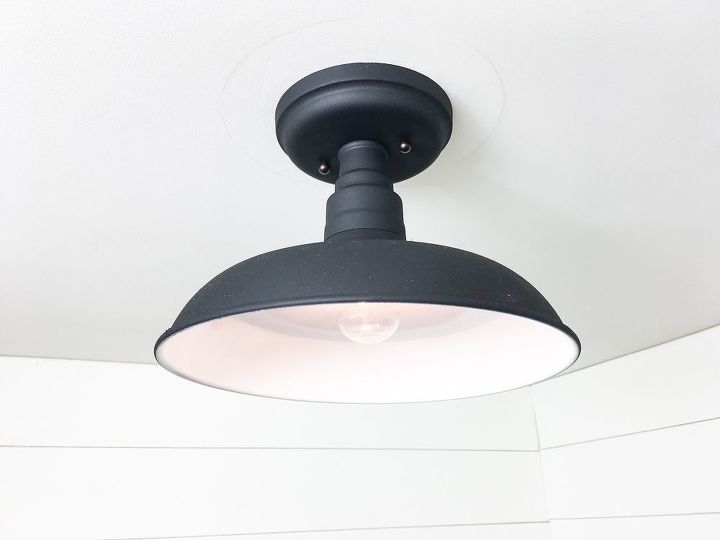
UPGRADE. HOW TO CHANGE A WALL OR CEILING LIGHT FIXTURE.
That old and busted light fixture is totally bothering you on the regular. You want to take it to the next level, but you’re not sure how. We can beautify that bad boy without the help of an electrician. What type of light fixture perfectly compliments your overall design aesthetic? Sconce? Pendant? Can light? Bougie track lighting? What style would pair well? Modern? Rustic chic? Mid-century modern? Farmhouse? Glam? Industrial?
The builder-grade ovular light fixture in our laundry room wasn’t cutting it. Dim. Ugly. Status quo. Unimpressive. So with our renovation, we pretty much had to bring this fixture into the 21st century. Schoolhouse seemed to be the style that played well off of our modern farmhouse vibe. We bought a bronze-colored fixture and spray painted it black to tie into our custom wood shelving brackets, black pipes for hanging clothes and handwritten script on the plywood canvases.
Don’t miss our breakdown on changing your wall or light fixture. Let’s replace that outdated fixture with your newly acquired electrical skills – with your bare hands. Show us the finished project once the brand new item is functional. We can’t wait to celebrate all of your newly acquired and recently tested renovation techniques.
Time to stop reading, friend. Let’s go renovate something.


Frequently asked questions
Have a question about this project?