


Gorgeous Wood Countertops Anybody Can DIY

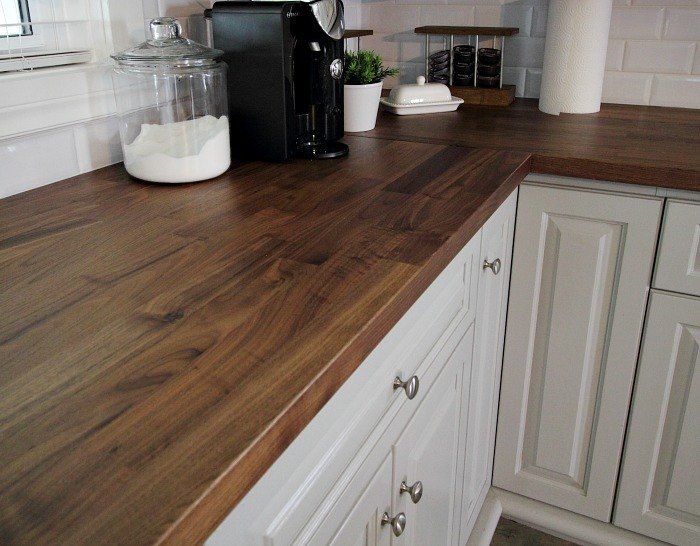
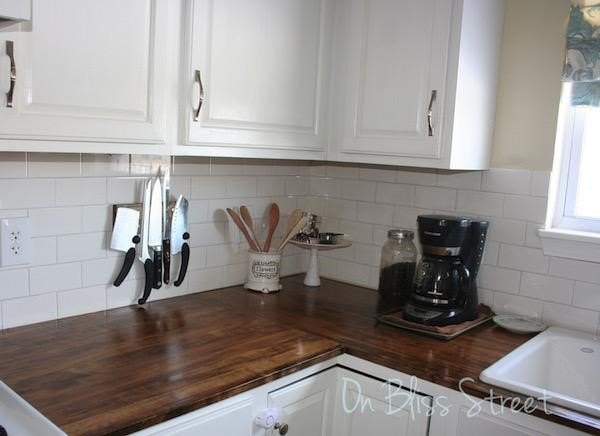
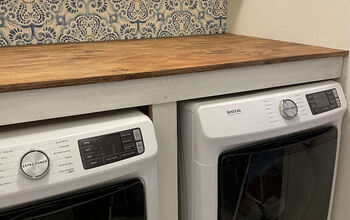
Wood countertops are a stunningly beautiful look and can bring such warmth to any location in your home whether it be wood kitchen countertops, wood bathroom countertops, in a laundry room, or even in an underutilized nook. The possibilities in design, shape, and color are seemingly endless, providing one with a truly custom look all their own.
See post: Creek Line House | What to Know Before You Install Wooden Counter Tops in the Kitchen!
Surely, it may seem that wood would be impractical in many locations, such as where there’s lots of water or in high traffic areas that see a lot of wear and tear as would be the case with wood kitchen or wood bathroom countertops. With a bit of ingenuity and the right products and maintenance schedule, wood can shine for years to come.
How to Decide on Wood Countertops
Do you have an area of your home that’s in need of some updating? An area that could use a counter surface? Are you looking to do it yourself? Wood is a great solution in many instances for a DIY’er, mainly due to its ease of cutting, shaping, and finishing. Unlike granite or marble or even tiles, wood can easily be managed by one or two people and there are no overly-difficult nor complicated cutting tools required. Using a product like wood speeds up a countertop project.
See post: OnBlissStreet | How to Make Your Own DIY Beautiful Wood Countertops for Under $200!
A further bonus of wood is that its cost is far below many other counter materials available. Granite, marble, or man-made materials such as laminate, engineered quartz or other solid surfaces require ordering and waiting plus additional labor to install. As such, costs for these types of counters can become exorbitant and can quickly fly out of budget range fast.
Another great feature of wood is that it’s effortlessly available at your local home improvement store or lumber yard, ready for the picking at any time. These stores, along with specialty lumber retailers, have a great variety of wood to choose from depending on the needs and design of the counter. You could even try repurposing some old doors!
Even better, wood can be finished in a bunch of different ways and colors giving a DIY’er the ultimate control over the complete design, designing it to fit perfectly and seamlessly into existing (or upcoming) decor. All of these add up to major bonuses in the wood category!
Things to Think About
Because the options for wood countertops are vast, there’s plenty to consider once the decision to use wood has been made.
Wood comes in standard sizes whether it be sheet materials, solid wood planks, board or stick lumber. When designing the new countertop, be sure to measure the existing ones that are being replaced or the area that the new counters are being installed down to the smallest detail. The old adage of “measure twice, cut once” definitely applies here for an exact fit. Measuring beforehand and drawing a quick sketch in plan of the area will allow one to easily figure out the quantity of wood needed, eliminating waste and cutting down on errors.
Be sure to assess your skill and comfort level with the various tasks required to build and install a wood countertop. Tools like circular saws or jigsaws will likely be needed. If these types of tools are not in your collection, they can be borrowed or typically rented at a home improvement store. Home improvement stores will also cut wood as well, usually for a small fee per cut. Before heading over to the store, call first to ensure this is an available option. Do note though, while their cuts will be straight, they are not guaranteed to be accurate.
Don’t forget too though, wood is still wood. It will age, it could warp, twist, or split. Scratches are inevitable though potentially fixable depending on your finishing choices. Finishes may wear over time but ultimately, there is no perfect counter material solution. Wood as a countertop does have its advantages over many materials such as laminate, all things that should be weighed.
Designing the Wood Countertop
Visiting Hometalk is an excellent starting point to help you gather design DIY ideas for your new counter. A quick search will turn up counters of all sorts of sizes and patterns, in various locations around the home, variations in shape or cuts, different types of wood materials, but most especially finishing options.
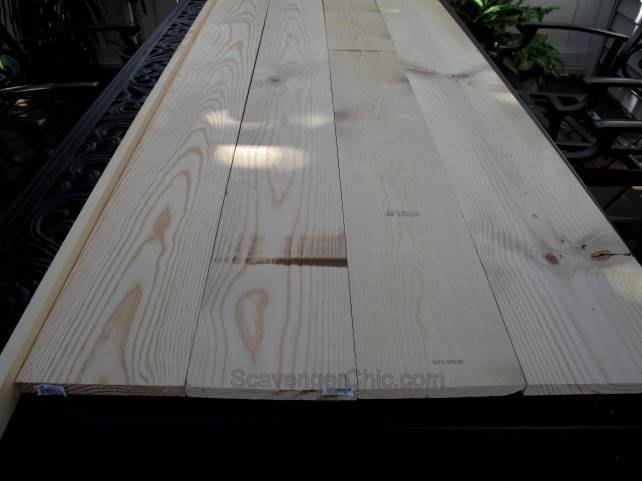
Options for wood are seemingly endless in their type and variety. More budget friendly choices would include sheet materials such as plywoods or stick lumber. These materials could even be used as a base and laminated over with wood veneer.
See post: Scavenger Chic | DIY Laundry Room Wood Countertop
Ikea and many home improvement stores will carry lengths of butcher block premade. Home improvement stores also have hardwood panels and stick lumber as well in woods such as aspen, oak, maple, birch, or poplar. Typically these woods are stronger and sturdier than pine and more likely to be straighter, less warped or bent.
You can also shop at specialty wood retailers who carry more exotic woods such as mahogany, cherry, or any number of woods you never knew existed. Some places also carry live edge wood where the tree has been sliced lengthwise, the bark likely still attached, and the tree’s natural shape is kept intact rather than milled straight.
Narrowing down the choice of wood is dependant on of course one’s budget, but also the intended purpose of the counter and its desired finished design.
Note wood typically comes in nominal thicknesses already predetermined at either ¾” thick for plywoods or one-by woods or 1 ½” thick for two-by woods. Deciding on the thickness of your counter will help you narrow your choices down. Note too, woods come in predetermined lengths which vary from say six feet to twelve feet. Laying out your design in plan with a quick sketch will help you determine the best lengths to purchase to maximize your budget and minimize waste.
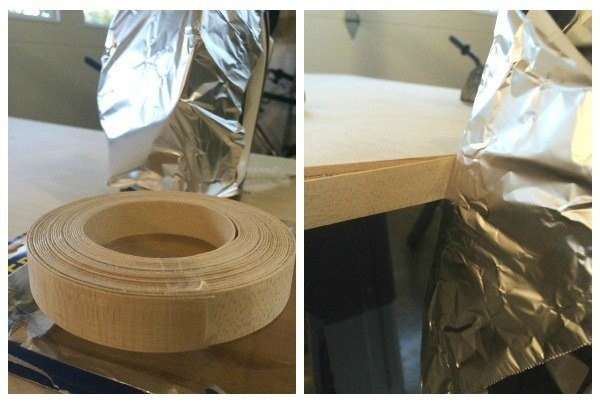
One other design aspect to consider is the edge of the counter. If you’re choosing a plywood, you’ll want to decide if the plywood edge with its many layers is the look you’re interested in or if you want to finish it, cover over it with edge banding. Edge banding is typically glued or ironed on and will emulate the surface allowing finishing with stains to match between the top and edge.
See post: Noting Grace | DIY Farmhouse Kitchen Island
Too you may want to consider routing or trimming the edge to give it a shape or sanding the corners down to provide a smooth rounded over edge. Leaving the edge square and straight is a great modern look. Keep in mind, if using some stick lumbers, the edges may already be slightly rounded. When connecting them, this will become more apparent quickly. Depending on the intended use of the counter, you can leave the gap or fill it in.
Building the Wood Counter
If you’re replacing an existing counter with a new wood one, building the new one’s shape is as easy as tracing the old one onto it and cutting it with a circular saw, table saw, or to cut out holes for something like a sink, a jigsaw is preferred. Drilling a hole or several will allow you to get the jigsaw blade in there and cut as needed.

See post: DIY Design Fanatic | Wood Bathroom Countertop for Less than $20
Joining corners or angles in a hidden fashion can be accomplished in several ways, one of which is a Kreg jig. Some research online about joining wood boards will reveal plenty of other options if a jig is out of the budget.
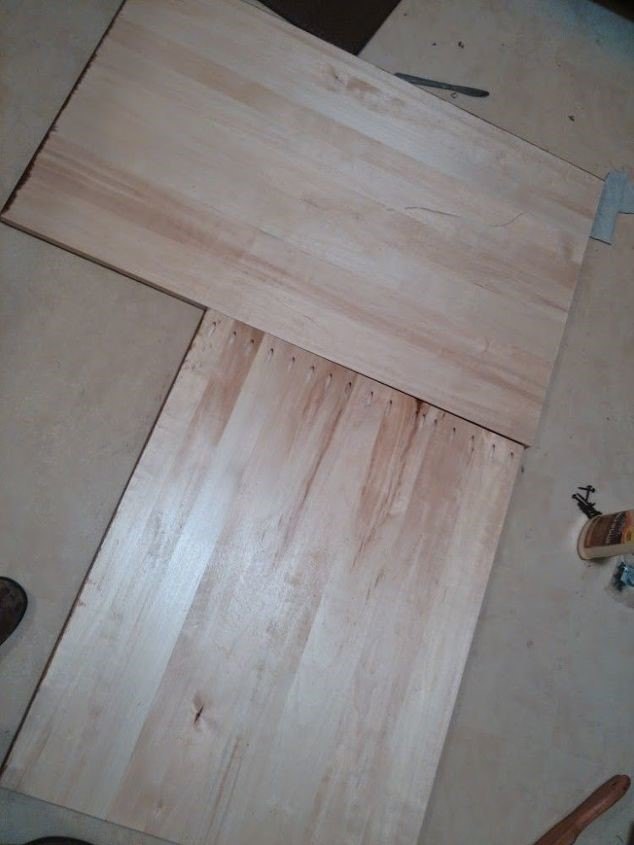
See post: OnBlissStreet | How to Make Your Own DIY Beautiful Wood Countertops for Under $200!
Be sure to note things like door or wall opening widths if you are constructing your counters in a location other than where it is being installed. There’s little worse than assembling something only to find it won’t fit through the door!
Finishing a New Wood Countertop
One of the most important aspects of building a wood countertop is the finishing. And critical to areas where food will be handled and prepped is making sure that whatever finishing top coats are applied are in fact food safe, most especially wood kitchen countertops. This is a requirement, an absolute must so be sure when you’re looking for top seal coats, you research products fully to ensure you’re getting the right products for your needs.
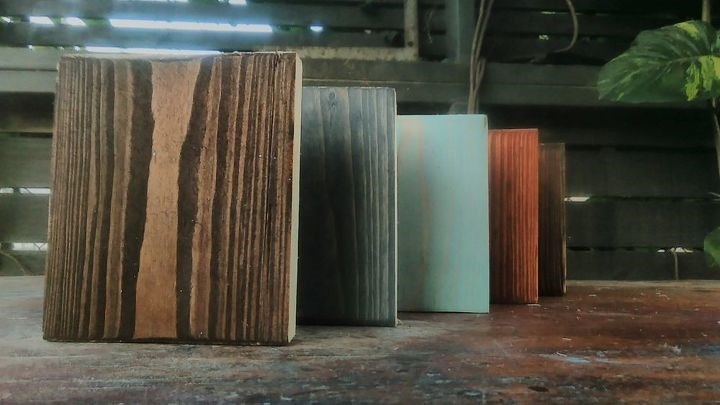
One of the most fun aspects of a project such as this is choosing the color, or no color even, for the wood. There are a myriad of stains and finishes available in a rainbow of colors that are sure to fit any decor.
See post: Escagedo Woodworking | How to Stain Wood (It’s Easy, for Beginners)
Stains come in many forms as well such as oil based or water based. Within that, there are gel stains, stains with sealers in them, even dye stains.
Choosing between stains can be a challenge but understand that their bases are not interchangeable. Science class in grade school taught us well that oil and water do not mix. What is meant by the bases not being interchangeable is that if you choose an oil based stain, for the best results, you will need to use an oil based sealer. While you can use an oil based sealer over a water based stain, you will need to make sure the water based stain is completely and thoroughly dry which will take several days. To keep your finish in tip-top shape through the years, it’s best to stick with the same base whether it be water or oil.
Know too that when using oil based supplies, the clean up involves mineral spirits or paint thinner rather than soap and water. If this is a no-go, this narrows the field to the water based product section of the stain aisle. A big benefit to an oil based product is its durability and it’s lengthy “open” time, its working time, making application easier. One thing to note about oil based polyurethanes though is that they do yellow over time.
Taking A Look At Sealers
There are several questions you should evaluate before deciding on a sealer. How do you expect to use the wood counter surface? Do you plan to use it as a cutting surface or mainly for food prep? Will the wood be surrounding a sink or be in areas where water will be a relative constant? Or will the surface see minimal use? The answer to these will help guide you to the best product for the long haul.
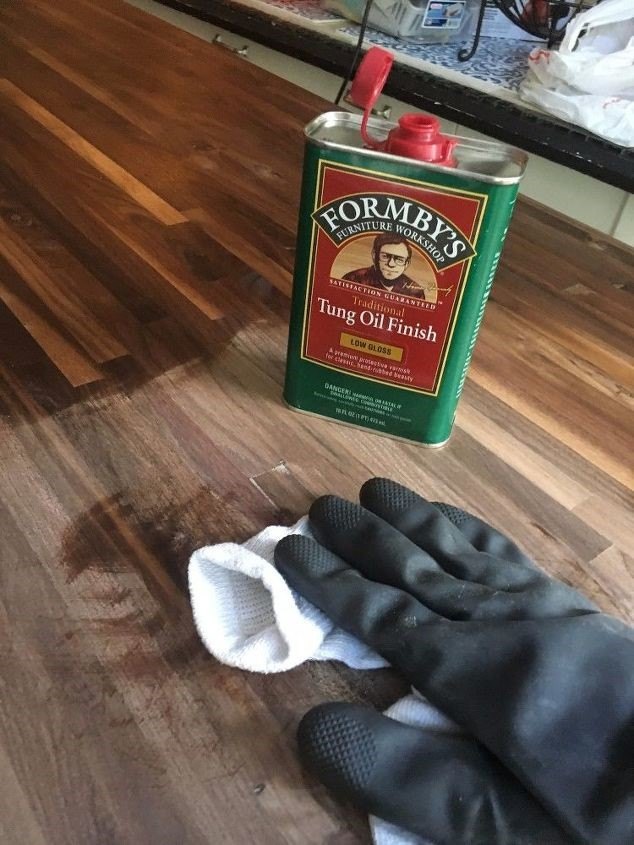
The two types of sealers are what’s known as penetrating or topical; either the sealer sinks into the wood such as a tung oil or sits atop it, never sinking in like a polyurethane.
Oils such as mineral or walnut along with waxes are best suited for wood kitchen counters that expect to see knife usage. These products won’t protect the counter from food stains, are only mildly water repellant but they will keep the wood from drying out. These types of sealers are best for end grain woods such as butcher block and may need to be reapplied monthly or bi-monthly for best results.
In the end, it’s tough to find the end-all-be-all sealer that will cover every base of water resistance, stain resistance, scratch resistance, is hard wearing and durable while also being green or easy to clean and maintain. Be prepared to manage expectations when it comes to patina, wear, stains, or dings. Choose what’s best for your particular situation and will resolve the majority of your needs.
Applying the Finishes
The application of the finishes is truly as simple as following the instructions on the product label. They are tried and true tested methods to provide you with the best results. There’s no need to purchased expensive tools to accomplish this task. Stains or paints can be applied with rags or brushes as can many sealers.
See post: Stacy Davis| Kitchen Table Redo - Part 2 - Butcher Block Ikea Hack
Installation
One of the greatest features of using wood for a countertop is the ease of installation. Typically all that will be needed are screws, nails, glue or adhesives, or a combination of these supplies. As the counter is already cut and ready to go, merely slide the top into place and secure it.
Now all that’s left is to be proud of your accomplishments and enjoy your beautiful new wood countertop!
Written for the Hometalk community by: Becky at Flipping the Flip
Comments
Join the conversation
-
What is the wood and stain in the opening picture of this page? It's exactly what I want.
-
I would also like to know the color as above comments!


Frequently asked questions
Have a question about this project?
Love the color of these countertops. What color is the stain and what type of wood did you use?