Mop head crafts
What are Your Favorite Mop Head Crafts for Fall Decorations?
by
Judy
+3
I'm looking for some creative ways to upcycle mop heads into fall decor. Would love to get some inspiration from this wonderful Hometalk community.

Hi judy,
My name is Linda. Here's an angel made in fall colors from another Hometalk member. You could also adapt this to make a scarecrow. Have fun!
https://www.hometalk.com/diy/craft/seasonal-decor/diy-mop-head-angel-doll-with-dollar-tree-30461667?expand_all_questions=1
DIY Mop Head Angel Doll With Dollar Tree Products For Decorating
Hi Judy, here are some No-Carve Pumpkin Designs and Decorating Ideas.
Save Item
Mummify your pumpkin with strips of torn drop cloth wrapped around and held in place with hot glue. The beady eyes are door bumpers painted to look like eyeballs.
Get twisty with this quick no-carve decoration. Cut sisal rope into a variety of lengths. Use a glue gun to attach rope to the pumpkin in coils of different sizes. Attach large coils first and fill in spaces with smaller ones.
Spray-paint a clean pumpkin black or white. Dip a brush into paint and drizzle paint onto the pumpkin one color at a time, turning and tipping it for even coverage and to remove any paint that collects around the stem. After one coat dries, layer on another contrasting color.
This pale white pumpkin can rattle its own chains. Start with a coat of off-white spray paint. Cut pieces of brass chain long enough to stretch from the stem to the bottom of the pumpkin. For each chain, anchor the top link to the pumpkin just beside the stem using a brass furniture nail. Drape the chain straight down the side of the pumpkin and nail the bottom end in place.
Form an eerie backdrop for a gnarled tree by painting the upper two-thirds of a pumpkin purple and the lower third green. (Feather the edges between the colors all the way around.) After the paint dries, paint a white moon high on the side. To make the tree, squeeze any color of paintable latex or silicone caulk onto waxed paper to form the branches, trunk, and roots -- the more gnarled the better. After the caulk dries overnight, spray-paint it black and let dry. The underside of the caulk should be just sticky enough to grip the side of the pumpkin while you press it in place.
Add a spooky scene to a plain pumpkin. Use the downloadable stencil for this crow-and-branch scene. Download the pattern, attach it to the pumpkin, and use a straight pin to outline the pattern. Remove the paper template. Paint inside the outline using a small brush. For best results, apply paint in light layers. Let dry.
Instead of a face, paint a fall night scene—complete with bats and a spooky owl—onto a pumpkin. Add another dimension by etching a moon onto the pumpkin surface.
Go for the gold. Apply round garage sale stickers at random around the pumpkin. Then cover it top to bottom with metallic spray paint. After the paint dries, use the tip of a utility knife or crafts knife to gently peel away each sticker, leaving behind a pumpkin-colored dot.
Stripes and polka dots are simple way to celebrate the season. To add stripes, start with a white pumpkin. Using a 1-inch paintbrush and yellow paint, follow the lines from the stem to the pumpkin’s base. Create a spotted pumpkin by covering it with a coat of white paint and adding orange polka dots. For painted pumpkins, start with a smooth, clean surface. Let paint dry between coats.
Enhance the clean look of your white pumpkins with copper speaker wire (#302989). Pierce the wire with a straight pin and push the pin down into the pumpkin at the stem to secure the wire. Follow the natural groove of the pumpkin, and add another straight pin at the base of the pumpkin. Trim off excess wire and repeat around the entire pumpkin.
How? With icons of the industrial age, of course! Mask the pumpkin stem with painter’s tape, then spray the pumpkin with Rust-Oleum charcoal paint and let dry. Push copper weather-strip nails into the pumpkin in whatever pattern you wish. Using a hot glue gun, place a ring of glue on the flat side of a tooth washer. Press it to the pumpkin and hold for 10–15 seconds while the glue dries. Repeat the process with three different sizes of washers until you achieve your desired look. Remove the tape from the stem when finished.
To make this one, mask the stem of a white pumpkin with painter’s tape, then coat the pumpkin with Rust-Oleum vintage copper metallic spray paint and let dry. Tear in half, length wise, a 6-inch strip of 1-inch painter’s tape for pieces that are ½ inch x 6 inches. Start at the stem and press tape to the pumpkin vertically. As you pull the tape off, the copper paint will pull away from the pumpkin in cracked pieces. Repeat the process two or three more times with the same piece of tape for a less dramatic peel. Switch to a fresh piece of tape and repeat for larger peels, exposing the original white pumpkin color underneath. Remove the tape from the stem when finished.
For an unexpected look, braided rope can do the trick. Hot-glue the edge of braided polypropylene rope (#424888) to the base of the pumpkin stem. Make a clockwise pass around the stem with the rope and add another dab of glue to the rope and hold it to the pumpkin to secure. Continue wrapping the rope down and around the pumpkin, adding glue every full circle. Wrap the rope all the way around the base of the pumpkin, coiling it up underneath. Add a generous amount of glue to the base of the pumpkin to secure the rope in place.
It’s simple and straightforward, but this pumpkin decorating idea is pretty cute, too. Just cut 18-gauge copper picture-hanging wire to your desired length (we used an 8-inch piece). Wrap the wire around your index finger for a curled look, then remove from your finger with the coil intact. Wrap one end of the wire around the base of the pumpkin stem, and gently pull the other end until the wire unravels from its tight coil and looks like a curly tendril on a pumpkin vine.
Welcome back to the Gilded Age! This time it’s paint, not actual gold, that’s setting the scene. Mask the pumpkin stem with painter’s tape, then cover the pumpkin with Rust-Oleum charcoal gray spray paint. Let dry. Spray Rust-Oleum vintage rose gold metallic paint on a cloth rag and immediately press the rag all around the pumpkin with a quick dabbing motion. After it dries, repeat the process with Rust-Oleum vintage copper metallic paint for a two-tone effect with more depth. Remove tape from stem when finished.
Spray-paint a pumpkin black. Drive a black double-point tack into the pumpkin at any location and tie one end of a 5/32-inch cotton rope to it. Wrap the cotton rope around the pumpkin using additional tacks to hold it in place as needed. For a variation on this pumpkin, first paint the entire pumpkin silver. Then tack coarse string tight against the sides and spray-paint the pumpkin black. Remove the string to reveal the silver lines.
Start with a couple coats of metallic silver spray paint. Then drive furniture tacks in vertical lines or the pattern of your choice.
For that fresh-off-the-vine look, spray-paint the stem green and allow the overspray to settle on the top of the pumpkin. Then cut pieces of wire of different lengths. Using a nail or scratch awl, make a hole at one location on the pumpkin and insert the bent end of a piece of wire. Loop and bend the wire into the pattern of your choice and anchor the other end in another hole. For the look of a vine, wrap a spiral of wire around the stem.
Mix things up this year with a purple pumpkin. Then drape it with a caulk spiderweb you can make in minutes using the pattern provided with the instructions.
Cut pieces of 1.88-inch-wide painter’s tape into squares and rectangles of different sizes and attach them to your pumpkin. (For extra-large pumpkins, you can substitute wider tape or adhesive-back shelf paper.) Then fill in the gaps with more shapes without allowing any of them to touch. Spray-paint the pumpkin silver and let dry before removing the pieces of tape to reveal the mosaic pattern.
Spell it out for trick-or-treaters with this pumpkin. Start by painting the stem an accent color -- metallic gold for the one shown here. Mask off the stem and paint the rest of the pumpkin the color of your choice. Then use furniture nails to get your message across.
Got more to say? Spray a pumpkin with two coats of chalkboard paint and write the message of your choice.
What's your lucky number? Try this simple idea: Decorate a plain pumpkin with house numbers. Start with a white pumpkin. Drill pilot holes in the pumpkin to make attaching the numbers easier. Not sure which numerals to display? Use your address number, and place it near your front door to greet guests. Or, add your favorite digits and use it inside.
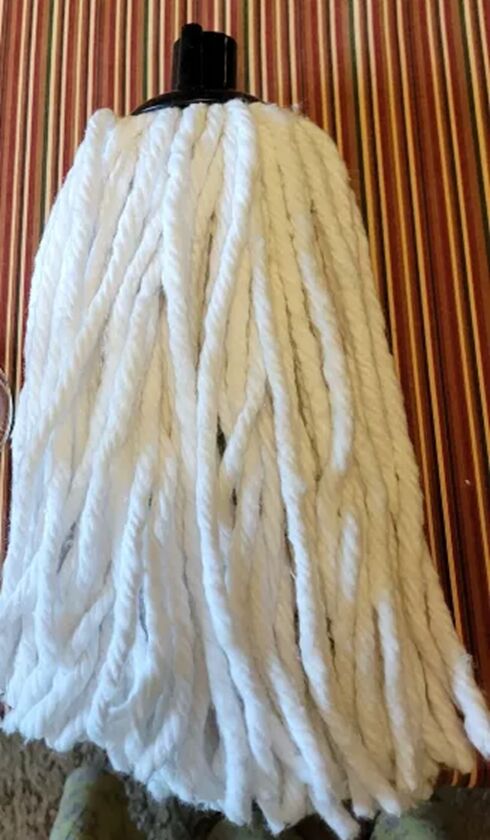
Create a hairy situation by crowning a pumpkin with a mop top. Knobs make great eyes and a nose, while a drawer handle makes a perfect smile. Make attaching the hardware easier by drilling pilot holes in the pumpkin where you plan to insert the hardware.
You could make a scarecrow and use the mop for hair...
Put the mop over a glass and make a glost!
Dollar tree mop head crafts
https://www.pinterest.com/ideas/dollar-tree-mop-head-crafts/948986615316/
Hi Judy: I put a hat on mine, a pair of sunglasses, and 2 pieces of black cardboard for shoes and it looked like cousin It :)