


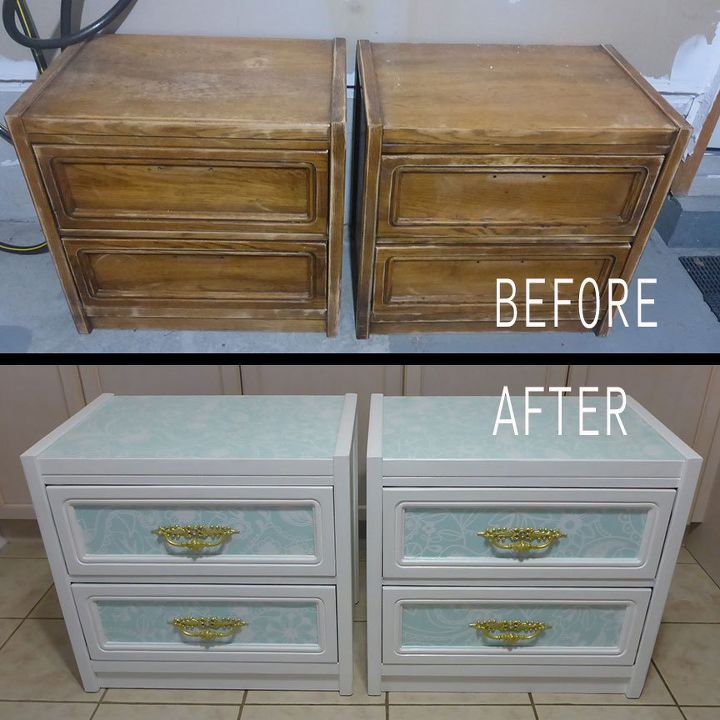
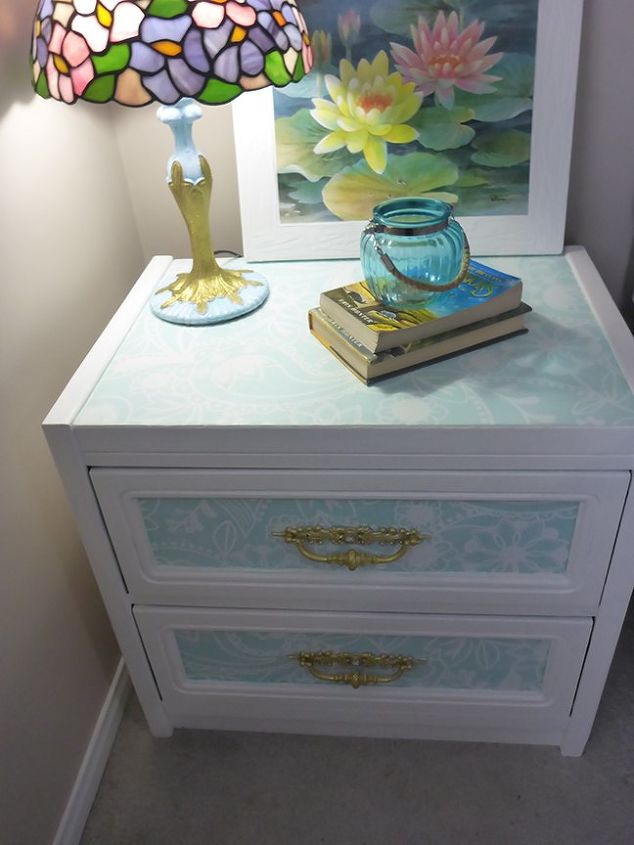
Tired Wooden Night Stands Get A Shade-y Makeover

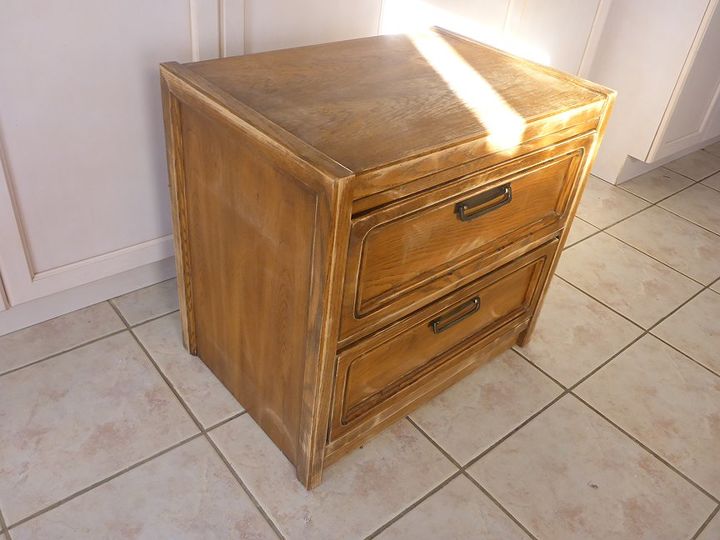
I bought a pair of solid wood night stands (oak maybe?) at a used furniture store. And even though I liked the wood grain and considered staining them, I decided not to go that direction. Because my bedroom has white furniture I wanted to make these night stands blend into the space.
Spoiler alert – this tutorial is probably not going to inspire the ‘wood purists’ out there. :)
Prep work
- Removed the hardware and filled the holes with wood filler, as I planned on using different pulls.
- Sanded using an orbital sander.
- Cleaned thoroughly with soapy water, plus one final cleaning with TSP degreaser.
- Painted them using Fusion mineral paint in picket fence colour, 2 coats.
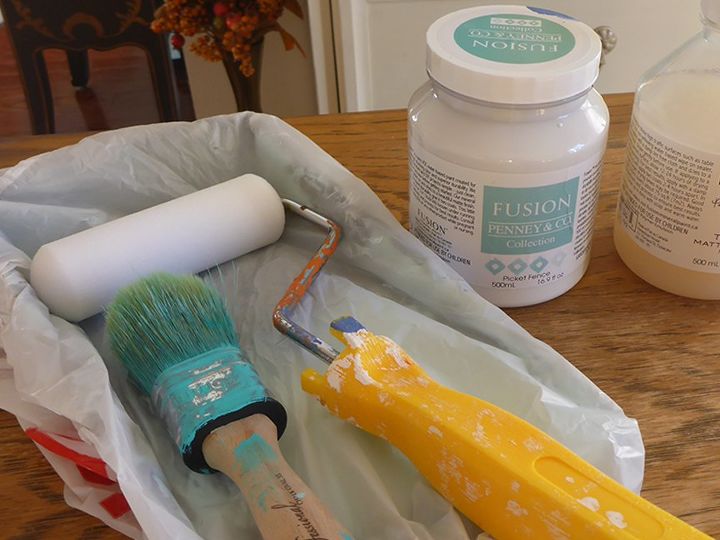
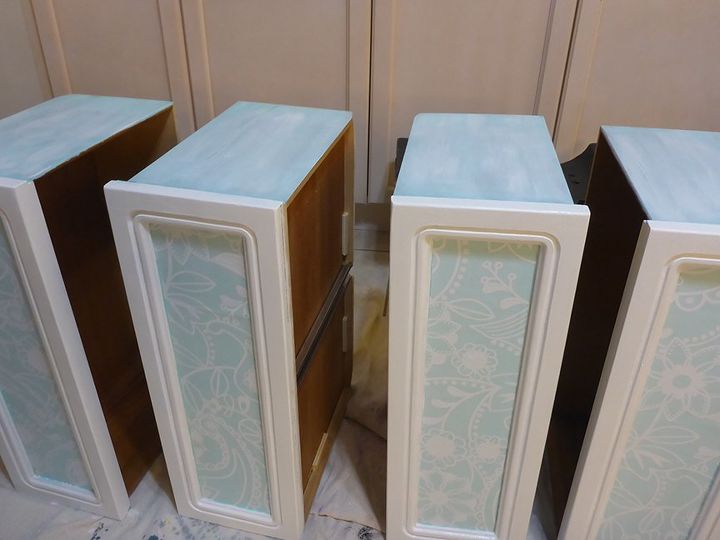
I had an Ikea roller shade that had stopped ‘rolling’ but I absolutely loved the pattern on it so I decided to decoupage with it. But because white-on-white would be a little too subtle for my liking, I decided to paint a backdrop colour on the areas I planned to decoupage.
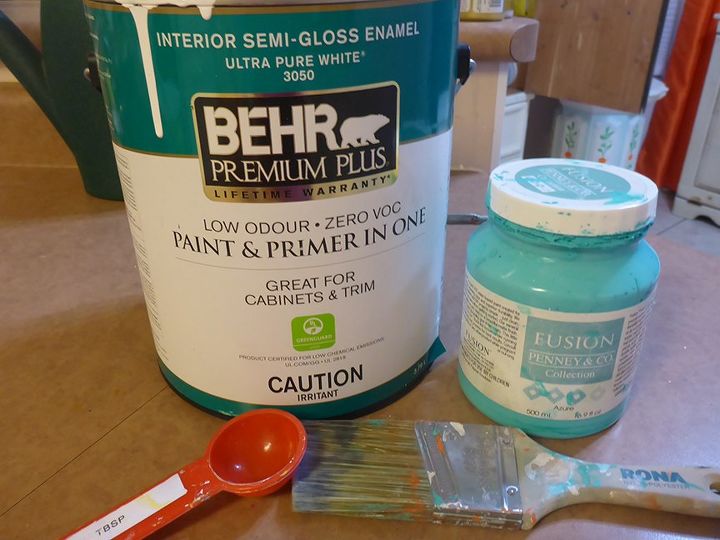
I didn’t have any of the white mineral paint left to mix my new colour – so I headed down to the basement to see what I might find. The only thing I found in white was interior semi-gloss enamel paint & primer in one! I had never used this type of paint on furniture before because I was worried about it being tacky (sticky tacky, not lame tacky). But since it would be covered with the shade I figured why not! I mixed 8 TBSP of the white with 1 TBSP of Azure blue mineral paint. And that was more than enough paint!
And I was also very pleased to discover that there was no stickiness at all! I actually used the white paint/primer to do one more coat on the sides of the stands, as something brown was leaking through the 2 coats of fusion. My guess is that at some point these may have held an ashtray! But who knows, I could be wrong. It’s funny the things you find yourself pondering when you spend that much time up close and personal with an old piece of furniture: Where have you been? Where did you grow back when you were a tree? What interesting items might have been hidden inside these drawers over the years? Who was the smoker? LOL
Decoupage
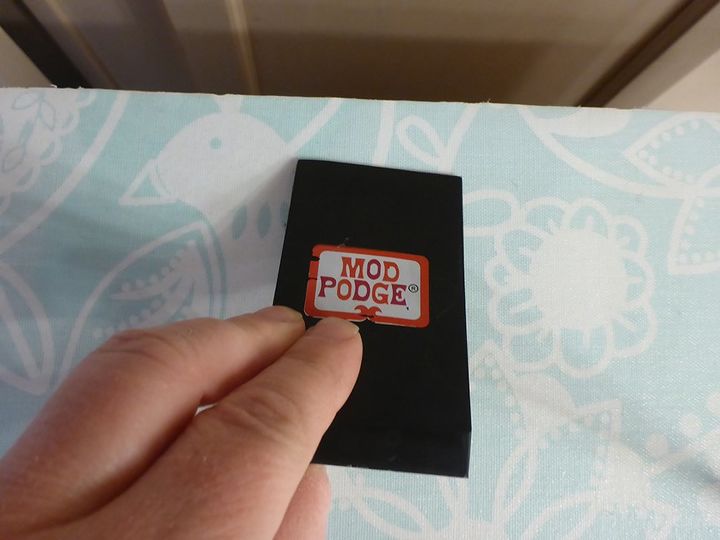
I cut out pieces from the shade to fit. Then I applied a layer of mod podge over the blue paint using a sponge brush and then applied the shade over it. I used a decoupage roller and spatula to ensure there were no bubbles. Once dried I applied more mod podge over the top to start sealing it. I started out using the sponge brush, but found it was getting little specs of black sponge stuck to the shade, so I switched to a round bristle brush. And this was way better!! Went on faster and thicker and no residue left behind. I did 3 coats of mod podge to seal it.

This is the shade on my dining table while I cut out the pieces for my night stands.
Other than the pulls, I was done! BUT then I remembered I still had a little bit of the blue paint mixture left – so I mixed it with water (about half and half) and did a colour wash on the sides of the drawers. And can you believe I still have some of that mixture left – not bad for 9 TBSPs of paint!!
The pulls
I found 4 pulls in my hardware tickle trunk that I loved! But the colour wasn’t going to work. I soaked them in TSP cleaner for 10 minutes. Then I spray painted them with primer.
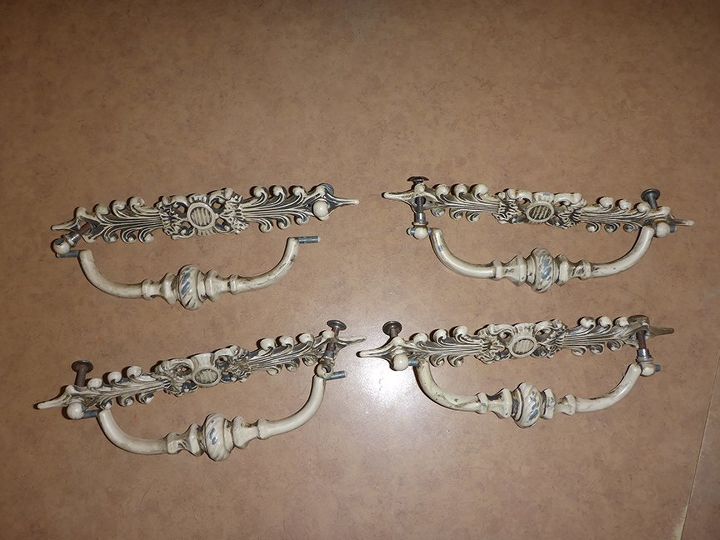

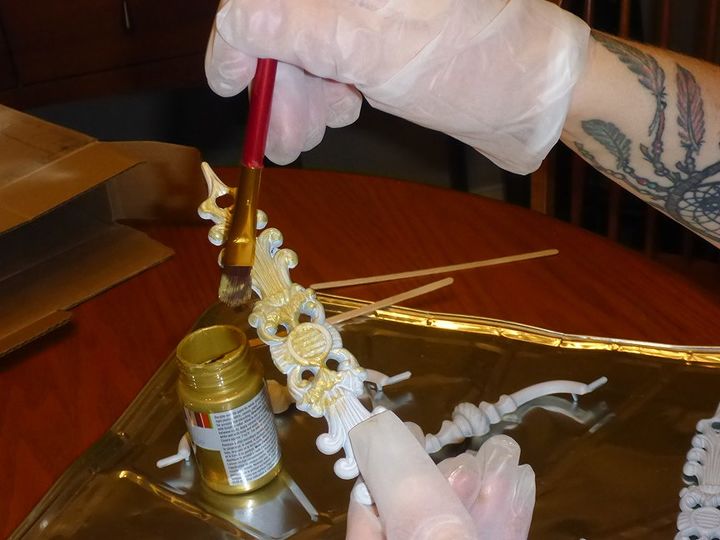
Afterwards I painted them with metallic gold using a precision brush. My use of this gold has been 'commented' as tacky in a previous tutorial (and I’m pretty sure she meant lame tacky, not sticky tacky – lol). But personally I love it. And that's what is important, given that they will be living in my home.
Once they were dry I went over them with a coat of mod podge to make sure the paint wouldn't rub off over time. And while the mod podge was still wet I added a small acrylic gem to the center of each pull. The hardware already had little circular frames in the center, so it was basically begging for a gem!
Attaching the pulls
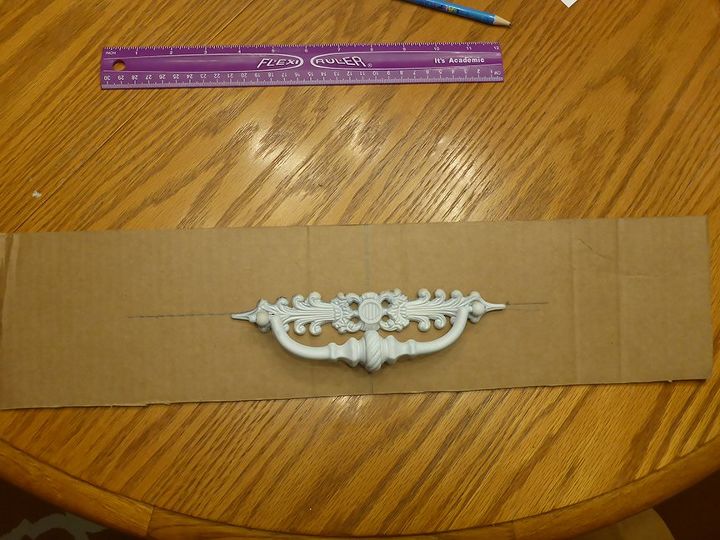
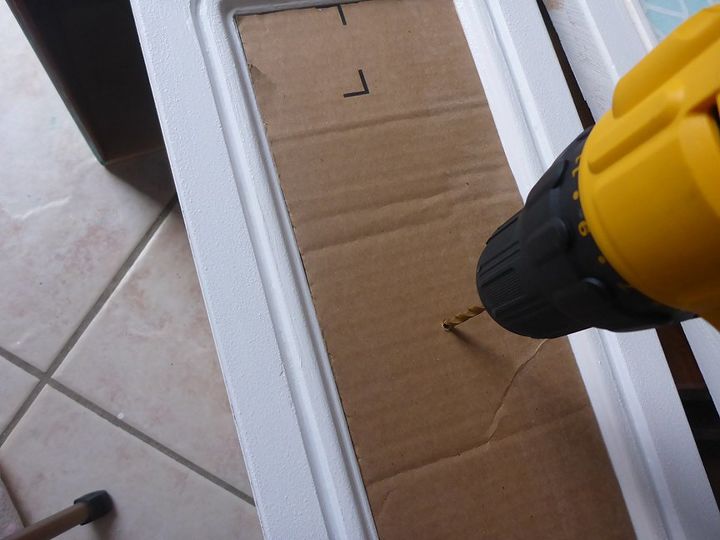
I was nervous about this step! I have a tendency to mis-calculate and end up with pencil marks all over things, or worse! So I made a template from a piece of cardboard. I tested it to make sure the pulls lined up with my holes and then I used that template to drill the holes in the drawers. I’m so glad I went with a template, because sure enough, my first calculation was indeed off!
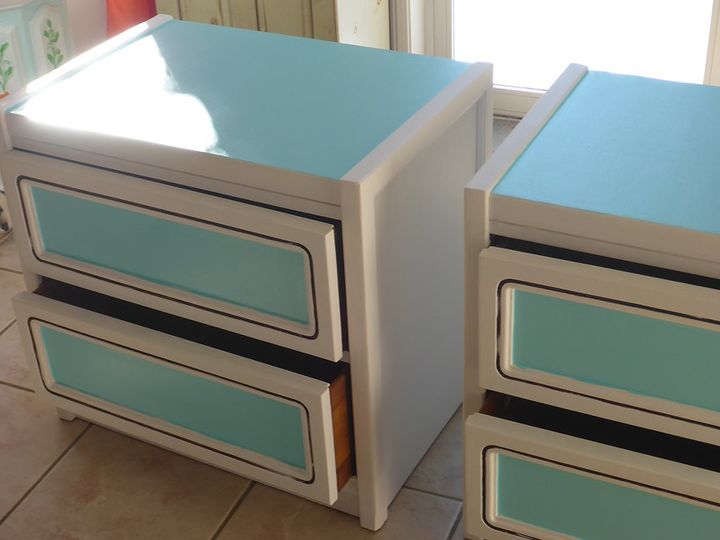
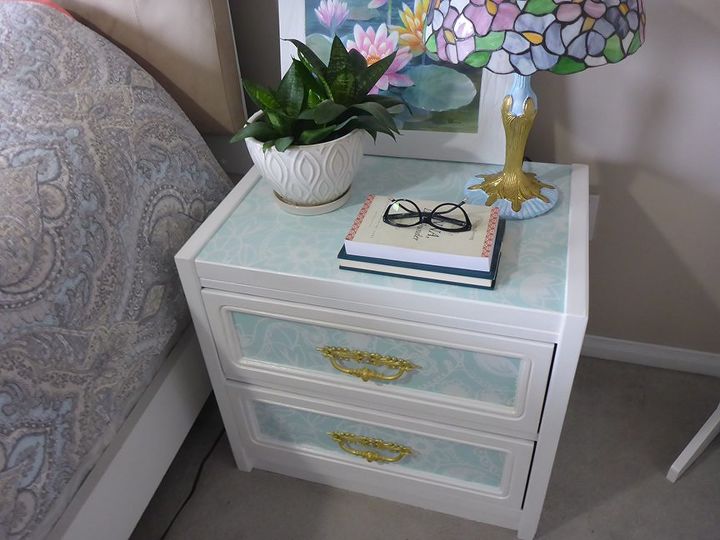
Done! I moved the night stands into my bedroom and admired how soft and pretty they are. I think they blend in very nicely and I’m happy with my shade-y make over!

Resources for this project:
See all materials


Comments
Join the conversation
-
One of my issues with painting wood furniture is that it looks so bland without the wood grain to give it some visual texture, but I love this!!
To be honest, I’m tempted to buy a shade just to take it apart for a look like this. It’s brilliant!
But as I type this, I’m thinking maybe I could do a similar thing with some sheer curtains that are damaged at the bottom 🤔


Frequently asked questions
Have a question about this project?
I missed it somewhere what did you use the cardboard for?
Love this idea and the way the blue comes through the shade. Repurpose everything! LOVE, LOVE, LOVE it! Great job. And although I personally don't like gold, you are right - its your house, so use what you love! Hint: did you know that Modge Podge is water soiluable? And, even after time, if any water gets on it, it will be affected and possibly come lose. You might want to consider a better sealer to protect your projects. Krylon Frost clear spray is great and won't add sheen. :-)
I love them and truly love the gold handles. Is the acrylic “gems” clear ? I’d love a closer pic of them in the finished project. Great job all the way around and for Darla’s comment that’s a good point it would be a shame to put a water Mark now you can diy a coordinating coaster 😜