How do I restain my deck properly so I do not have to do it every?
+2
We live in a condominium and there are specific guidelines of the color we must paint/stain the fence around around our deck which must be a light Beige color. Our deck presently is also a light beige color however, we want to change the color of our deck floor to a light brown stain...what procedure would you suggest to remove the light beige color which is on the 2"x 6" deck board flooring & then apply a light brown stain (please recommend a light brown brand name stain)...thank you.
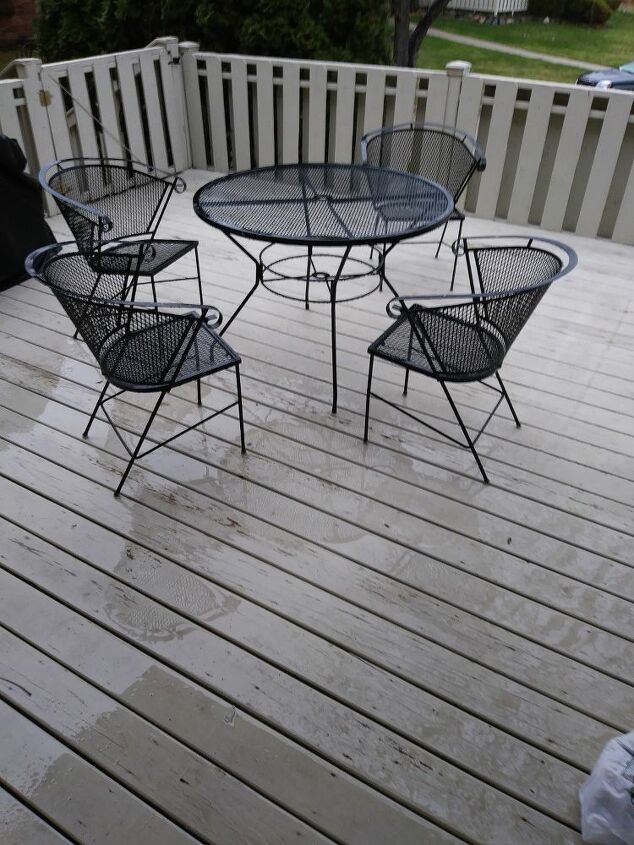


Looks as if your deck has been painted. You would have to power wash and sand all of the paint off to get down to bare wood before you could stain. Keep in mind that you may not get all of the paint out of any deep cracks and crevices. I would use a penetrating stain that soaks into the wood rather than a product that lies on top of the wood. I use Armstrong Clark stain for my decks. If it is not sold in your area you can buy it online. www.armstrongclarkstain.com
I agree that the deck looks as though it's been painted. Yes, GK is correct as far as the prep work but you only need to sand down anything that is loose or has chipped. Then, use a deglosser on the entire deck and allow everything to dry 72 hours. Then you can repaint using an exterior oil-based paint which will last longer. Be aware this paint will cost you $30-60 per gallon.
Before you do anything though, think about the condo situation. As said, the HOA requires decks to be light tan matching everyone else. IF you have UN-neighborly neighbors or Condo Commandos, you may have to undo all your hard work by making part of the deck brown if others can see the floor of the deck.
Rather then painting or staining, what if you purchased squares that are meant to make a patio? You can lay them on the existing deck, I know I’ve seen them in a cedar color, but perhaps they are available to paint also.
Hi Bob, we had the same problem with the stain not sticking and peeling after one winter, prep is important, so sand it well, and then clean it and allow it to dry. Select a good quality stain (solid color) and follow instructions exactly, allow to dry completely between coats. We used Sansin stain, and it was worth the money. Good luck with your project!
Looks as though you have a lot of advice. Can you tell us if it was stained before or painted? They do have solid stain, that looks as though it was paint.
if you decide to pressure wash your deck, (which I do not recommend at all) you would need to buy a deck wash, the pressure washer should be on the lowest speed, or better yet, just use a hose and spray with your finger on the nozzle. Pressure washing your deck, pushes the dirt and grime you need to come off, deeper into the wood and it can cause wood splicers and wood to break apart. (Not something you want to worry about.)
you will need to sand the deck to get loose the old stain or paint to reopen the pores of the wood to accept the new stain.
(To keep your deck lasting the longest, all sides of boards should be stained and sealed with a waterproofer. However, because yours is all together and more then likely you don’t want to pull each board, you can (if your able to get to it, restrain both sides of your deck unless the bottom was stained previously and looks great from beneath.)
use sand paper with a grit of 100 or 120. These are finer sandpaper’s that won’t rip up the wood as you sand, and should keep you from having to resand with a finer grit paper after the first sanding. It will take a little longer with this grit, however, if you want to tear through the paint and stain first, us an 80 grit paper, then follow with the 120 grit to smooth out the rough wood to prep for staining.
once you have prepped the wood, use a leaf blower to remove sanding dust, do not use a broom, the broom with push the dust back into the wood. Not a good idea.
Your deck must be completely dry, (3 days in hot sun) to start your stain. If you had paint before, you would want to use a solid deck stain that is oil based (Home-depot). Oil stains penetrate deep into the wood for a longer lasting stain, and protection. Because I can’t tell if it’s a paint or a stain on your patio, I would recommend using only the solid deck stain. It will look like it was painted however, it’s a stain, not paint, that penetrates the wood to help your finish last a lot longer.
if you get to bare wood you can choose semi transparent, or solid oil based stain.. always use oil based, never latex or acrylic. (They sit on the surface and only made for walls.)
go in, choose your colors, 1 gallon should cover about 250-300 sq feet. When your there, you will want to pick up some foam brushes and a paint pan, and a fine nap roller head, one that says for stains. Plastic to cover things you don’t want stained under your deck, painters tape or a metal/plastic shield to keep stain off your house. You’ll want to get a broom handle to fit in the end of the roller. Staining brushes for rails and edges of the outer deck. (Ladder if you need one)
*important, any oil based paint, needs to be stirred during the process, to keep the color through out the entire stain, or it will separate to the bottom and you will end up with a splotchy stain job. The paint department will put it in the shaker to mix the colorants, but before using it, make sure the bubbles are gone before applying (usually The vibration of the vehicle ride will bring bubbles to the surface.) only ever stir stain with the wooden stir sticks they give out at the paint department.
Now to get staining.. the foam brushes are to stain between your boards (cracks, make sure if you have anything under your deck that you don’t want stain on, cover or remove. Home Depot also sells plastic or canvas sheeting)
The fine roller is for the walking part of the deck. Go slow on the boards to not let the stain bubble, if it bubbles go to the staining brush for the smooth finish. Do cracks first, wiping the excess on top boards so it does dry clumpy, pr follow with rolling before the cracks dry. Always work in small sections, let the cracks decide the sections.
Allow to dry the allotted amount given on the back of your can before walking or use of deck.
don stain yourself in a corner!
this process takes time, to do your deck correctly. Do not rush it.
if done correctly, your stain should last for a few years before you’ll need to stain again. If you keep on top of it, you will not have to start from the beginning the next staining. You would only need to clean, lightly sand defects and restrain...
hope this helps.