


Spider Plant Repotting: Revitalizing An Unhappy Plant
My Spider Plant was oh so sad. The leaves had faded, brown tips were everywhere & the babies had dried up. See what I did to revitalize it (yes, there are before & after pics) & bring it back to glory.
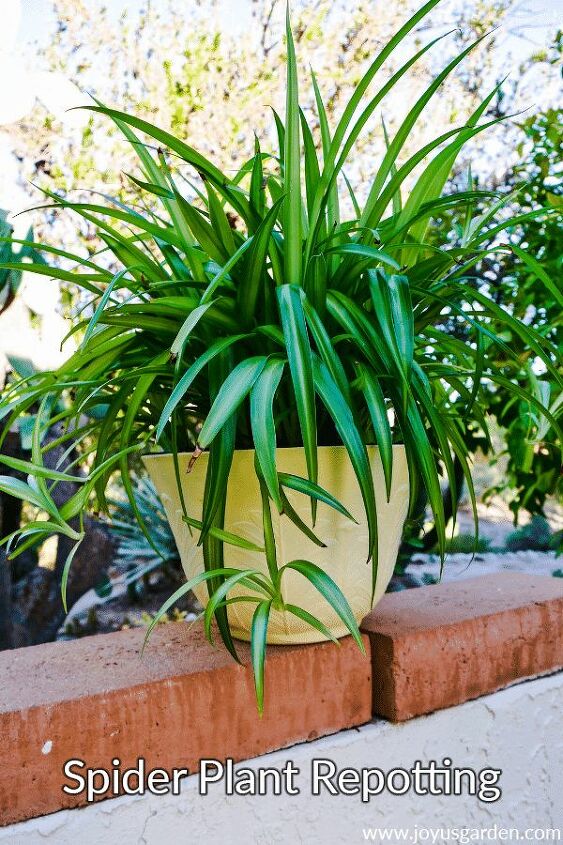
I felt bad for my Spider Plant—it was so unhappy. But all that has changed in just a few months time. Now it’s a healthy green and babies have appeared. What did I do to make this happen? The solution is simple: spider plant repotting. I revitalized my Spider Plant by repotting and moving it to a new location.
My Spider Plant was happily growing outdoors in coastal California ( USDA hardiness zone 10a) but then I moved and brought it along. It took a turn the 2nd year of living here in Tucson ( Zone 9a) and unhappiness set in. I had it hanging right outside my front door and the hot, dry, sunny summers here in the Sonoran Desert had taken their toll.
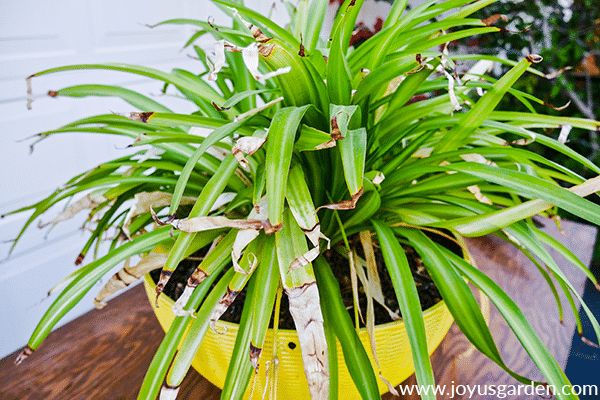
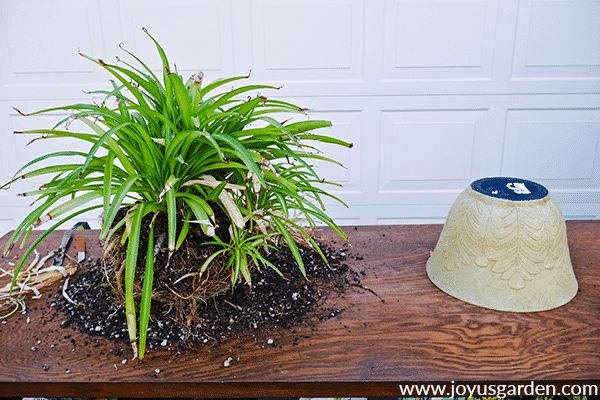
The color had faded to a yellowish-green and most of the leaves (especially the outer ones) were badly tipped brown. It was only getting 2 hours of the morning sun but in the desert in summer, it’s brutal. Plus, the babies were smaller, much fewer in number and some had dried up completely. As it turns out, my plant was very pot bound.
Spider Plants, like Dracaea marginatas and Ponytail Palms, are prone to brown tipping on the very ends of their leaves. It’s simply a reaction to the dry air in our homes. But my Spider Plant had more than just brown tips – some of the leaves were halfway brown and others well on their way.
Time to be a good plant mama and spring into action. Spider Plants are tough as nails (except for those brown tips!) and not at all fussy.
Spring through summer. It’s best to wait until the temperatures have warmed and the days have gotten a bit longer. In temperate climates you can do it into early fall.
I repotted the 1 you see here at the very end of March.
Avoid repotting your Spider Plant in winter as it’s the time for houseplants to rest.
As I said, Spider Plants aren’t finicky when it comes to their soil mix. A good quality (preferably organic) potting soil will be fine. It should say that it’s formulated for houseplants on the bag. You don’t want a planting mix for outdoor plants – it’s too heavy.
I’m partial to Ocean Forest because of its high-quality ingredients. It’s a soilless mix & is enriched with lots of good stuff but also drains well.
The majority of this mix is potting soil & if that’s all you have, that’s just fine. The ingredients below are optional, but because I have way more plants than 1 person needs, I have them on hand. Besides, I like to baby my plants when planting because the mix is their foundation & they deserve it. I also used:
I use the Prococo Chips Block – this is similar to what I used.
Charcoal improves the drainage & absorbs impurities & odors. Pumice or perlite up the ante on the drainage factor too.
I use less when planting indoor plants. It, along with worm compost, slowly enriches the mix.
This is my favorite amendment, which I use sparingly because it’s rich. I’m currently using Worm Gold Plus.
You can read how I feed my houseplants with worm compost & compost here: How I Feed My Houseplants Naturally With Worm Compost & Compost
Snake Plant Repotting
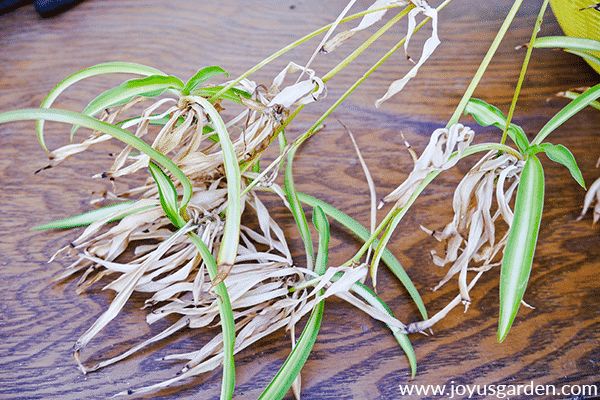
Your Spider Plant may not be as big as mine so you can skip the root ball shaving portion. Their roots are very strong & grow very tightly. You’ll need to massage the root ball & gently pull the roots apart a bit. Just like kneading & pulling pizza dough!
1.) Water the plant thoroughly 1-3 days before transplanting. You don’t want to repot a stressed plant.
2.) I knew the plant was potbound (putting it mildly) so I took a dull butter knife & ran it around the perimeter of the root ball. This loosened the roots away from the sides of the pot. Don’t worry if you cut some roots in the process – Spider Plants have a lot of them.
3.) Remove the plant from the pot by turning on its side & gently pulling out.
4.) Fill up the bottom of the pot as needed (so the top of the root ball is slightly below the top of the pot) with ps, cc & charcoal.
5.) Fill in around the sides with mainly potting soil. Details towards the end of the video. You can also see how much root ball I shaved off.
6.) Top with a very light layer of worm compost.
I put it on the top of the wall under my Pink Grapefruit tree in bright shade. After a couple of days I watered it well. It settled in for a couple of weeks before I removed the leaves that were badly tipped, yellow or dead. I removed a lot of them because the plant was sun & heat stressed. The babies came off too because none were worth saving.
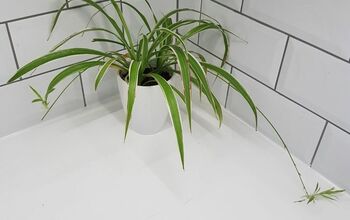
It’s been 3 month since I repotted my Spider Plant. I’ve since moved it into the house & it sits on the floor in my bedroom next to my Variegated Dracaena marginata.
It sits 4′ away from a large, north facing window. The sun shines intensely here in Tucson so it’s very happy in this location.
My Spider Plant has greened up beautifully. Not only has the color returned to the foliage but it’s put out so much new, fresh growth.
And, the best part – 2 babies appeared after 1 1/2 months. It now has 6 babies on it. Oh you know it, Spider Plant propagation video coming soon!

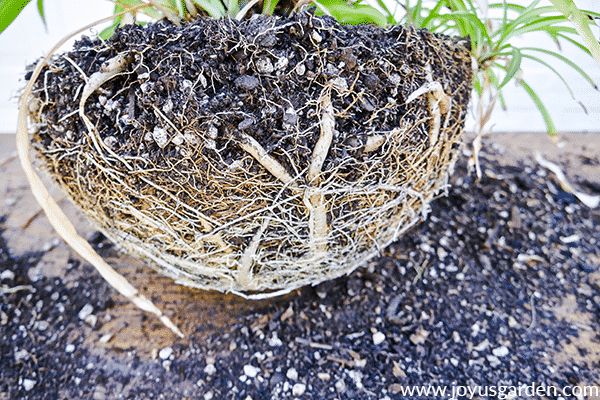
My Spider Plant was even more tight in its pot than I thought. Even though those roots & tubers store water, they weren’t able to absorb it. Potbound plants don’t hold as much water as those which have a bit of room for the roots to grow.
Don’t be afraid to cut the root ball. Spider Plants are tough as nails & they can take it. Mine looks none the worse for wear!
Don’t give up on a plant which looks bad. Sometimes it needs a new location, repotting or an adjustment in watering to have it revitalize.
My Spider Plant is a happy camper now. And, more of those babies are on the way!


Frequently asked questions
Have a question about this project?