How to prepare niches on furniture for chaulkpainting?

+9
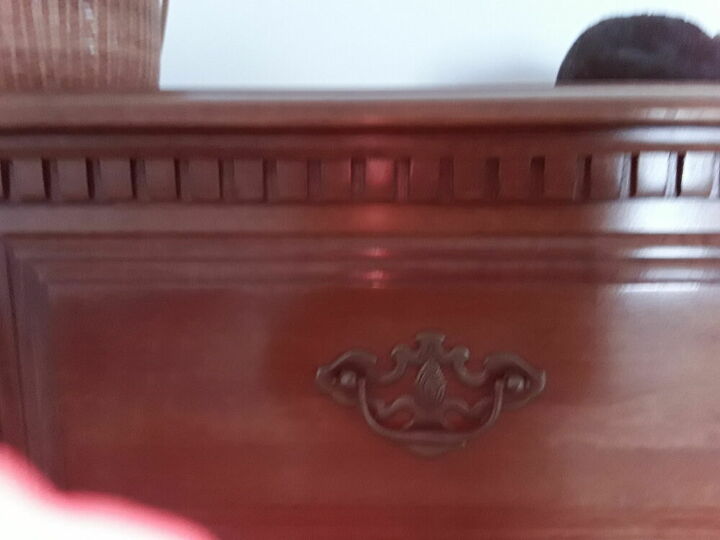
I'm psyching myself to chaulk paint our 55 y/o Bassett maple dresser. The pieces have a strip of molding along the top, looks like teeth (sorry, best description I have!) How do I get those intricate pieces sanded well enough for paint?


Try liquid sand paper. The purpose of "liquid sandpaper" is to take the sheen off a previously finished surface so that a new application of varnish, urethane or paint will stick.
Hi Elaine, hope these videos help you out,
https://www.youtube.com/watch?v=wLTaLAAizDE
https://www.youtube.com/watch?v=N2FgIj0vCDA
You really don't need to sand much if you are using chalk paint if you have to sand at all. You just want to sand lightly with some extra fine sandpaper to take off any shine from a poly or poly like finish. You don't need to sand all the way to the wood. You don't even have to sand if you are using chalk paint. I believe that is called "dental" molding. You want to use a good brand of chalk paint for a dresser. I would choose Annie Sloan for a dresser. I know it is a bit more than some other chalk paint lines but I think it's worth the money. I do not use Annie Sloan for everything. It just depends on what project I am working on and how it will be used. I choose Annie Sloan for all the furniture I paint for myself. Here's a few tips for you!
https://2beesinapod.com/2018/06/18/how-to-chalk-paint-furniture-our-best-tips
https://thepainteddrawer.com/2018/01/how-to-tuesday-create-a-smooth-finish-using-chalk-paint-no-brush-strokes
Just do the best you can. The inside of the dental moulding won’t get much wear and tear (compared to the top or sides). And the chalk paint adheres really well anyhow. :)
Hi Elaine. Chalk paint does not require sanding. If you're going to sand it, start with 80 grit sandpaper, then move to 200 grit, and finally to 400 grit. Good luck Elaine. Stay well.
Just as an interesting bit of trivia, when these repeating shapes are built into architecture, such as castle walls, they are called crenellations. (example below)
Hi Elaine,
You need some specialty sanding materials. Sanding tools that can get into really tiny crevices can be purchased at a woodworking store like woodcraft and rockler. Woodcraft is where I got mine. You can buy sanding blocks with wedges and points to get into those hard to reach areas and dental moldings. There are even sanding cords you can buy to go around crevices of spindles etc. These are a few that I have that work great!!!!:
https://www.woodcraft.com/products/large-contour-sanding-pads-6-piece?via=5d112bea776f6f4e030006e2%2C5d112e2e776f6f0be9000984%2C5d113233776f6f7087000af6
https://www.woodcraft.com/products/finishing-kit-sanding-sticks-24-piece
For a general page of sanding supplies:
https://www.woodcraft.com/categories/sanding-abrasives
They say chalk paint is a magic paint that you don't have to strip or sand the surface before painting. You could prime and spray paint as well.
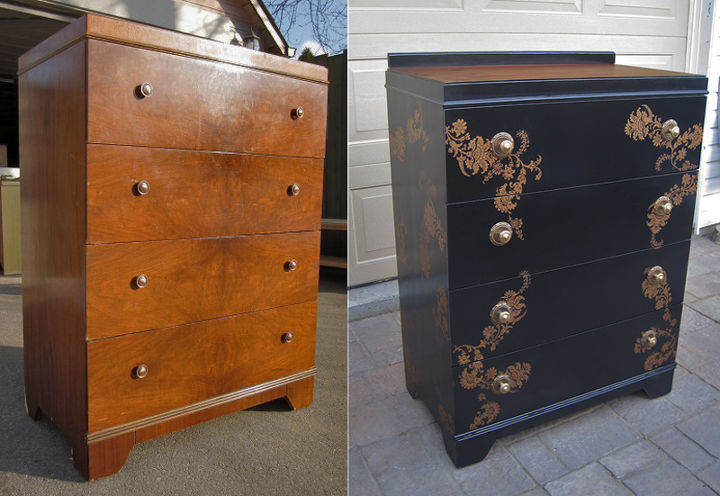
Although you could do these things, I am a firm believer that the look after the fact will ALWAYS reflect the prep that went into the project. The longer the prep, the better and smoother your project will come out in the end. SOOOO...it always depends upon how much you care about the piece that determines how much time you want to spend on it. GOOD LUCK! This is a gorgeous piece!
Your chalk paint project will TOTALLY change the look of your bedroom set and I bet you'll enjoy it for many years to come. Great advice by some many other Hometalker's that I'll not add my 2 cents worth of advice! :)
If you need to sand wrap sand paper around a pencil, chopstick, skewer, spoon handle. A few passes is all you need just to remove any shine.
I have been doing painting projects for 40 years. Unless you plan to stain something, you don't need to sand it. As long as the surface is in good shape, liquid sandpaper/deglosser is my "go to" product before I paint anything. Follow the directions on the package precisely. I sometimes go over the item twice with liquid sandpaper just to make sure I have covered all areas. It is quick and easy to use and doesn't create the mess that sanding does. After using the liquid sandpaper/deglosser, use a high quality primer that is designed to adhere to any surface. Don't skimp on the primer. This can make or break your project. Even if you plan to use chalk paint, prime first. I know people will tell you you don't need this but your chalk paint (or any type of paint) will hold up so much better with the correct primer. I prefer to do two light coats of primer rather than one thick one.
With all the labor that goes in to redoing furniture, I want the results to look professional and I want it to last. A little bit of effort in the prep is worth years of having great looking furniture. If you skimp on the prep, you will pay for it with paint that flakes off or easily chips off.
It’s called dentil moulding with an i and either use a liquid sandpaper or just use a good primer over the whole thing.
Becky is correct.
When seen on mouldings or on mantels, this design is referred to as dentil.