


How to Build a Compost Tea Brewer
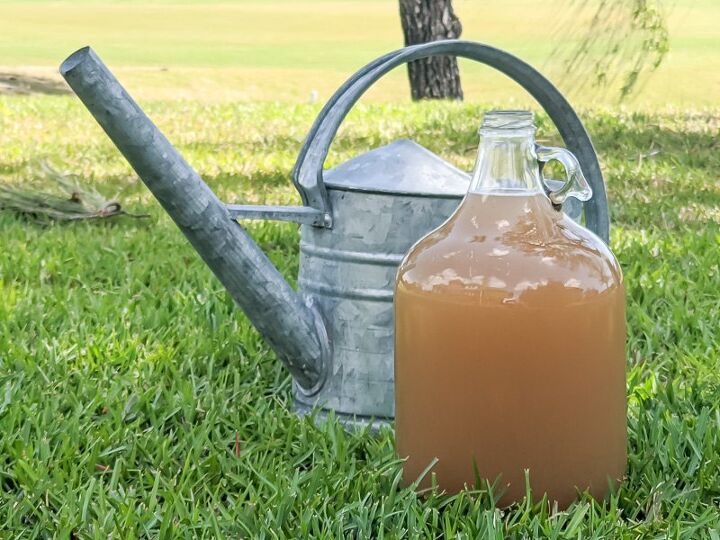
In the ten years since we have been actively working an organic veggie garden, we have never seen more lush and bountiful growth and more healthy and productive plants. In a prior post we talked about Compost Tea – what, why, how and the fact that since we used so much – 50 gallons a week – it can become costly to purchase as much as we need, so we built our own!
We have talked about Actively Aerated Compost Tea (AACT) being the most beneficial compost tea, so these Compost Tea Brewer Plans are specific to producing AACT.
All AACT brewers have the same fundamental elements:
- Container/vessel to hold the liquid/tea – with bulkhead fitting and spigot to dispense
- Compost
- Air pump and tubing/frame to introduce and diffuse oxygen through the solution
- Nutrients to feed the microorganisms and enable reproduction
1. Container
Rubbermaid Brute Heavy-Duty Container – 32-gallon
I used the Rubbermaid Brute brand because I was familiar with it having owned one for some time. Tough, heavy-duty and it is USDA Meat and Poultry Group listed, ensuring regulatory compliance for food storage and cleanability.
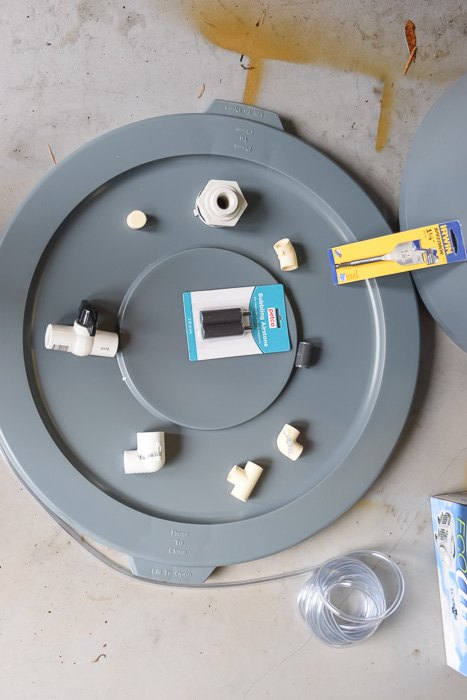
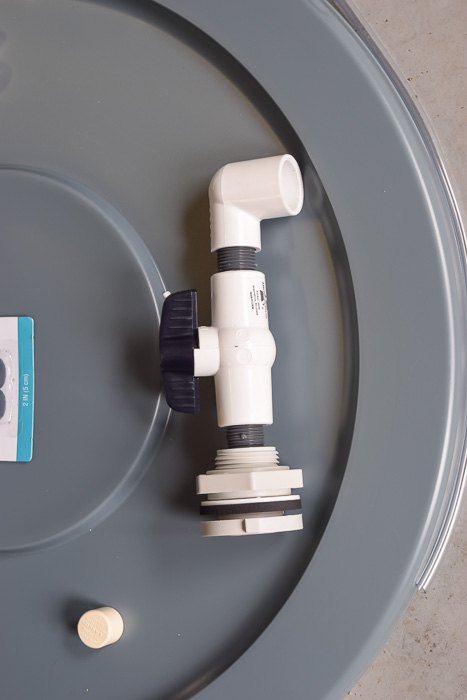
2. Bulkhead Fitting and Spigot
I fashioned a spigot using a bulkhead fitting, PVC ball valve, two threaded connectors, and 90-degree elbow and it’s working great! Here is what I mean by “bulkhead fitting”… very similar to what I used – Bulkhead Tank Fitting, 1/2″ NPT Female
- 1 PVC Bulkhead Fitting – female threaded
- 2 PVC Threaded Connectors – threaded
- 1 PVC Ball-Valve – threaded
- 1 PVC 90-degree elbow – threaded
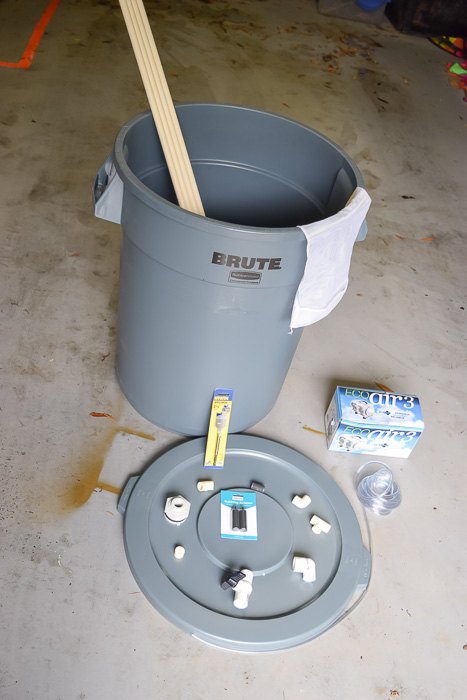
3. Air Pump and tubing/framework :
EcoPlus 728457 80W Commercial Air Pump, 1300 GPH
The pump I used is a somewhat less powerful version of this same brand – it cranks out 1030 GPH and is adequate – but if I had to do it again I’d go for the more powerful version. The difference in cost is very modest and more air and more agitation to dislodge the microbes from the compost would be beneficial. Make sure it comes with a multi-outlet divider because we will be running multiple airlines from it.
4. Tubing:
I run three airlines from the pump. One to each side of the frame/base and one to an airstone placed directly beneath the compost “teabag” to agitate and oxygenate the microbes contained in the compost. A minimum of 15-18 feet of 1/4″ clear vinyl tubing is required.
We will also need to “split” the air supply from the tubing to ensure equal distribution so we’ll need two “T” splitters to insert into the tubing like the one shown below.
- 1/4″ Clear 2 “T” Splitters
- Plastic Tubing, 25-Foot
5. Frame/Aeration Base:
I used 1/2″ PVC pipe to construct the octagonal base and the uprights from which we attach a cross-bar to hang the “Compost Tea” bag while brewing. Once complete, the structure will fit nicely into the Rubbermaid container/Compost Tea Brewer. You’ll need a minimum of 10 feet of 1/2″ PVC for the aeration base and the uprights plus a 16″ length of a smaller diameter for the “crossbar”.
- 10 ft of 1/2″ PVC pipe
- 2 ft of 1/2″ CPVC pipe – smaller diameter
- 8 3/4″ 45-degree “slip” connectors – to join the octagon base pieces
- 2 3/4″ “T” connectors – “slip” on – plastic tubing/air supply from the pump gets inserted to these
- 2 3/4″ “T” connectors – “snap” on – uprights to hold teabag crossbar hanger gets attached to these
- 2 3/4″ End Plugs – to cap tops of “T” connectors – air supply goes into these
- 2 3/4″90-degree elbow – 1/2″ crossbar is inserted here from which to hang “tea bag”
- 1 Large Air Stone – attaches to air supply, oxygenates and helps to displace the beneficial organisms from compost into our tea.
Container and Spigot:
1) Cut a hole into the side of Rubbermaid container to insert bulkhead fitting where you want to place the spigot- see the red mark on the container above – START SMALL!!! We need to ensure a “snug” fit.
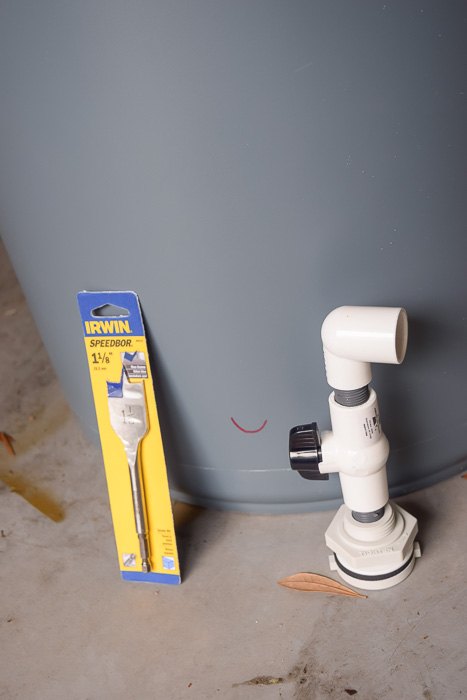
2) Insert bulkhead fitting, assemble internal and external parts and tighten
3) Assemble spigot by threading connector into bulkhead fitting, attach a ball valve to the connector, thread the second connector in the valve and attach 90-degree elbow – Congrats! You’ve made yourself a container with a spigot, perfectly watertight, and with a robust flow…The first step in making your DIY Compost Tea Brewer!
Frame/Aeration Base:
1) Cut 6-5 3/4″ sections of the 1/2″ PVC pipe. Take 3 of the cut pieces and join them together with the 45-degree connectors – do this twice. These will be the two sides of our base that will eventually become an octagon once all pieces are joined together. The picture shows 8 sections, I then used 2 of them for the next step.
2) Cut 4-2 3/8″ sections of the 1/2″ PVC pipe.
3) Take the two PVC pipe End Plugs and drill a small hole in the center of each – the hole needs to be small enough such that the plastic tubing fits very snuggly – as watertight as possible. Again, start small and enlarge the opening as necessary to enable a very snug fit.
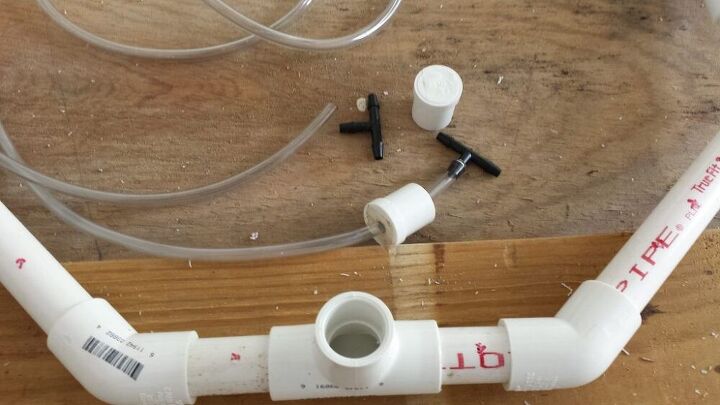
4) Cut two 6 foot lengths of clear plastic tubing and insert them into each of the recently drilled End Plugs. Pull approximately 6 inches of the tubing through the hole – remember it should be a very snug fit. Attach a “T” splitter to the short end of each of the lengths of tubing.
5) Insert the End Caps with tubing attached into the top of the slip on “T” connectors – as seen above. Make sure that tubing is not “kinked” and that the “splitters” will be in a position to distribute air to both sides of the assembly once the End Cap is placed firmly in the top opening of the “T” connectors.
6) Insert the 4- 2 3/8″ segments of PVC into each of the open ends of the “T” connectors
6) Join the two sides we made in Step 1 above with the “T” connectors by joining both sides with 45-degree connectors. We should have an octagon with “T” connectors on opposing sides and should look something like the image below.
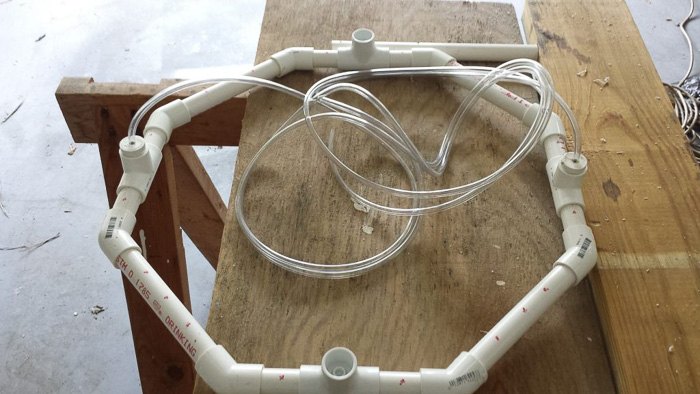
7) Drill 1/16″ holes on the top of the PVC – evenly distributed about an inch apart into the PVC octagon base. If you look closely at the image on the right you can see the ink dots I’ve placed on the PVC to mark the placement of the drill holes.
8) Place the “Snap-On” T connectors on opposing sides of the octagonal base – as shown at right.
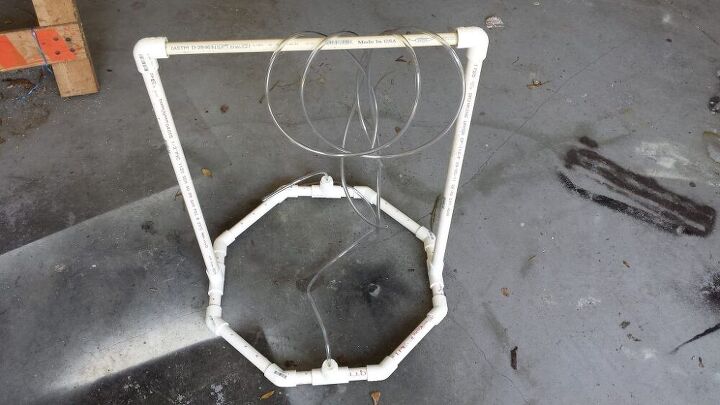
9) Cut two 3 foot lengths of PVC and insert one in each of the “Snap-On” T connectors to form the uprights to hold the Tea Bag crossbar. Place the 90-degree elbow joints on the end of each upright, cut a 16″ length of CPVC pipe to insert into the elbows. At this point, our structure is complete and should resemble the image below.
10) Take the completed Aeration Frame and simply insert it into the Rubber Maid container, connect the clear plastic tubing air lines to air pump, attach the third clear plastic line to the airstone and we have our very own 32 Gallon DIY Compost Tea Brewer! Congratulations!!! You are ready to start brewing homemade Compost Tea!
Pop on over to the blog for our Compost Tea recipe and how we brew our compost tea.
Resources for this project:
See all materials


Comments
Join the conversation
-
Hi Karen, that's weird! It is https://nourishandnestle.com/make-compost-tea-brewer-brew-compost-tea/
-
Wow, you are committed to your garden! I am impressed, I hope your yield is bountiful & you enjoy all the fruits of your labor!


Frequently asked questions
Have a question about this project?
Do you have a picture of it completed?
Thanks, where is the link to the blog?