


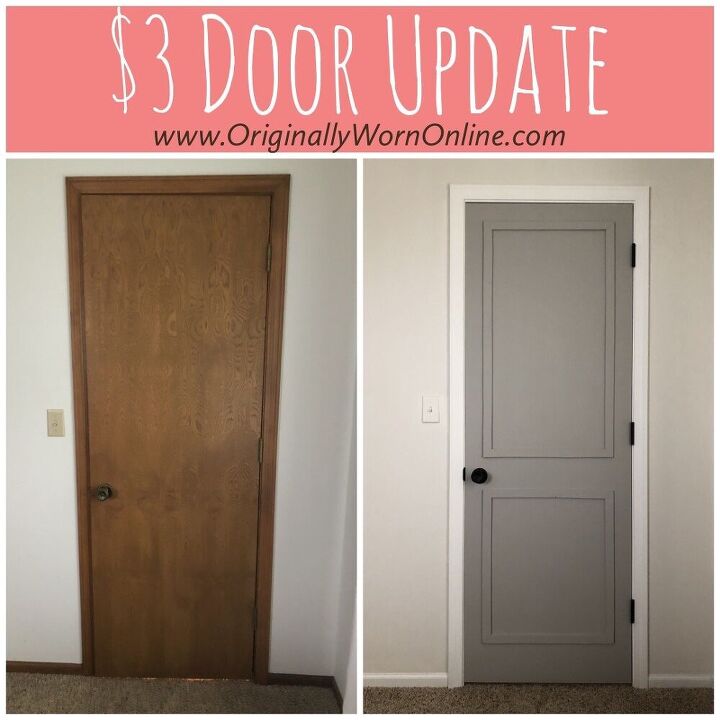
How To Update A Hollow Core Door For $3!
How to update a hollow core door for $3 a side in wood trim.
It is a super cheap and easy way!
Watch the video tutorial here —> https://youtu.be/ZIxqCKbqywU
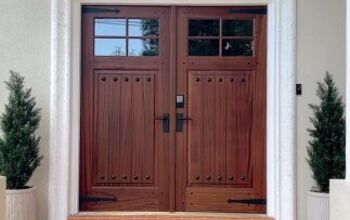
When my husband and I were looking at buying homes, one thing the old homes that I loved usually had were these amazing, paneled, solid wood doors. They were swoon worthy! And even though the newer (i.e. 60’s-80’s) homes were more updated in the places it mattered, insulation, electric, etc., one thing I could never get over were those darn flat, hollow core doors. But as you know, we went with one of those newer, flat doored homes.
I have lived with them for 3 years now, but now I am on a mission to change that... on the cheap. First, let me tell you how I got to the solution I did, because on the surface, there seems to be some better options.
In our last home, my dad replaced all those hollow core doors with real, old, paneled doors. They were amazing, but it isn’t easy fitting old doors to new door jams, and he is busy on other projects. So this task was up to me.
Next option, and the one I thought I would do when I started out, was to rip plywood down in strips and fake a 5 paneled door look. But here is the issue with that, this only works when the “front” of your doors opens out of the door jam. Like a closet door would. The reason being is that you can’t add a 1/4” of thickness to the door and expect it to close against the current door stop the same. It won’t line up. You could move the door stop, but mine are manufactured as part of the doors jam. I would have to basically rip the whole thing off and then replace it with a whole new one. (Some doors have nailed in stops that can be pried up and moved.) Next fix for this was to move all the trim in a 1/2” so the door would shut and look good closed. But ours are open 90% of the time and I didn’t like this idea either.
So in came the next plan, I swear I will get to the actual how to soon, I just want you to understand why so you don’t have to rack your brain on all the options and spend hours in the store like I did. The next option was to add trim to the inner part of the door, and fake large panels. This looks fine, it’s not my favorite, but it was the next best option. So I set my sights on trim at Lowe’s. That stuff is pricey! Even with the cheapest littlest piece of trim, and needing about three pieces per side of the door, I was looking at roughly $30 in trim per door. Yes I know that I could’ve only done one side of the door, but my OCD also would not have let that happen! So in the very cheapest option I’m looking at $30 of trim on a door, to make an OK looking update. Well, for $40 a door you can buy a panel hollow core door. If I’m going to spend that much money I would rather just replace the doors.
Yes, so now I set my sights on trying to find the cheapest option for wood that I didn’t have to rip down into teeny little strips because although I can cut miter edges easily, I’m not very good at ripping wood down. And the people at our hardware stores seem less than pleased to do that, and sometimes flat out tell me they won’t. So, I ended up finding the perfect size trim, for the perfect price, in the lattice section.
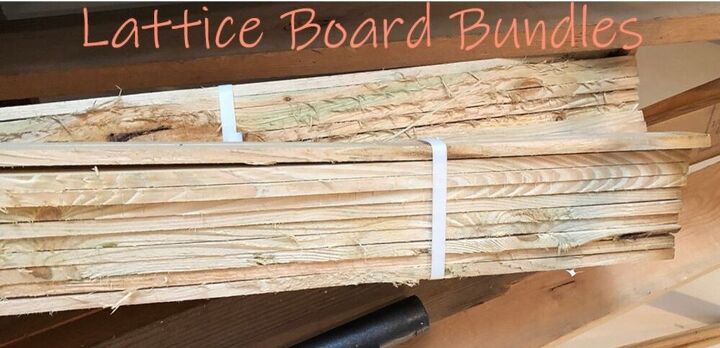
These bundles of boards are actually replacement boards for lattice fencing. They are treated wood, but you can put treated wood inside of your home with no issues. This board is 6 feet long, 1 1/2" wide, and cost only a $1 per board. That’s just $.17 per foot. Hard to beat. At different stores you buy them in different amounts. At Menards you can buy them in 8 foot strips. At Lowes you can buy them in 6 foot, 10 pack bundles. I ended up getting mine at Lowe’s, because that is what is closest to us. After all that, you finally know the what and the why. On to the tutorial!
Your first step would be to take off the hardware, including the hinges, which makes you take the door off the door jam. If you do not plan on painting your hinges, you could leave your door attached to your door jam and just tape off your hinges. Since I’m paining everything flat black, I took all mine off.
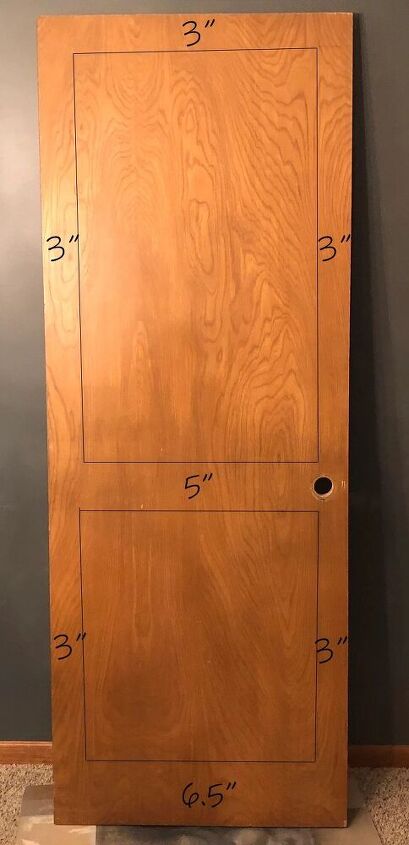
Next I had to figure out what lengths to cut my boards to. The measurements of the actual boards are kind of pointless to share, since every door is different. But you can see in the picture how much I came in on the sides and bottom, so you can come up with your measurements. You will typically want to raise your bottom at least double of your edge measurement because that is what it looks like in traditional doors.
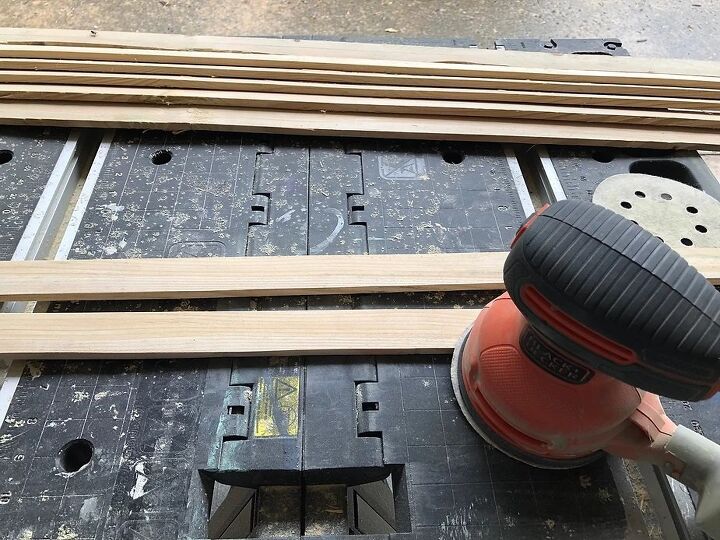
To prep the trim wood, I gave it all a quick sand with my palm sander (40 grit sandpaper) and then measured out my longest pieces at the miter corner. Then cut them all on a 45° angle. You can use a miter box or miter saw. Either will work just fine.
I cut my pieces to create two squares with the 45° angles in each corner. I laid them out on my door, and taped them in place to make sure I liked the placement.
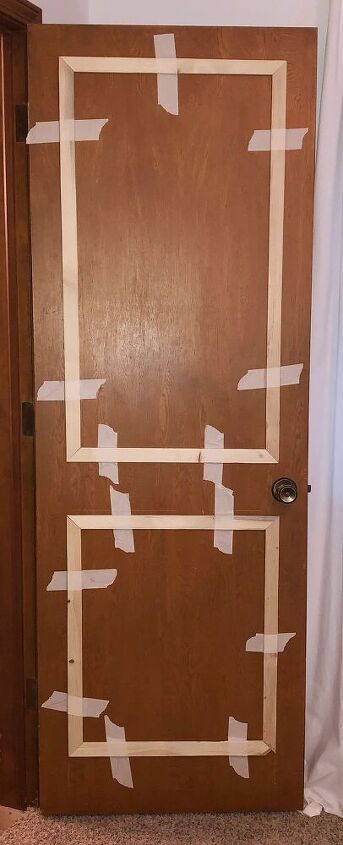
Next, I took a board at a time and put a S shaped bead of liquid nails down the back. Placed back on the door, pushed down tightly, and taped in place. I did this with all of the trim and let it dry overnight.
Then I came back with paintable caulk and caulked all the edges to give it a cleaner look. I let that dry overnight too.
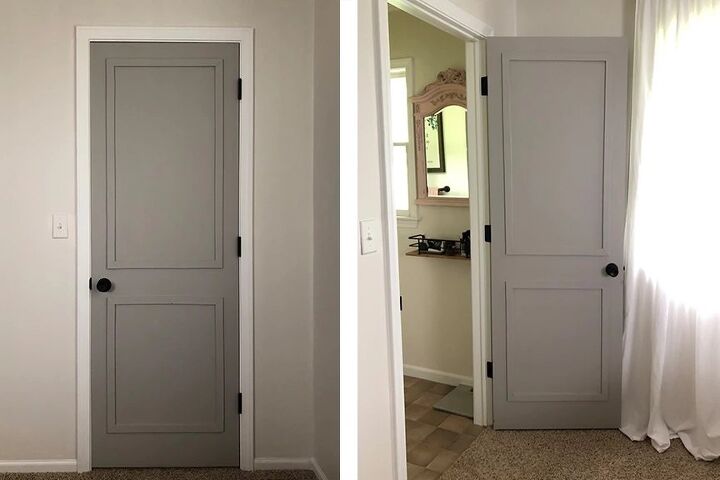
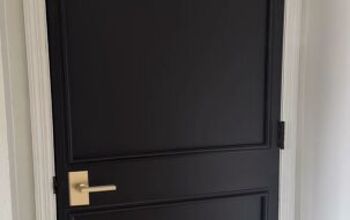
Next, I painted the whole thing in Annie Sloan Country Gray. I did this because I did not want to sand, and with Annie Sloan paint you don’t need to sand before you paint for good adhesion. Plus, the color Country Gray covers really well and tends to cancel out the orange tone of the doors.
Once this dried I was able to go over everything with a coat of Sherwin Williams latex paint. I painted mine in the color Amazing Gray. For my doors I only needed one coat of each color for full coverage. Once I let the doors dry overnight, I attached the hinges onto the door, the door knob, and hung the door back in place. BAMM, DONE!
Another little tip, if you have to do more than two coats, try to avoid doing it on your edges of your doors. The more paint built up you have on your edges, the more likely it is that it will not shut smoothly when you put it back on.
Well there you have it! I updated my hollow core doors for roughly $3 a side in wood. It was the absolute cheapest way I liked, until the time when I replace them with real, old, paneled wood doors. But that’s a project for round two of our home remodeling.
Hope you enjoyed this post and tutorial, be sure to share it with your friends with ugly doors!
Happy Painting, Rachelle!
Resources for this project:
See all materials


Comments
Join the conversation
-
One of the best hacks I've seen. Tremendous return on small investment and time. So many houses I've looked at have these ugly doors. It's amazing how this transforms them!
-
WOW!!!! Excellent creativity!!! Looks gorgeous!!


Frequently asked questions
Have a question about this project?
What is the length of the top and bottom boards. TIA
When I printed the instructions none of the pictures printed, why?
Can it be done on hollow core doors?