


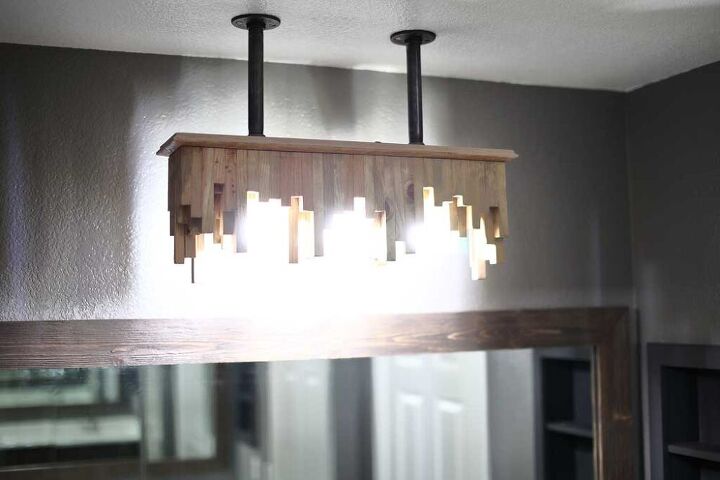
How to Build a DIY Bathroom Ceiling Light Fixture

Having proper and functional lighting in the bathroom is important, but it’s just as important that you like the way it looks. It’s probably where you spend the morning getting ready for the day. Focused activities, like putting on makeup or shaving, can benefit from thoughtful lighting. Changing the lighting is one of the quickest ways to transform the overall feeling of your bathroom. In this tutorial, I’ll go through the steps on how to build a DIY bathroom ceiling light fixture.
You could find more photos and info about this project here: TheDIYPlan.com
I’ve designed this light fixture using scrap pieces that I had laying around in my garage. You might also be interested in the previous project that I did in this bathroom. I refinished the bathroom vanity top with epoxy resin, then changed the cabinet doors and drawer covers and made a bathroom mirror frame.
Tools for this project
- Tape Measure
- Drill
- Miter Saw
- Table Saw
- 1 3/8″ Shank Forstner Drill Bit
- Kreg Jig
- Sander
- 1/2″ Drill Bit
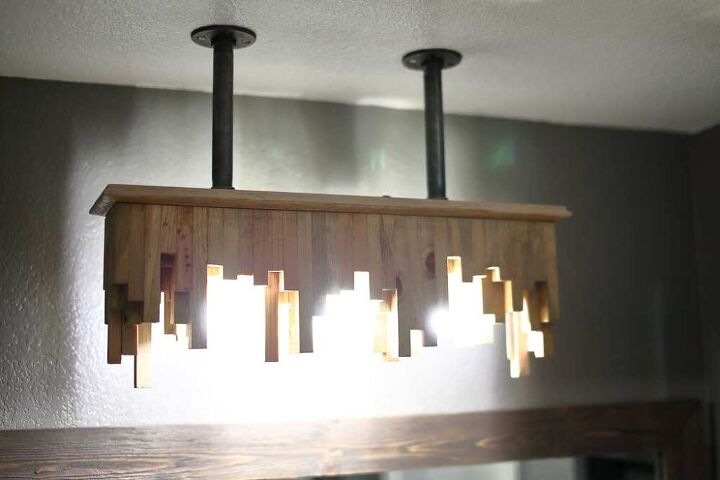
Start with cutting the base for the light fixture. This base could be as big or as small as you want. For this project, I used an old drawer cover board from the bathroom vanity that I remodeled a few weeks ago. This board is 3/4″ thick and 5 3/4″ wide by 25 1/4″ long. Since this was a drawer cover board it had a decorative edge that was cut with a wood router.
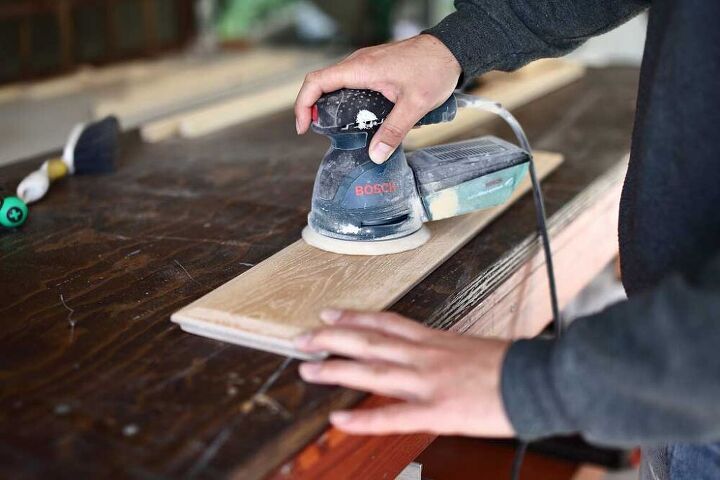
If you don’t have this size board laying around, then take a 1×8 pine board and cut it to 25 1/4” x 5 3/4”. This will be the base of the light fixture. Then using a random orbital sander, sand the board on all sides and the edges. If you like the decorative edges, then you could do that with a wood router.
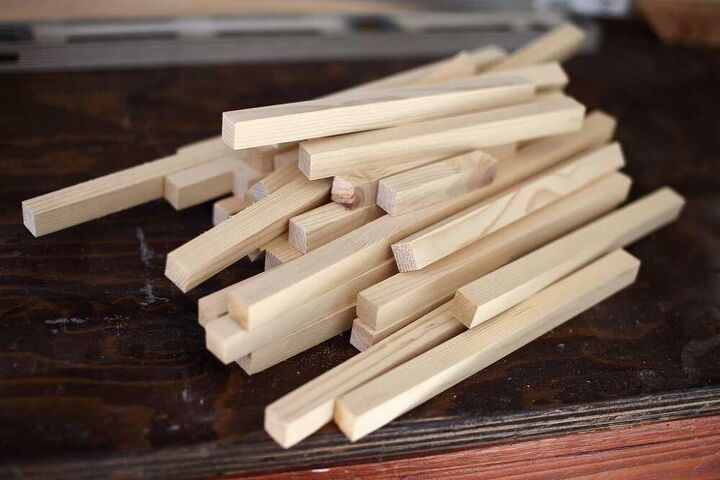
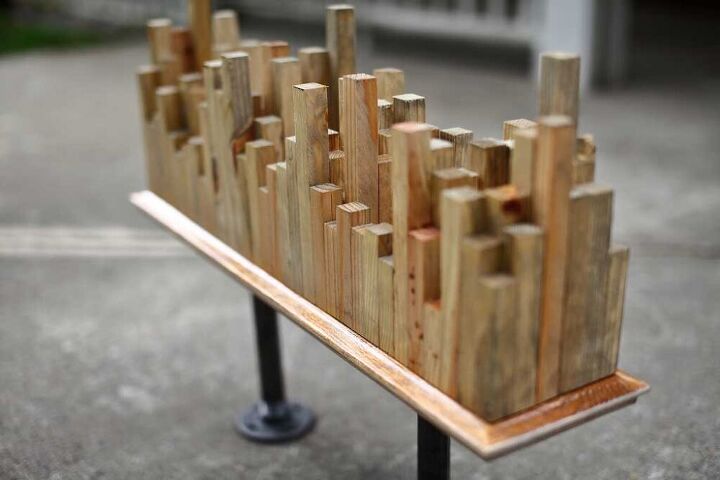
Next, you need to cut the 3/4″ x 3/4″ pieces into smaller blocks at different lengths ranging from 2″ to 8″ in length. Before cutting random lengths, first cut 12 blocks to 2″ in length with a miter saw. These 12 blocks will need to be glued together in sets of four for the light bulb. Set these blocks aside, you will need them in the next step.
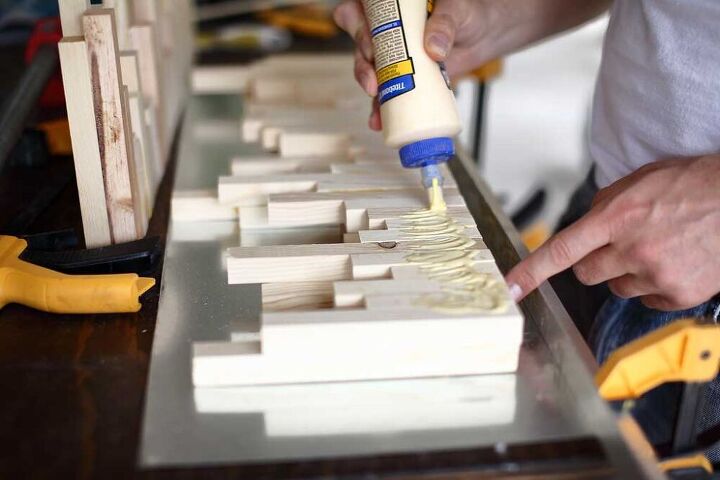
Now, these 3/4″ x 3/4″ blocks will be glued together by layers or rows. I used a flat sheet of metal to layout the block. Using metal or plastic prevents the blocks from gluing to the workbench. At the bottom of the sheet metal, clamp an angle or some kind or ruler to serve as a guide to make sure all the pieces as straight. Also, on the left side clamp a square to the angle to have the block at 90 degrees.
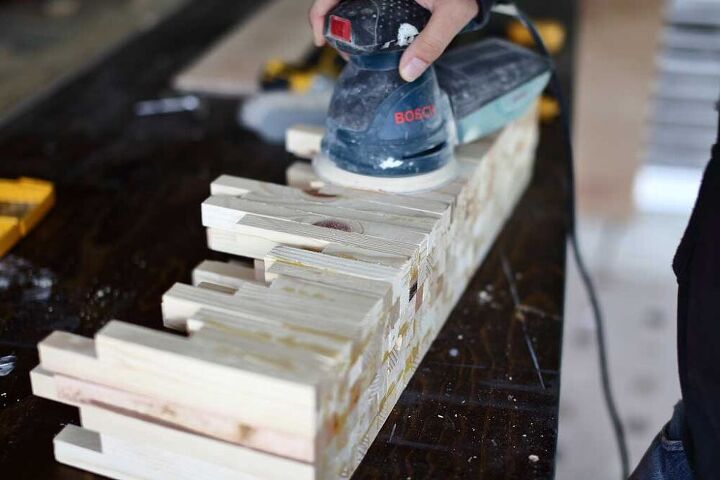
Once the glue is completely dry, use a random orbital sander to remove any dried glue or uneven spots. If the bottom is uneven or will take too long to sand, use a table saw to cut off 1/8 of an inch to make it straight.
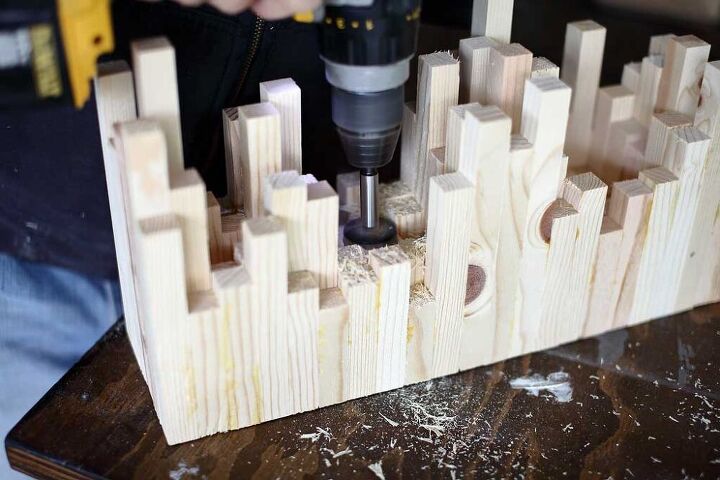
Take a 1 3/8″ shank Forstner drill bit (same drill bit that is used for cabinet door hinges) and drill a 3/4″ deep hole in the center of 2″ blocks where the light bulbs socket will be inserted. Then continue drilling through the blocks with a 1/2″ drill bit. This hole will be used to feed and connect the wires.
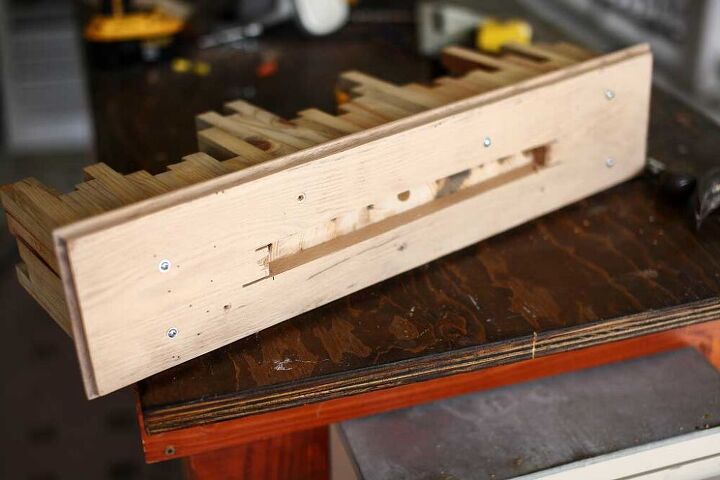
Take the base of the light fixture and cut a 3/4″ wide by 12″ long opening in the center using a skill saw and a jig saw. This does not need to be a perfect cut because it will not be visible. Now position the glued blocks in the center of the base and using 1 1/4″ pocket hole screws, screw it in on the backside.
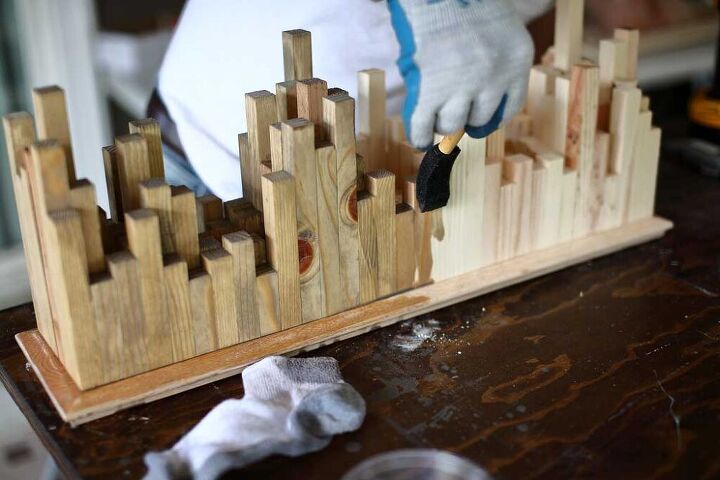
Staining this light fixture is a little tricky because it doesn’t have a smooth surface where you could apply the stain and then wipe it off. It’s almost impossible to wipe off the stain from the blocks that have random heights and are so close to each other. So I deluded the stain with paint thinner to make the stain lighter and then applied it on the light fixture. I used 1/4 cup of paint thinner mixed with 1 teaspoon of Briarsmoke stain. After applying this mixture on the light fixture, I didn’t wipe it off, I left it the way it is to dry. If you want to make the stain darker, you could add another teaspoon of stain or stain a second coat of the same mixture.
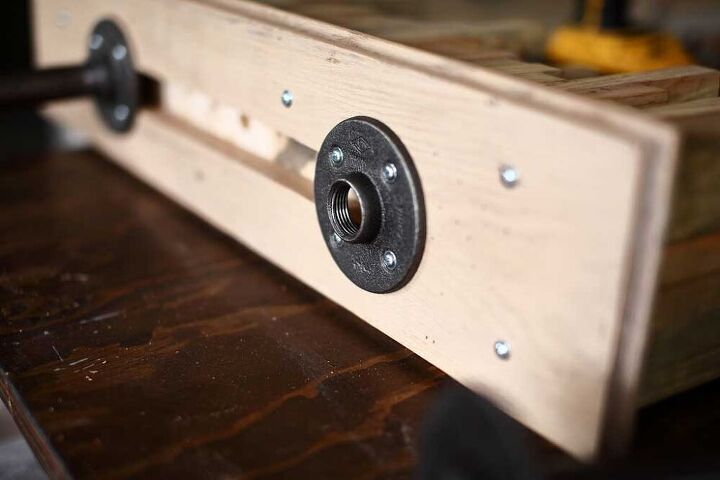
First, attach the 3/4″ threaded black iron floor flange directly over the ½” hole on the backside of the light fixture. You will need to have two of these flanges attached on both sides of the fixture base. Then screw in 8” long steel pipe into the floor flange, and another floor flange out on top of the 8” steel pipe. See picture
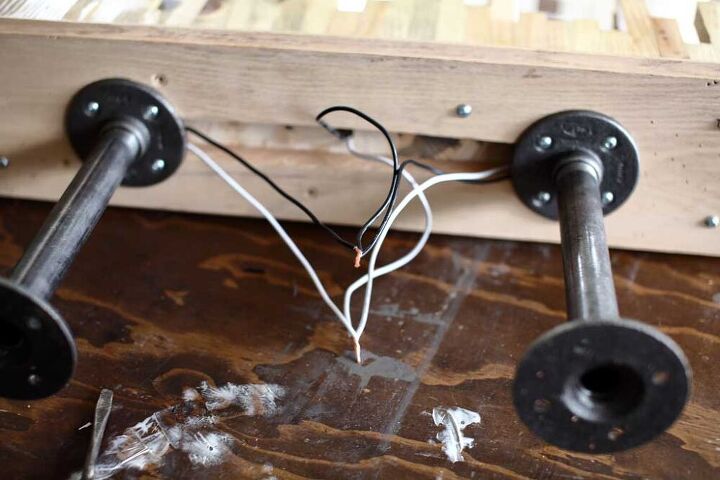
Now insert the fan fixture socket into the 1 3/8” hole on the front of the light fixture. Make sure to feed the wires through the hole first. The fan socket should be snug inside the hole. If it’s too loose you could place a small piece of tape on the socket and insert it back inside and that will keep the socket in place.
When working with electricity, it is important to make sure that the house main circuit breaker is off before touching or cutting any wires in the wall or attic. For wiring the light, you should have a black and a white wire coming out from the wall that’s connected to the on/off switch (on the newer houses you’ll have a third ground wire). Each of the fan sockets should also have a white and a black wire. Connect all black socket wires to the black wall wire and all white socket wires to the white wall wire. Ignore the third ground wire.
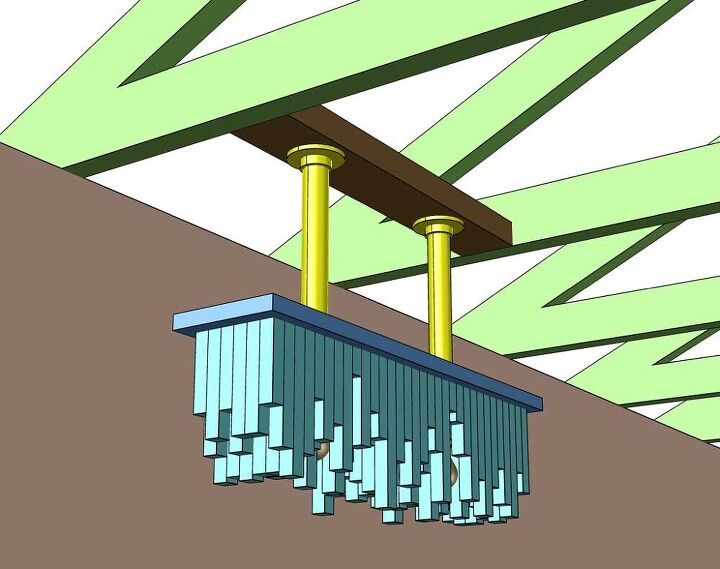
To hang this light from the ceiling, the upper floor flange needs to attach to the structural truss in the attic. If the flange does not land on the truss, you’ll need to add a 2×4 brace that spans the trusses. Do not attach this light fixture to the drywall without any backing. The drywall by itself will not hold the light.
Resources for this project:
See all materials


Comments
Join the conversation
-
This is beautiful!!
-
This is lovely, thank you for sharing. I think this would look well as a wall light too either with the jagged edge pointing up OR down.


Frequently asked questions
Have a question about this project?
So creative and beautiful. What did you do for the light bulbs. Are they the see through or ? Excellent instructions!