How to Build a DIY Wooden Bar Stool

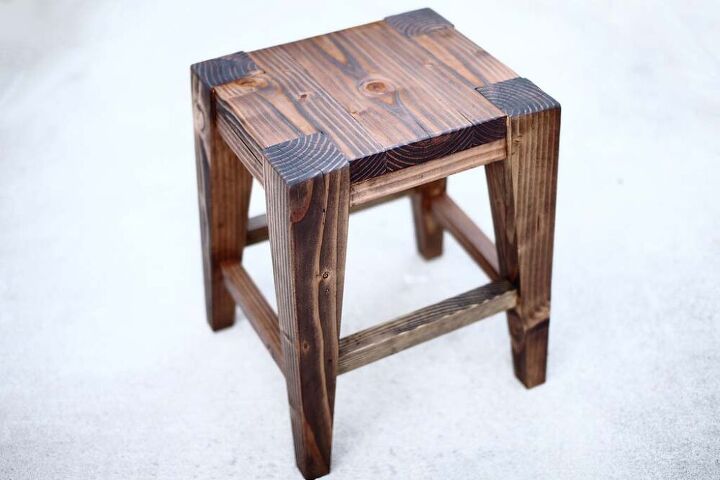
Typically bar stools come with thin legs, but I decided to make this DIY wooden Bar Stool with legs from trimmed 4×4 lumber. This bar stool looks bulky, but it’s a perfect fit for a dining table that I made several months ago.
Please visit my website for more info and pictures TheDIYPlan.com.
Tools for this project
- Drill
- Tape Measure
- Sander
- Pivoting Bit
- Table Saw
- Kreg Jig
- Miter Saw
Take 4×4 board and cut into four pieces to 22 1/2″ in length. These will be the legs for the bar stool.
Next, measure and mark 2″ from the top of the leg. Then from the 2″ mark cut the 4×4 board at 5° angle all the way down using a table saw. I made a jig out of 2×6 to help me make this 5° cut. See photo. Make this 5° cut on all 4×4 pieces.
Rotate the 4×4 board 90° and again, from the 2″ mark, make a 5° cut all the way down. Now you should have two sides with 5° cuts and the other two untouched.
Next, cut the upper 2″ section of the leg to 5° as shown on the picture. Again you’ll have two sides of the leg cut and two sides straight/untouched.
Make a jig from 2×6 piece of by cutting 45° grove in the middle. Then take the straight side of the leg and place it inside the grove. On the upper section of the leg, measure and mark 1 1/2″ from the center of the ridge. Then set your miter saw to 5° bevel and make a cut. Next, measure 21″ from the top of the straight side of the leg and make a 5° bevel cut as shown on the picture.
Take 2×6 and cut three pieces to 14″ in length. Rip off 1/4″ on both sides of the middle section, and on the inside of both edge sections, see picture. For the area where legs go, cut out 3 1/4″ x 3 1/4″ squares on four sides. Then drill pocket holes as shown on the picture for 2 1/2″ pocket Hole Screws. Apply wood glue in all the seams, then clamp and screw boards together.
Now attach the legs with 2 1/2″ pocket hole screws and wood glue. You will need to use pivoting bit tip holder to get those screws in because of space constraints.
From the remaining piece of 2×6, cut 1 1/2 x 1 1/2″ strips of wood. Then measure the distance from the leg to leg at the seat and cut to that exact measurement at 9° on each end. Drill pocket holes on the backside. Use wood glue and 2 1/2″ pocket hole screws to attach these boards.
Similar to step 8, measure and cut 1 1/2 x 1 1/2″ footrest at 9° on both ends. Two of the footrest will be higher than the other two, so measure accordingly before making the cut. Drill pocket holes on the bottom of each footrest and attach them using 2 1/2″ pocket hole screws and wood glue.
The last step is to sand the bar stool 220 grit paper, then apply pre-stain before staining. Once the stain dries, apply polyurethane. You’re done with a DIY wooden bar stool.
Enjoyed the project?
Resources for this project:
See all materials
Comments
Join the conversation
-
 Joanie
on Nov 29, 2020
This is carpentry here and I love your work......this is beautiful! Good Luck on your future projects!!

-
 TheDIYPlan
on Dec 09, 2020
Thank you!
-
-
-
 Valerie Burge
on Nov 30, 2021
This is fabulous!!!
-








Frequently asked questions
Have a question about this project?
regarding the foot rest, one pic shows the piece going thru the leg, the other says use pocket drill holes and screws. is this a choice or which is correct?