


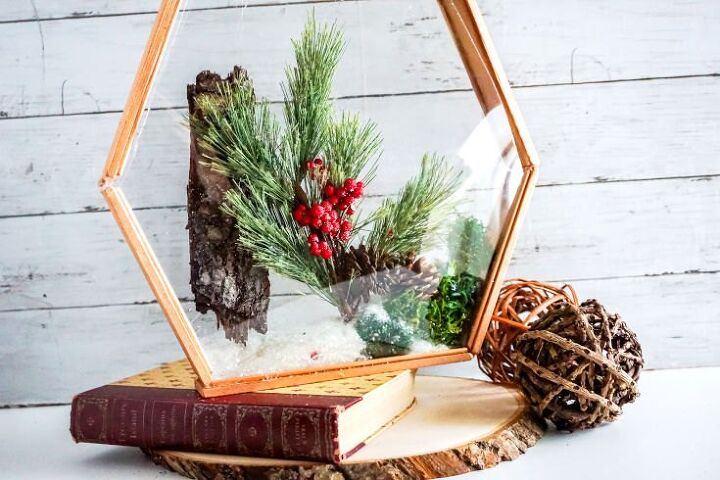
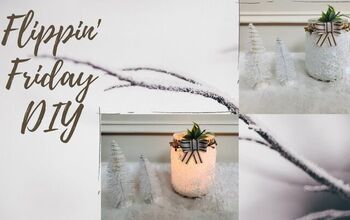
DIY Winter Suncatcher Terrarium
This 3-dimensional DIY winter suncatcher terrarium is inspired by geometric glass terrariums. A fun twist on what is traditionally a kids project, these terrarium suncatchers are updated as a winter craft for adults. It’s easy to create unique, winter home decor for a sunny window, shelf, mantel or table. All while having an enjoyable afternoon indoors.
Learn how to craft your own DIY winter suncatcher terrarium. Plus check out my video tutorial for a step-by-step guide for making this fun and enjoyable adult craft project for your winter home decor.
Sometime back I made a upcycled CD suncatchers as part of an women’s craft night with my friends. I thoroughly enjoyed this adult craft project, and wanted to give it another go. However, rather than crafting a traditional suncatcher, I wanted something unique and little more grown up. A DIY suncatcher that not only looks great hung in a window, but that would also double as seasonal home decor. Thus, my idea for a DIY winter suncatcher terrarium was born.
I recently ran across a cute children’s suncatcher craft in a Facebook group. It featured seasonal botanicals pressed between clear contact paper. The preserved botanicals were set between two paper plates with holes cut out in the center that served as a frame. I loved this idea of using seasonal botanicals and other natural elements to make a suncatcher. However, I wanted an adult variation on a suncatcher craft that didn’t involve paper plates or popsicle sticks.
I also thought it would be cute, that rather than use a round frame for my suncatcher, to make the shape more like a geometric terrarium. After all, terrariums include all types of plant life instead. And what’s more fun than a terrarium that a.) you don’t have to take care of and b.) you can hang in your window?
Here's how to make yours.
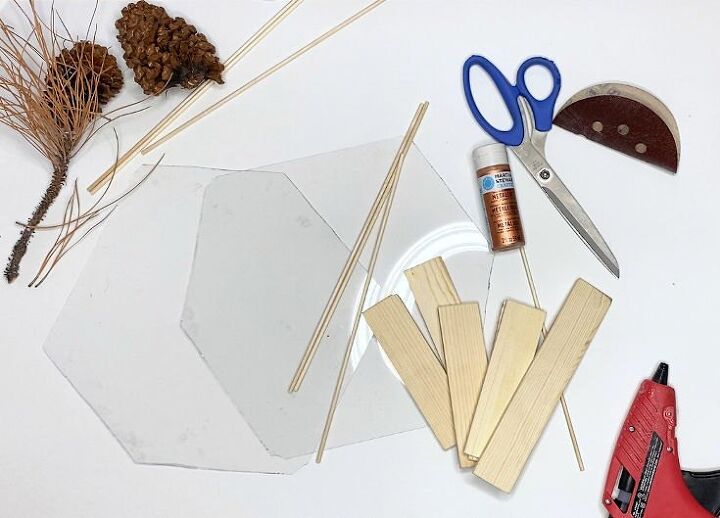
- 2 – 8 x 1 ½ inches Pieces Craft Wood
- 4 – 6 x 1 ½ inches Pieces Craft Wood
- 4-5 1/4 to 1/8 inch diameter Craft Dowels
- Copper Paint
- 2 Thin Acrylic Sheets
- Various Fall or Winter Filler Elements
- Small Eye Hook (or Picture Hangers)
- Fishing Line (If using eye hook)
- Hot Glue Gun & Glue
- Sharp Scissors
- Sandpaper
- Paint brush
- Ruler
To start, cut two acrylic sheets into a hexagon shape, with the top and bottom being 8 inches long and the 4 remaining sides being 6 inches long.
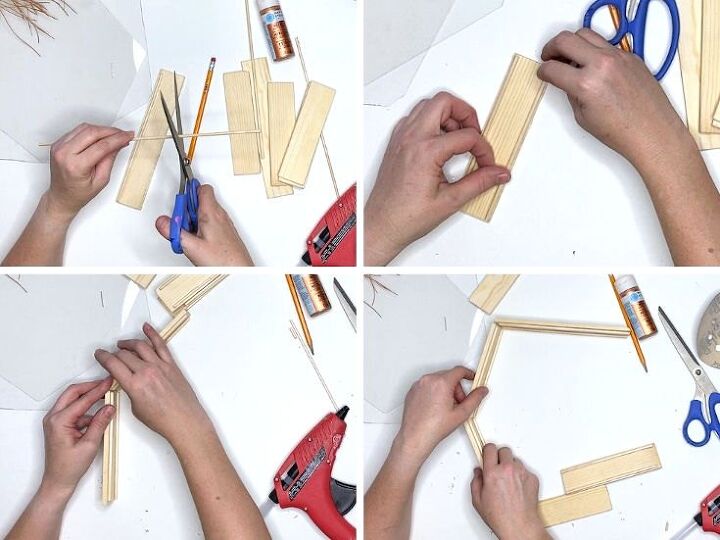
Now cut the craft wood down to size. Use a ruler to measure out two pieces of wood that are 8 x 1 ½ inches each, then cut to size. Follow with four more pieces cut down to 6 x 1 ½ inches.
Next, use a pair of scissors to cut the dowels down to the same length as each of the craft wood pieces. You will need two dowels, cut to size, for each piece of wood.
Hot glue a dowel, that is an equal length to a craft wood piece, about 1/4 inch from the edge of the craft wood. Then repeat on the other side of the craft wood with second dowel. Repeat for six of the craft wood pieces.
Cut six additional pieces of wood craft so they are about 1 1/2 inches long. They should be equal to the width of the craft wood.
Hot glue one of the small dowel pieces to each end of both of the longer craft wood pieces.
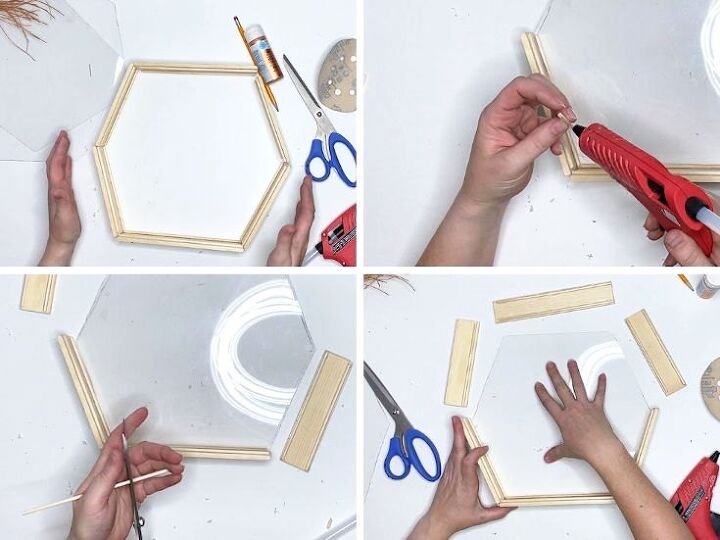
Now place the craft wood pieces on their sides in the hexagon shape, using the acrylic sheets as your guide.
Next, hot glue the ends of the short craft wood pieces on either side of each long pieces of craft wood. Do not glue the short pieces together.
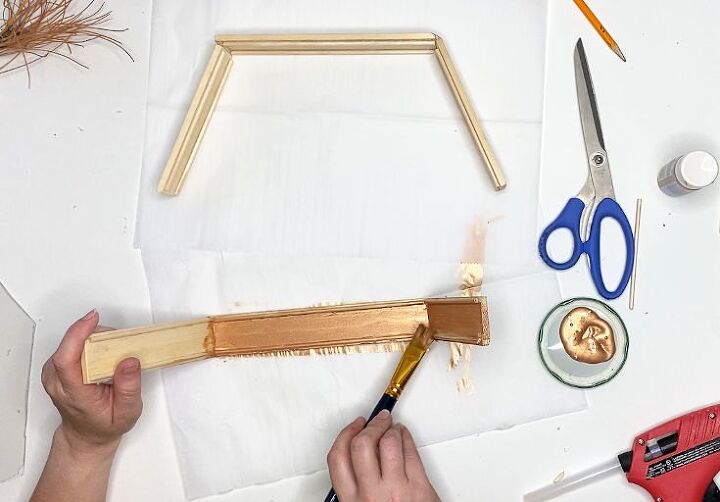
Paint all of the craft wood pieces and dowel pieces with the copper paint. (Or another paint color of your choice.) Allow the paint to dry fully before moving on to the next step.
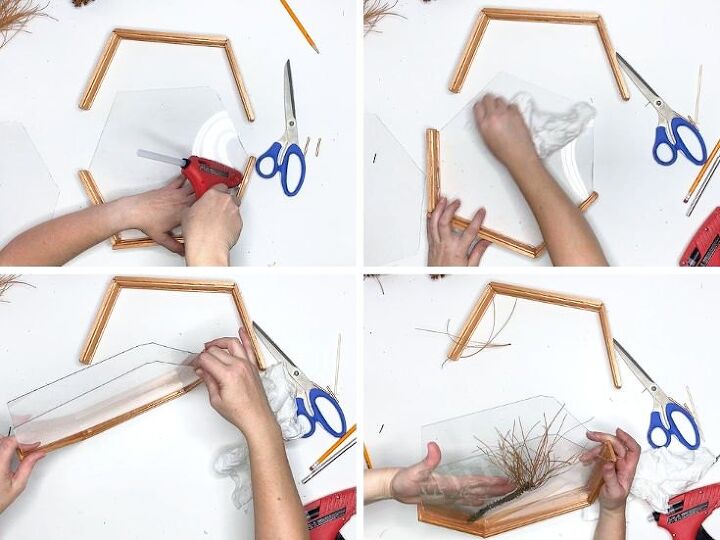
Once the paint has dried, slide one of the pieces of acrylic into one of the wooden half-hexagons of craft wood. Use hot glue to affix the acrylic sheet in place, so that it is pressed against one side of the dowels.
Now slide the second piece of acrylic into the half-hexagon of craft wood. Hot glue the second sheet of acrylic into place.
Before filling your DIY suncatcher terrarium, first clean each of the acrylic sheets. You’ll want to make sure they’re really clean. So think, spring cleaning those dirty windows!
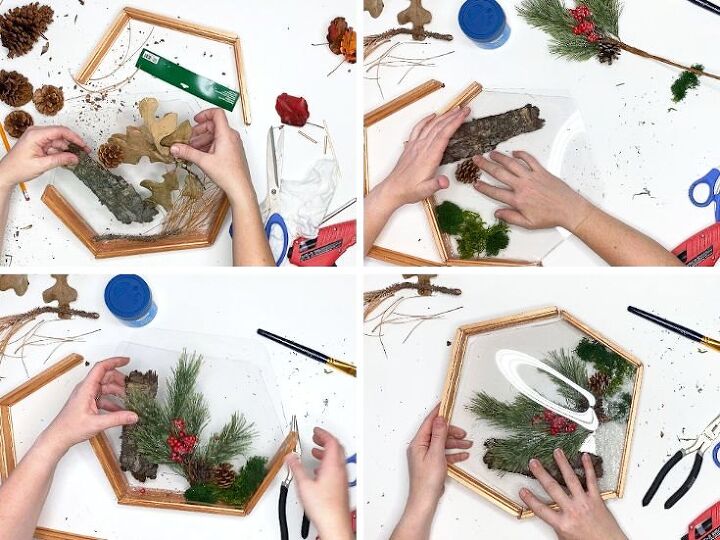
Once the acrylic is clean, fill the interior between the acrylic sheets with your chosen fall or winter filler materials. You can hot glue them into place on one side, if necessary, to keep them from shifting or moving around. These elements can include pine cones, pine needles, glitter, faux floral evergreen branches, tree bark, or any elements of your choice. If any of the pine cones or other fillers are too wide for your suncatcher, and deform the acrylic, simply cut them down with your scissors.
Once you’ve completed the arrangement, slide the second half-hexagon piece in place over the acrylic sheets. Then hot glue the joints between the two half-hexagon pieces together. For a more polished look, you can sand down the glue and paint over it.
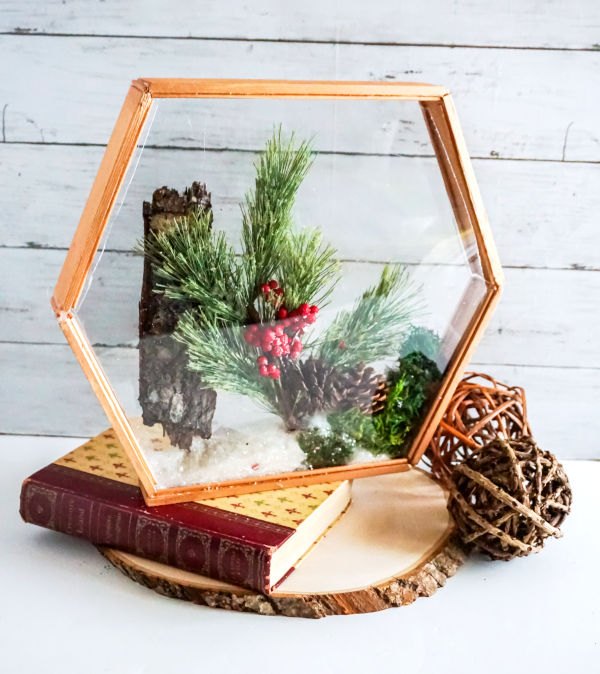
Your DIY suncatcher terrarium is now ready to display in your home as winter home decor. If you’d like to hang your suncatcher in a large picture window or on a wall, simply screw an eye hook into top and attach fishing line. Or attach a picture hanger the back. Otherwise, your suncatcher terrarium is ready to display, as is, on a shelf, a holiday mantel, or on a table.
Resources for this project:
See all materials


Comments
Join the conversation
-
Cool Beans!!
-
Very pretty. Creative idea.


Frequently asked questions
Have a question about this project?
I wish I had a bigger screen!! I love this but I cant see how the dowels are attached to the craft wood😟 where did you find the acrylic? Is that an upcycle or did you purchase it?