


Santa Inspired Wall Hanging
Do you ever run across a wood piece or frame or vessel and a random craft idea pops into your head? When I created this half round cutout with my business partner, for some reason, I just kept coming back to Santa!
I hope you enjoy this interpretation 💕
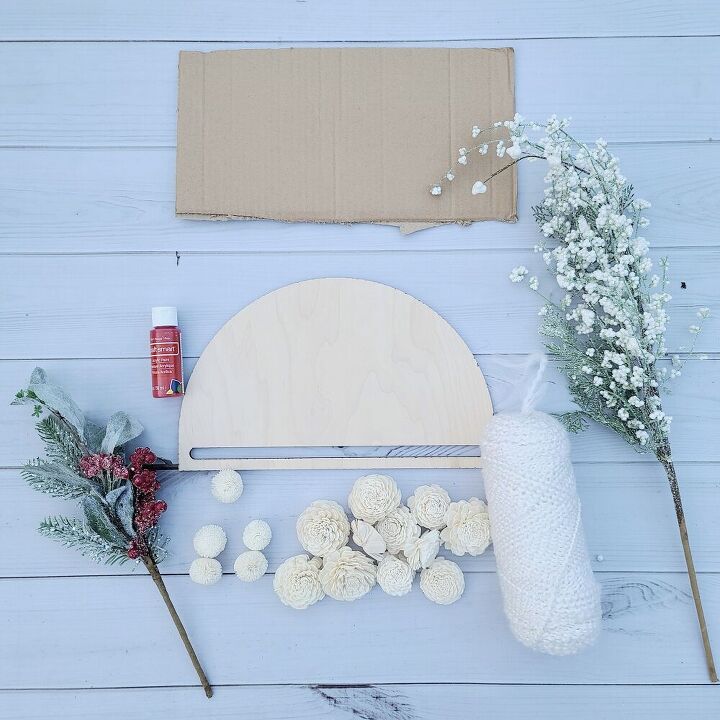
Here is what I used for this project:
- 14" Half circle wood cutout
- Cardboard flap (from an Amazon box)
- Wood flowers from Oh You're Lovely
- White yarn
- Craft acrylic paint and spray paint
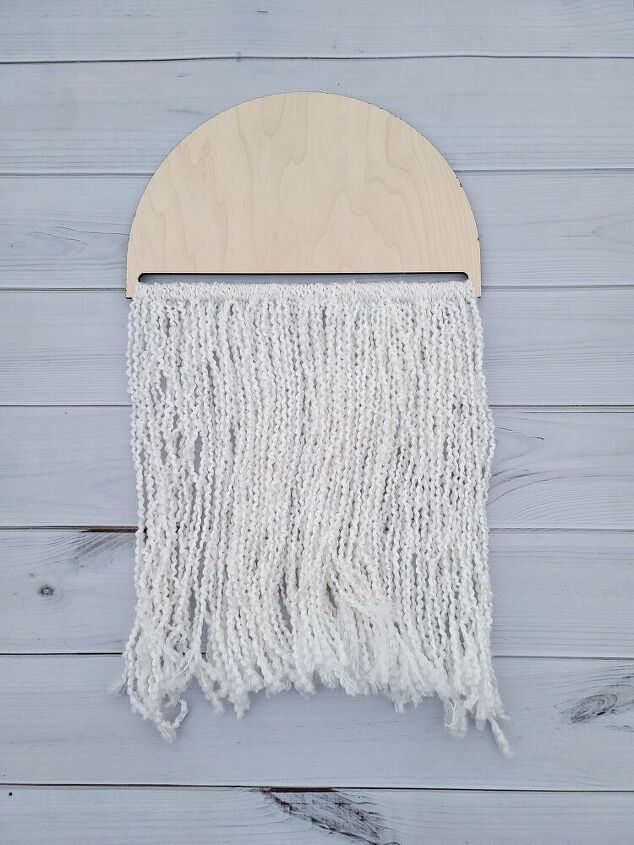
I wanted to create the illusion of Santa's beard and thought white yarn hanging from the cutout on the half circle would be perfect!
I cut the yarn into approximately 28" pieces but you don't need to measure this exactly as you will shape the beard when you are done by trimming the yarn ends.
Starting at one end of the opening, I created a loose loop with the yarn and pulled the end of the yarn through the loop (making sure the bottom piece of the cutout was in between}. It is a little hard to describe but I looped it around that bottom piece the way I loop a scarf around my neck!
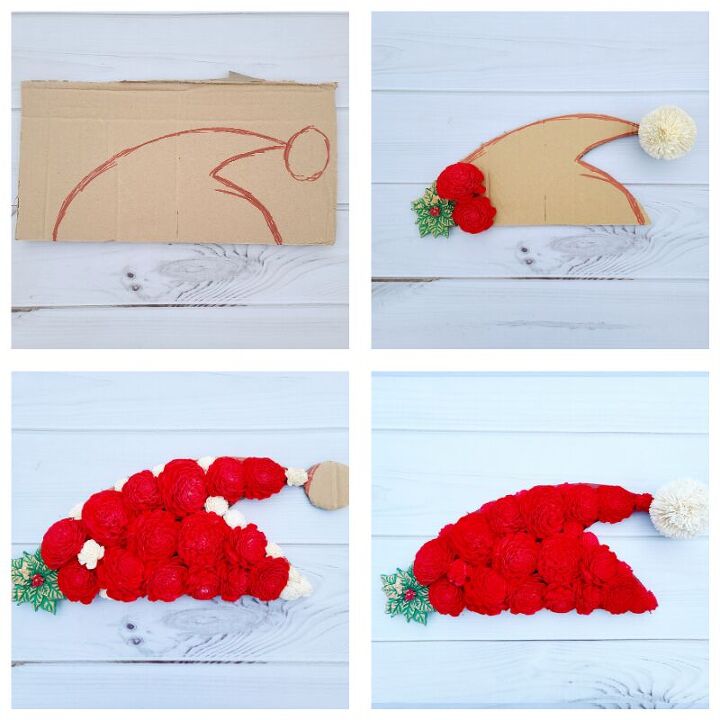
I am not the best freehand artist but since I wanted to cover the entire hat in wood flowers, it was okay!
Start by drawing a Santa hat on cardboard and then cut it out of the cardboard. Now it is time to add the accents and flowers.
While creating another Hometalk tutorial, I had created this really cute holly piece out of hot glue (you can find that blog here!). I thought it would be a perfect accent for Santa's hat so I added that to the corner with a dab of hot glue.
Next, I started to place the flowers (I used 2" marigolds dyed in red). Wood flowers are surprisingly soft and pliable so I was able to kind of squish them together to make sure the full hat was covered. In certain spots, the larger flowers were too big so I added in a munchkin marigold flower.
After everything was in and I liked the shape, I spray painted the white flowers so they blended in with the already dyed ones!
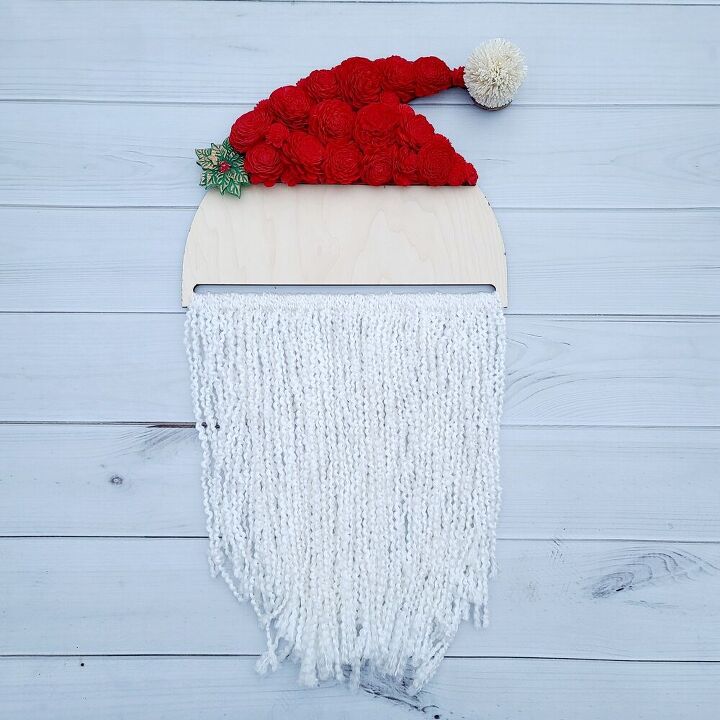
Once the spray paint had dried, I simply hot glued my cardboard piece onto the wood half circle! To hang this on a wall, I would add a command strip (the ones without the hook) to the back of the wood cutout.
I really enjoy the somewhat understated, minimalistic (I am normally extra extra so this is very subdued for me!) look of this piece as is. That said, you have so many options for what you can do here! You can paint on a Santa face, add Merry Christmas lettering to the wood (see pic below!), add more greenery...the sky is the limit with your options!
I love the hive mind in this community - would you leave this piece as is or would you add something else? Let me know in the comments!

Resources for this project:
See all materials


Comments
Join the conversation
-
I think I'd make some bushy eyebrows and instead of words put glittery snowflakes on the hat! I love tgishis it lends itself to individualitt. Think what some kids would do with these! Fun!,
-
Make your own circles or research to find less expensive. Or use the tops of pizza boxes or any cardboard, make two and glue together to be more sturdy, then cut in half. You don't need the slot in the circle. Ann suggested mops from Dollar Tree. Great call! Mop or yarn you can brush out to make fluffy. With the yarn you can cut a length of white yarn and then cut the lengths of the "beard" yarn and make larks head knots around the length of yarn. Glue to half circle and If you want the hat 3D make red pom poms and a white one for the tip. Can also do a brim of white pom poms. You can also use any fabric you have on hand to make the hat, even an old sweater you are going to discard or give to charity. Cut and glue. You can freehand with hot glue the holly leaves and then make the leaf veins by using a hot nail and scribing onto the cured hot glue leaf. Or use felt. I do want to thank Stephanie for the idea and will be saving this post. I like to find ways to cut the cost of crafting but keep the high end look of a project.


Frequently asked questions
Have a question about this project?