1. Clean the tire
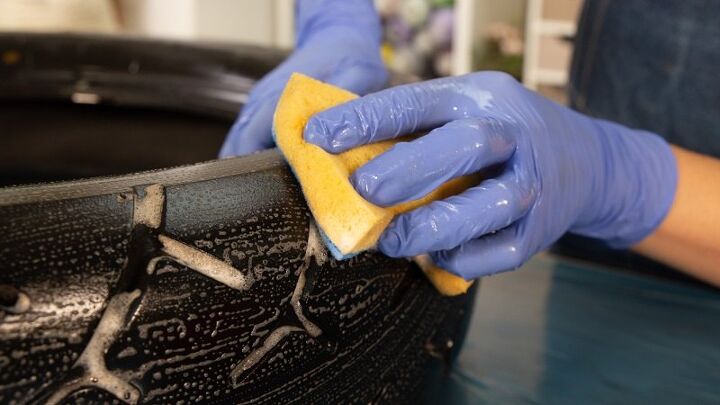
Let's do it! The first thing you have to do is take your tire and clean it both inside and out. To do this, use a stiff bristle brush, and run it all over the rubber until you make sure you have removed any traces of dust or dirt.
We bring you another idea to recycle a used tire! This time we have created a stool that opens to store magazines, small objects ... Anything you don't really know where to put! If you are also one of those who no longer know how to store everything they have at home and you also want to decorate your home with a very original seat ... This project is for you!
1. Clean the tire
Let's do it! The first thing you have to do is take your tire and clean it both inside and out. To do this, use a stiff bristle brush, and run it all over the rubber until you make sure you have removed any traces of dust or dirt.
2. Measure and cut two pieces of wood
Take your meter and measure the space inside the wheel, between the middle of one of the edges and the middle of the opposite. This measurement will help you trace the diameter of the seat covers.
Transfer the dimensions of the diameter to the wood and draw two equal circles. For this, the simplest thing is to screw a wooden strip to the board and use it as a compass (you must make a hole through which a pencil can pass, which is at a distance from the screw equal to the radius of the circumference). Then, you just have to turn the ribbon and it will be a perfect figure.
Next, cut the two circular caps with a jigsaw and sand the edges well to ensure a smooth, professional finish.
3. Paint the tire and base
It's time to color your seat! Take an acrylic paint bottle of the color you prefer and paint the outside of your tire, as well as the piece of wood that will be placed on the bottom of it, with the legs. Then let the paint dry for the amount of time indicated by the manufacturer.
4. Screw the base to the tire
It's time to assemble the structure! Using a drill, drill several screw-sized holes in one of the wood caps that will attach the wood to the tire. Then insert them so that the heads are on the outside of the seat. To secure them, you must turn the tire and, from the inside, tighten them with nuts, using a wrench.
We have used 4 screws.
5. Attach the legs to the base
The next step is to place the legs on the base of the seat. To do this, we recommend marking with a pencil where you want each one to be placed. Then make the holes following these marks. Remember to use a drill bit the same size as the screws on the legs. Insert them and secure them with nuts from inside the seat.
6. Upholster the seat
You have now reached the final step, with which you will finish customizing your seat. 🙂
Take a sheet of foam and draw a circumference slightly larger than the circular seat covers. Cut it with the help of scissors and "wrap" the cover of your seat, stapling the foam to the wood.
Repeat the procedure but with a piece of cloth. It is important that you choose the design of the fabric carefully, as it will be what stands out the most from the stool. Cut it off and staple it to the inside of the lid, over the foam.
The stool is ready! What did you think of this tutorial? Leave us any questions in the comments section.
Barring the smell the finished project looks great. I would use it on a covered patio. As far as comfort, I would add a 3 or 4 " piece of foam lightly glued to the foam sheet. Cover with fabric and staple onto the bottom of the seat overlapping the foam sheet. For outdoor use, I prefer PVC legs.
Do you like to give things a second use? And the plants? Then watch this tutorial: transform a used...
A classic of recycling! If you have a used tire on hand and a good garden, you can make a DIY swing...
Do you like original furniture? Then we have something for you. We tell you how you can make a round...
A few months ago I finally got around to painting our black "starry night" 90s fireplace.Here is...
I wanted to decorate the front porch for Valentines but I couldn't find exactly what I wanted to...
My most favorite DIY of the year, my girl's bathroom! Just like all of my projects, I tackled this...
I desired some kind of shelf for my workshop tools, but wasn't really sure what to build. I mean,...
When trying to clean out my garage a while back, I needed a place to store not only my wood for...
If you're wanting to make changes to your garage, you are sure to find some ideas you can use in...
We completely transformed our garage/shop from ugly and cluttered to clean and organized using...
Your garage might just be the hardest-working space in your house -you use it as a workshop, a...
As an avid DIYer I always have scrap wood laying around so I decided to try to make a simple stool...
I may be more excited about this project than any I've made recently, because it's a gift for my...
To improve posture, to improve circulation or simply to be able to work with a little more comfort....
A tire, T-shirt yarn, and methacrylate. So you can make a round table with these three materials and...
Please take a minute to click here to sign up for the Mother Daughter Projects weekly newsletter....
Do you want a special place to put your favorite plant? Watch out for this tutorial! This is how you...
Do you like low seats? We show you how to transform a used car tire into the new beanbag that your...
Do you want to give your garden an original touch without scratching your pocket too much? Watch out...
Dogs at home? Recycle a tire and build a very creative homemade drinking fountain that will be the...
With all the organizing going on in social media, I was officially bitten by the "I need to get my...
This is the time of the year when my brain just wants to organize everything in sight. If you’re...
A Beginner’s Step By Step Guide For Planting Dahlia Tubers
Let’s make these easy DIY farmhouse style stars today! You will see how easy it is to make these...
Whether you have an intimate gathering of two or a wedding with 200 people, a charcuterie board is a...
These rolled paper roses are so easy to create, and there’s just something about winter that makes...
Hello Dear Friends,
I am so excited about today’s project!
*This post contains Amazon affiliate...
I know this has been done so many times but it never gets old when you have a chair that you come...
How cute are Conversation Hearts?! How about making some to hang in your front window or even on...
I had a client want his antique hutch his Grama gave him a bit more modern but to still be used in...
Today's project I am sharing with you all on hometalk the basic information on how I made this...
I found this piece from my local Facebook marketplace. I say local but I did drive about 50 min to...
I saw on YouTube people making an ottoman or a bench by them selves and i always anted to to do one...
It's amazing what a 1/4 inch piece of plywood can do!Before remodeling our master bedroom and...
I have updated several thrifted magazine racks with new paint to be used as magazine racks. But,...
DIY Cleaner and Bathroom Spray with witch hazel, two simple recipes that you can use in your home....
15 seconds from a breakfast bar to a dinner table! For three years, we’ve been trying to figure out...
My sister bought - what was supposed to be- an antique wash stand. It actually was a poor knock off...
Have a question about this project?
What did you do about the rubber smell? I have purchased recycled rubber items and could not tolerate the smell.
I would make the cover water proofs and use on a patio
Wouldn't these also be perfect for a man cave?
Absolutely a good idea. If the cave is well ventilated like a garage or shed.