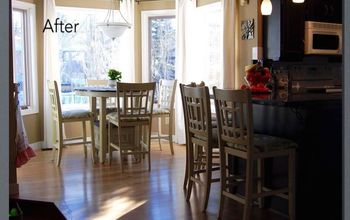
This old table and chairs will be used in my sewing room in our farm house. I recently updated my cedar chest and sewing table to go with this table.
I applied car wax to the chairs and table legs. I applied water based poly to the table top.
This old table and chairs will be used in my sewing room in our farm house. I recently updated my cedar chest and sewing table to go with this table.
I applied car wax to the chairs and table legs. I applied water based poly to the table top.
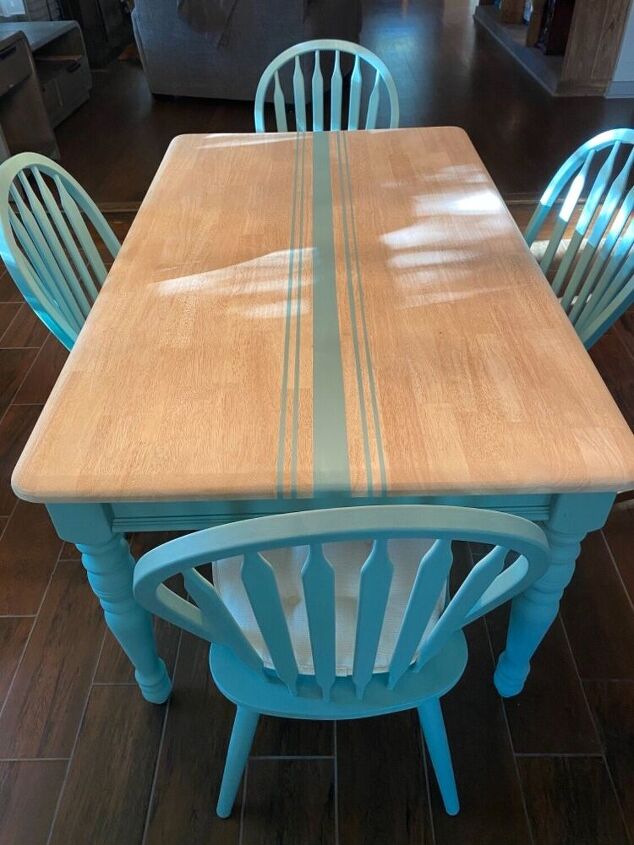
Finished table and chairs except for a few more coats of poly on the tabletop. The sun is shining through the trees through the window and makes the white marks.
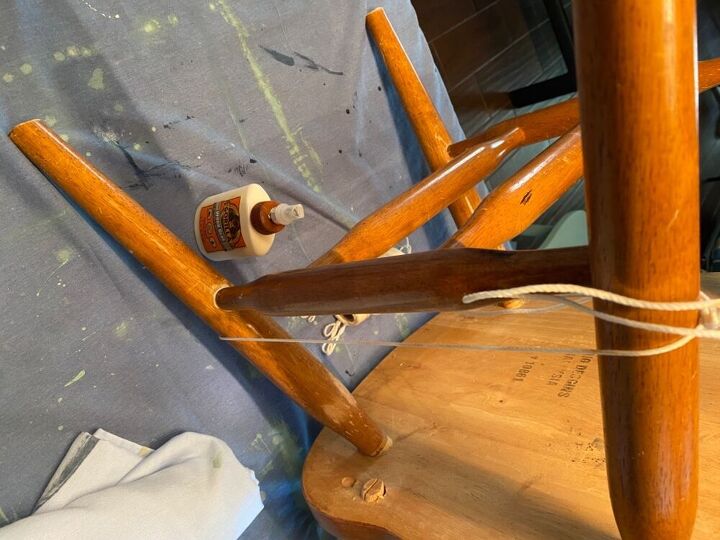
Several of the chairs were in bad shape. I used wood glue and string.
The backs and legs of the chairs was where our cat George used to sharpen his claws. George lived to be 15 years old. I sanded every chair that had rough wood before I painted.
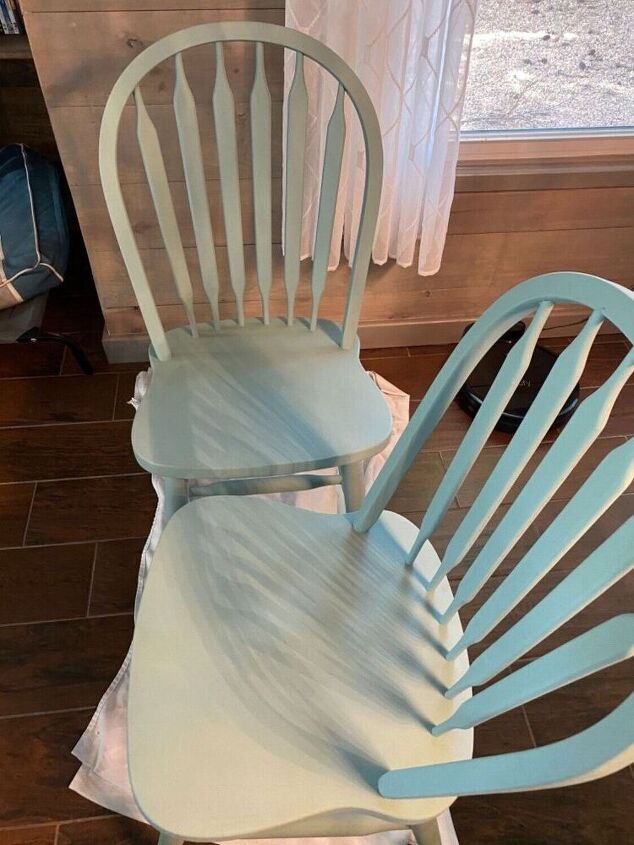
First coat of milk paint on chairs.
Mr. helped me carry the table outside so I could sand the top. I sanded the lip around the table top smooth.
The rubber back of the cushions are great! The cushions do not slide off!
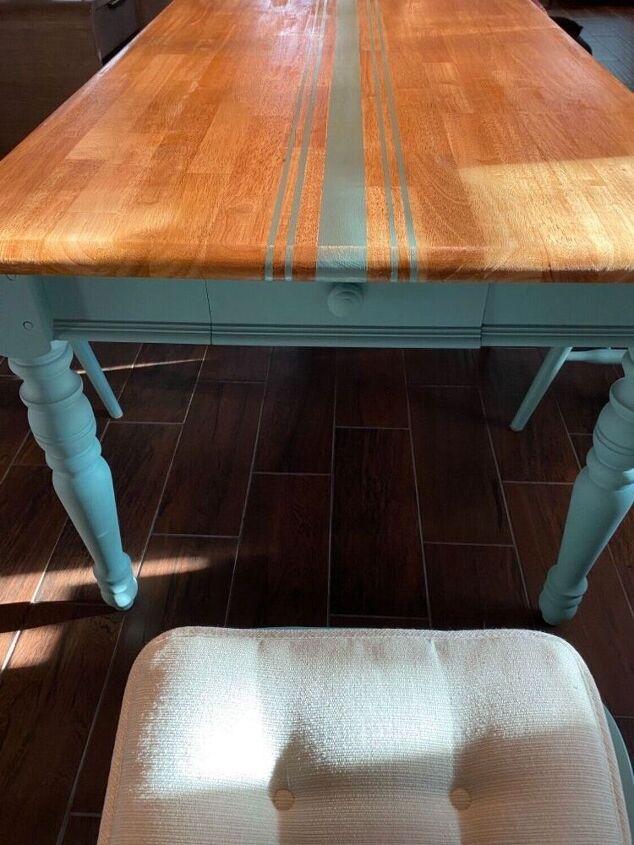
I added the grain sack look to the table top using blue painters tape and milk paint.
What did you use the polcrylic for and how did you apply it?
I have one of those butcher block round drop leaf tables that were so popular in the 90s.
I love your feed sack idea.
Would you do one set of stripes, or two? It’s a three foot round table.
I would do only one of the full stripes needed to get the grain sack effect. Less is more. 😊
Thanks. Good idea
Great job, but I have to warn you, the backing on the cushiones will leave mark's on your chairs, the nonstop backing kinda of days into the finish. I replaced mine with ones that have ties and are reversible.
I’ve had cushions with ties. I’ve had no luck with them. The ties pull out when we moved around. This rubber is light and full of holes. I have these same cushions on my pub table. So far so good.🌴
Thank you for warning me but so far so good.
Beautiful job! Love the color! But as Diane stated, the cushions will destroy your chairs. That’s what happened to mine....Walmart sells cute tie on chair cushions.
I bought mine from Amazon. I’ve bought several sets from Walmart, Target etc....always pull apart. So far so good on these on this set and my pub table. Thank you for warning me.
A fabulous refurbish job. The color is so inviting and the finish on the top of the table is so pretty. A job to be very proud of.
I would love to have something like this in my home. I love it!!.
Your table is wonderful! The taped stripes down the center makes this table stand out ahead of any other kitchen table re-do i have seen. You nailed the different stripe widths in perfect proportion to the length of table. And, i think waxing, not painting, the table top topped off a stunning project!
So pretty!
such a great idea. Would also look so cute for a little girls table and chair set. Just add a few curlicues to the stripes. Love the colour you’ve chosen.
Really pretty. I have similar old chairs, this gives me some inspiration.
Very inspired by this, I'm in the process of clearing out a spare bedroom full of containers of home decor and the room will be my craft and sewing room, I was undecided if I wanted to install a countertop with cabinets or a large desk with a hutchtop added, after seeing your lovely table and chair set I'm now knowing this is what I want to do since its a large room
I’ve always preferred a table to craft or sew. I think I sit in every chair being able to reach my project. Good luck with yours!
Green with envy here! I have a heavy sewing machine so I only sew on my very sturdy butcher block kitchen table, very inconvenient as it’s in the kitchen plus table is round so I need to use ironing boards to hold up large projects on the left. Table appears perfect to handle such things like quilts and curtains. Looks very pretty and just might start searching for an old table/chairs to make a more useable/convent sewing space. Nice work
My wife and I decided we needed a new dining table and we wanted something a little different. So I set to work making a DIY wood dining room table with a bent lamination feature. The table looks great in our home and would look great in yours too. Remember, the fondest memories are made when gathered around the table!
After building a dining table for our breakfast area, I’ve built and created plans for a DIY Dining Table Bench with Curved Legs. I took the same leg design from the table and scaled it down to about 18” in height and designed the bench to match the table. To make the seating more comfortable, I added a cushion on top and wrapped it with fabric.The entire bench was made from one full sheet of ¾” plywood and a lot of wood glue. This bench could be easily adjusted to different lengths. If you’re interested in matching dining table, you could find the plans here.For this DIY dining table bench with curved legs, I used a Surebonder staple gun to attach the fabric to the bench.
Do you have a furniture piece that has a great finish but the stain color is not what you want? Follow how I used a product that can change the color OVER an existing finish.
I've see these so many different ways, from covered with twine to wrapped in yarn. My version FABRIC!!
My sister just moved in to a new house and her daughter is getting some new furniture. So naturally I step in. She's very feminine and whimsical so I had some ideas.
This post is sponsored by Rustix. All opinions are my own. Wood walls, wood boards and any sort of wood home accent has become a “thing.” I have to say I think this popular trend is here to stay! We recently swapped out our master bathroom vanity for a larger one, added a checkerboard accent wall and a new light fixture. When Rustix reached out to collaborate with a wood plank project, I knew exactly where I wanted to use it!
My kitchen table was a hand-me-down of a hand-me-down and I wanted a new one but it just wasn't in the budget. I decided to do this instead!
I have had this sewing machine for quite some time. A friend of mine left it here. I decided to turn it into a phone station after seeing another one similar to this one (which you can find on my blog)
Looking for ideas for an Old Sewing Cabinet. Find inspiration on transforming a Vintage Sewing Cabinet that may be sitting in the corner collecting dust. Sewing Cabinet turned Desk Transformation, a super easy furniture makeover. I'm Cynthia Nessel from Create With Cynthia and my website is all about DIY Home Decor Projects and Vintage Furniture Makeovers.
Isn't adding grain sack stripes to projects such a classic look? I've done it many times over, and it never gets old!But one thing I hadn't done yet was to create a woodgrain effect where the grain sack stripe sits instead of a painted version...So I jumped at the opportunity to try it on a recent wood stackable chair find I landed for cheap!The result? OH MY GOODNESS. This piece is SO handsome now in comparison, don't you think?Here's what I did:
Currently trending right now, Farm Tables and Farmhouse Decor are EVERYWHERE! I recently had a client that wanted to transform her outdated dining room table she had for years into a rustic Farm Table without breaking the bank. I was able to do just that using just one material- PAINT! This DIY Farm Table is super simple to tackle and create and will save you a ton of money. You'll be loving your new farmhouse decor in literally a day.The best thing about this technique is that you don't have to use a natural wood table. Even if your table is mahogany or dark cherry wood, just by using a good oil-based primer and some paint, you can transform it into a farm table. Try this technique out on any table in your home, whether a coffee table, end table, kitchen table, or even a headboard or wood plank wall. Anything made of wood would look amazing using this process.To start, simply sand down the entire table to get off any rough spots or debris. Wipe clean and prime the table entirely using a good oil-based paint if your table has a shiny varnish topcoat, or is super dark. If not, a regular water-based primer will work just fine.
If you’re into DIY, but working on a budget then you NEED to be stalking Facebook marketplace and your local swap pages. I had been looking to change up the feel of our dining room decor, and really had my heart set on a round pedestal table with a gorgeous detailed base. If you’ve looked into purchasing a dining table with any sort of character then you’re well aware they can cost a small fortune. Diligent stalking of the marketplace let me to a table with a gorgeous base for a cool $75. SOLD.
Easter/spring is a great time to be creating with fun colors.They’re just so cheerful, especially this time of year.In between the cold grey winter and the warm green spring. We’re in the damp and brown stage right now. lol. Very boring.So, this is a perfect time to be creating something quick, easy, inexpensive, and colorful.
Get the steps to create a photo banner to decorate for your next celebration. Photo banners are perfect for milestone birthdays, graduations, retirements, anniversaries, or showers.For more simple and budget-friendly DIY project ideas, be sure to follow us on HomeTalk and visit our blog!
I gave our wet bar a glow up makeover with new paneling and stools.
Have you ever made such beautiful dyed Easter eggs that you just wanted them to last forever?To me, there’s nothing like decorating with real dyed eggs. But unfortunately you can’t keep traditional hard-boiled, dyed Easter eggs.But there is a way to use real dyed eggs in your decor. Years ago I learned how to blow the egg out of its shell so I could dye or decorate the shell to keep for my Easter decor year after year.And it’s so easy to do!
Making this little macramé hanging pod is a bit trickier than a simple wall hanging, but it is well worth the effort. I already have a ton of ideas in mind for these little baskets. They would look adorable used for storage on a nursery wall. I also plan on making some for my son’s upcoming wedding in an actual old barn; how sweet would these look hanging on rustic wooden columns? So take a little time, learn this technique, and you’ll find a myriad of uses for your macramé hanging pod.(Affiliate links included for your convenience. As an Amazon associate I earn from qualifying purchases. See disclosure here.)supplies needed:The finished size for this hanging pod measures 6″ wide x 15″ length (basket only). The fringe adds another 12″. 3mm cord:4 pieces, each measuring 8 feet4 pieces, each measuring 6′ 6″4 pieces, each measuring 6′4 pieces, each measuring 5’8″16 pieces, each measuring 5’4″one piece, measuring 3’6″preparationCut pieces of cord according to the lengths shown above. Be sure to tape all ends with painter’s tape to avoid fraying.step 1 – make the handleGather the 4 pieces of 8′ long cords and find the center. Create the handle by making a row of Square Knots measuring about 5 inches long.
I’m excited to share this easy to build mudroom bench with you today. Certainly every home needs to have some sort of storage system like this. In fact, that was the case for the income suite that my son and daughter-in-law had built in their basement.A few weeks ago my daughter-in-law, Megan sent me a picture of a mudroom bench. She was wondering if I would help her build one for their basement apartment. After all the time and energy spent finishing their basement, Alex was tired of projects and was not interested in building mudroom storage for their renters.I was excited to help Megan with this project. You see, a few years back she had asked for a table saw for Christmas and she had never really used it. I thought his would be the perfect opportunity to teach her how to use it and get her over her fear of power tools.Well, as it turned out, I didn’t get to help much after all. After a trip to The Home Depot to buy the supplies, Alex came home and started to build the mudroom bench. In fact, by the time I arrived on Saturday, the bench was built. My only portion was to paint the mudroom storage bench with my Wagner paint sprayer.All of the supplies to build this mudroom bench are readily available at The Home Depot. Purchasing primed boards, saves time in the painting process.In addition, you will also need a few tools. A pneumatic brad nailer makes it go up rather fast. However, if you don’t have one, old fashioned hammer and nails will work. In addition, a drill was used to secure the shelf brackets to the wall as well. But you can muscle it with a screwdriver.This post contains affiliate links for your convenience. As an Amazon affiliate we earn from qualifying purchases. See our disclosure for details.)Supplies: primed shiplapfarmhouse arch bracket3/4″ mdf 4×8′ boardspackling puttycaulk48″ unfinished pine stair treadwood glueprimed 2 1/2″ x 8″ boardwood screwspaintstainMinwax Wipe On PolyTool:pneumatic brad nailerdrill/driverWagner paint sprayer
Looking for a quick yet unique centerpiece for your Spring table? This Red & White European Dish Garden is just what you need!
I always love cloches! They are so much fun to fill with cute holiday items and this one is no different. The best part of this project is that it's made using Dollar Tree items. I am sure you all know by now that my passion is creating crafts on a budget and I do my best to make them look boutique worthy.Let's get started on another fun creative craft!
I love brown, boring furniture. Especially great bargains with interesting bones. I snagged this beauty for $30 on line. A forty minute trip to and from and I was already trying to imagine what this creature could look like.
Thanks to DecoArt for providing products used in my bathroom makeover. This post contains Amazon affiliate links.
Got a blank wall and 30 minutes? Paint an arch! This is such a great way to liven up a space or try a new color. AND! If there’s one thing I find myself saying OVER and OVER, it’s, “it’s just paint.” Don’t like it? Paint over it. Simple.
This kind of project is easy to make and will be an impressive addition to your home. I live in a beach community and make/sell these for beach towels left and right. But you can make something like this for your guest bathroom or use it as a coat rack in any room. Wood, hooks and a little imagination is all it takes.
I bought this wooden leaning ladder many moons ago. When I brought it home my husband commented that it really served no purpose other than to sit in a corner. When you placed things on it they would fall off so basically it just sat in the corner in our bedroom until recently. I had made up my mind I was either going to do something with it or get rid of it. So I came up with a plan.
This very well may be the easiest project I will ever post. For quite some time now I have wanted to make a tray with some of the pizza pans from Dollar Tree. I anticipated that I would have to get very creative in order to come up with a nice-looking tray. Imagine my absolute surprise when I finally embarked on this project and started... AND STOPPED with spray paint! That’s it! I originally planned to add a stencil design, (and may still later go back and add one) or “feet” so that it is a tad bit elevated. But the honest truth is that I do not feel that the tray needs them. I think for this project, simplicity is key!And if a $1 pan and spray paint wasn’t easy enough to create a tray, while writing this post, I realized that you could also use this “tray” as a plate charger when creating a festive tablescape! It’s a two for one!!!
I love Spring! I also love items typically found outside like statues, used inside for decorating. I found one I loved but whoa was it expensive! So..I achieved the look with a thrift store find.
Readers have been asking Chemistry Cachet to create an easy DIY Lysol spray, and we are finally sharing that post with you today!Please, visit our blog post linksfor answers to questions! We are sharing WHY we use hydrogen peroxide, how it compares to rubbing alcohol, and we also break down this spray vs the store-bought version. We have all the answers for you there.
I purchased this mid century modern dresser on my local Facebook marketplace and I knew I scored as it turned out to be solid wood!
I have 2 cats. Both are not picky at all with what I feed them but one throws up pretty often after eating. I've tried smaller portions more often and different food but nothing seems to really help. One day I was scrolling Facebook and saw an ad for a raised, tilted cat food dish and decided I would make one myself.
I used fallen tree branches to upcycle a dollar store vase for a fresh spring look.
This post is sponsored by ClosetMaid. All opinions are my own.We love a lot of elements of our little, old house, but the tiny closets are not one of them. We wouldn’t call ourselves fashion people by any means (most of our day-to-day pandemic wear is paint-stained project clothes, if we’re honest) but after a quick weekend closet makeover with ClosetMaid’s SuiteSymphony system, we feel like we’re shopping in a cute little boutique every time we get dressed.You can also get more DIY tips and hints at our blog Shoe Makes New.
Framing posters and kid’s art is really really expensive, so I had to turn to a cheaper solution - just a few bucks, that wouldn’t cost an arm and a leg.And it hit me: the best solution was getting dusty in my craft room, but I just couldn’t see it till now.It’s a half frame actually, but it worked like a charm for what I needed. Keep reading to see what I mean!
I refinish furniture for a living and staging that furniture for photographs is part of the job, so I need A LOT of home decor items to choose from. And let's face it, home decor is not cheap. A beautiful and unique vase will cost upwards of $20, and when I need that vase in multiple colors/styles, it gets super pricey. Sooooo....what better way than to create that vase yourself?Let's get to it....here's how I created this beautiful boho style vase..........*Time estimate is based off of work time only, does not include dry time*Price is based off of what I think it will cost someone to make this piece. I had everything except for the glass vase on hand already, so my cost was only $1 😁
A big thank you to Timberchic for sponsoring this post! A few weeks ago I created a small man cave. More like a corner really. Just a small wall that I designated as a music “room” for my husband and his 12,000 guitars.But when I was done? The rest of the space felt… flat.See, in creating the music wall, I’d drawn a whole lot of attention to how boring the plain white walls in the rest of the space really were.Luckily, I had the perfect solution...In this post, I’ll show you how to install a peel and stick wood plank wall using Timberchic river-reclaimed wood planks. Using basic tools, you’ll be able to complete this DIY in a single afternoon once your planks have acclimated!The BeforeHere’s a true before to give you an idea of what I started with. Hello endless white walls of blah.(Yes, this was taken at Halloween.)
I found this desk at a thrift store for $15. It was very sturdy and in fairly good condition. It just had a few scratches and general wear&tear. I decided to give it a facelift!
A client I had in the past msgd me asking for a dresser for her master bedroom! Gave me the general idea of what she was wanting and I got to work on what I thought would be the best one for her. Eventually I found the perfect one! And oversized antique! I love when clients get me to do something colour wise out of my comfort zone!
I used the poly for the tabletop and used those black sponge brushes to apply it. I sanded lightly with 220 after each coat dried. I’m on my 4th coat and might do a couple of more.