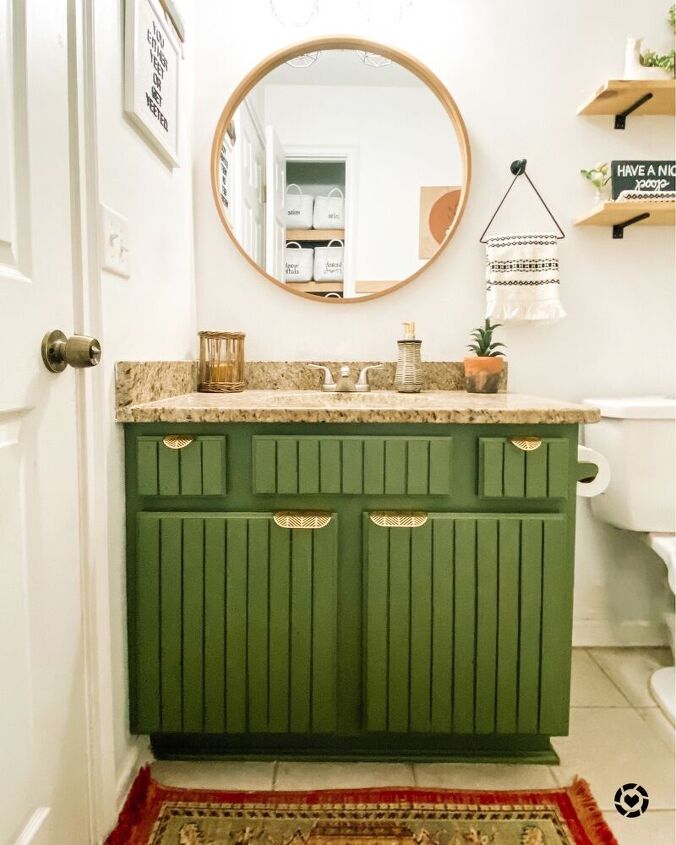
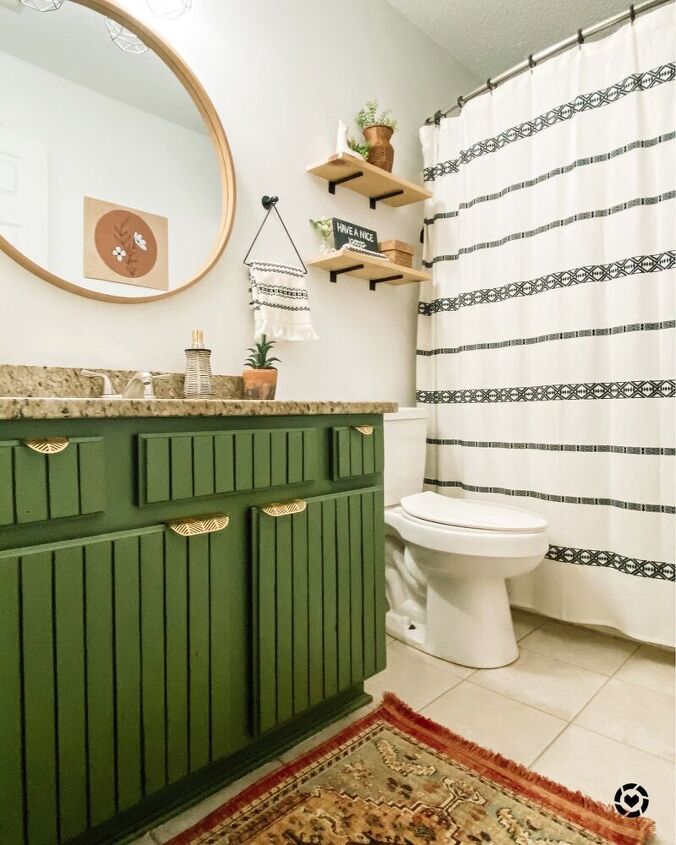
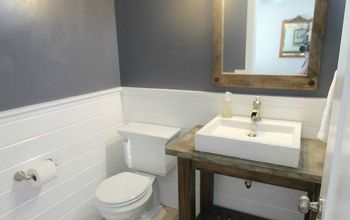
I wanted to update my boring builder grade bathroom vanity.
I painted it last year but was lazy and didn't prime so it was chipping and wasn't looking its best.
I wanted to update my boring builder grade bathroom vanity.
I painted it last year but was lazy and didn't prime so it was chipping and wasn't looking its best.
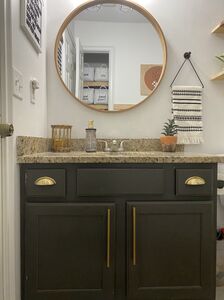
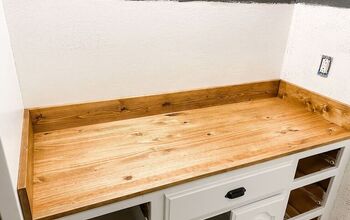
I decided I wanted to do a fun slatted treatment on the front like my kitchen peninsula so I headed to Home Depot and picked up these lattice/fill it strips for 98 cents a piece and then on to Lowes to grab some Valspar Cabinet enamel in Sherwin Williams Germinating Green, Cabinet enamel is so much more durable than regular paint as it dries to a hard finish that isn't as easy to scratch.
I started by taking off my cabinet doors. I cleaned the entire cabinet with TSP to make sure all the grime was off.
I had some 1/4 inch plywood left over from another project that I cut to size and nailed in the recessed area of the door. You could totally make all new doors with plywood but I chose to work with what I had on hand to make this as budget friendly as possible.
I then caulked the cracks, smoothed it out, and let it dry. You could also use wood filler but I was just using what I had on hand. I sanded it lightly and then primed everything with Killz bonding primer.
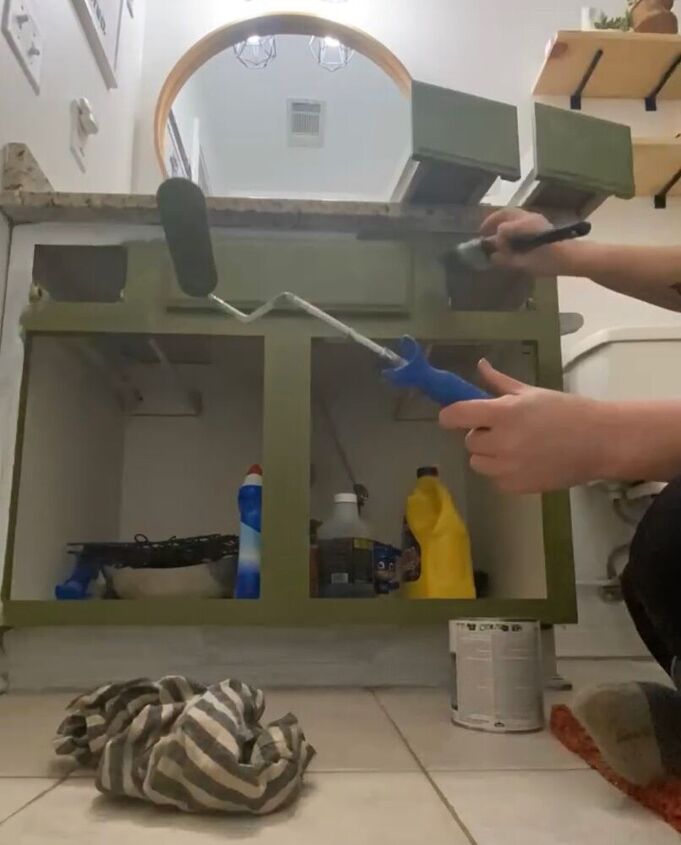
Once that dried, I did a light coat of my cabinet enamel. You want to let it dry 8 hours between coats and it usually takes 3 coats to get the coverage you want.
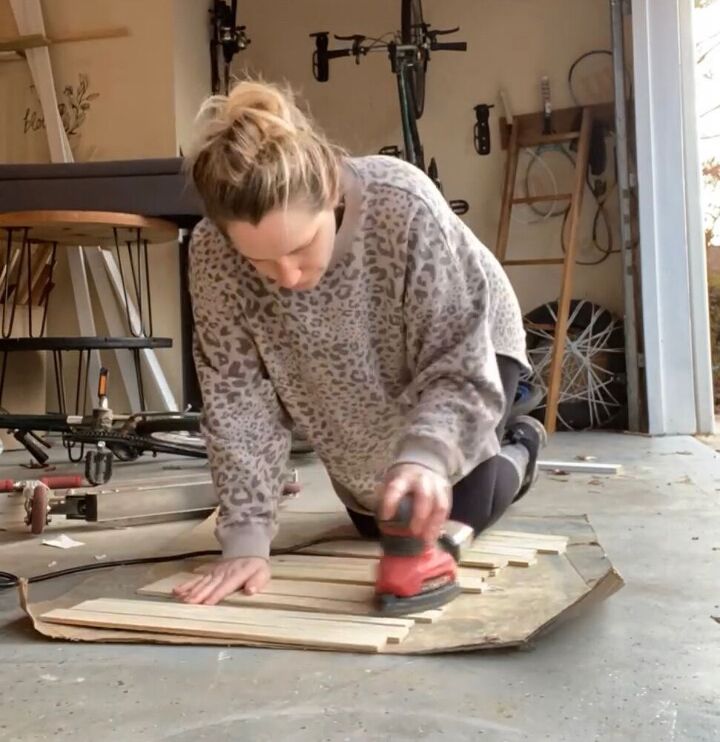
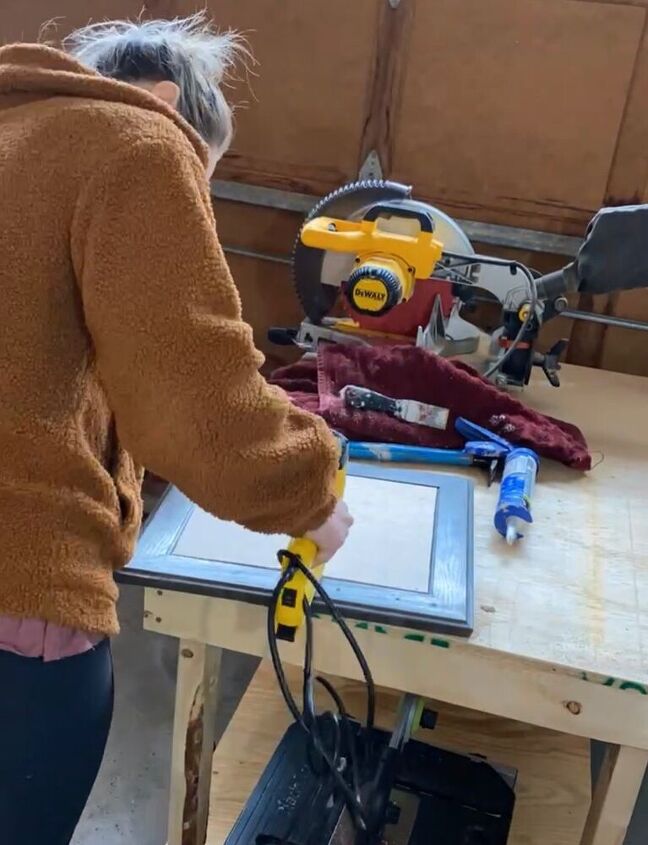
While that was drying, I cut my wood strips to size and figured out my spacing. Its tedious, but you want to sand every piece to make sure its smooth. No splinters here.
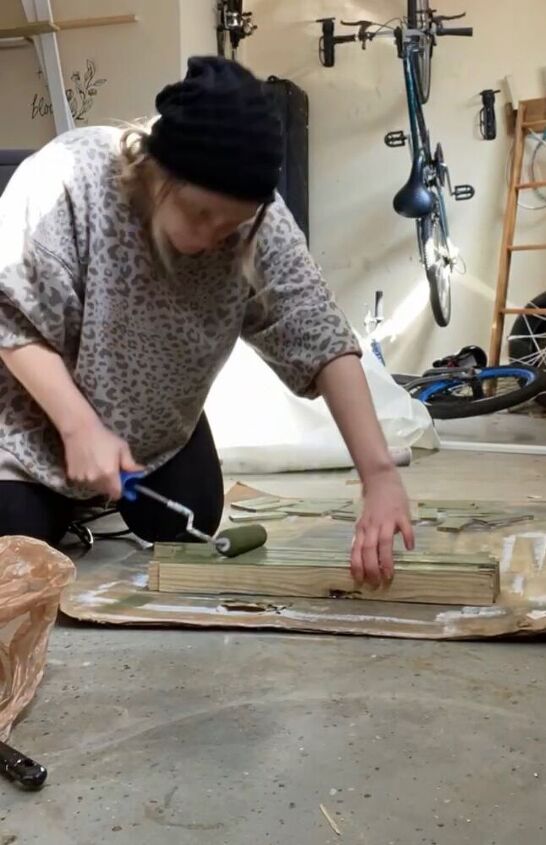
Then you will prime each piece, and then paint each piece with a first coat. I bundled them together to do the sides so that it went a little quicker.
Do a second coat on everything and allow to dry for another 8 hours.
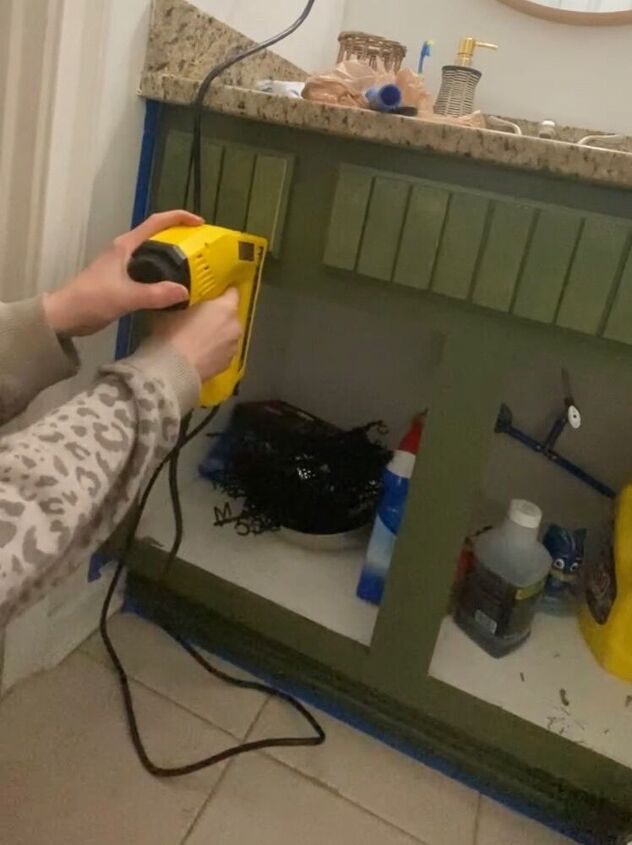
Once dry, attach the wood strips with brad nails or wood glue, then do a final coat of cabinet enamel.
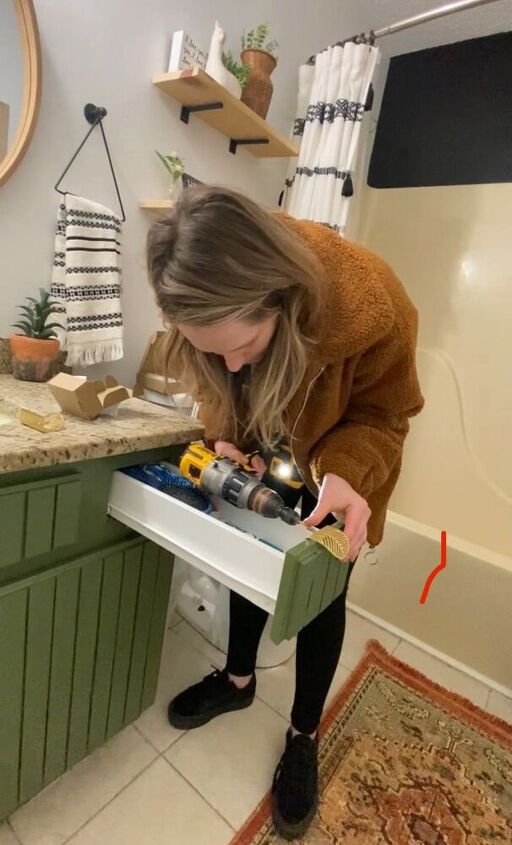
Allow to dry and then you can install your hardware! I snagged these and these on Amazon, and only used half so I have enough to do another vanity!
You can shop this screenshot on like to know it
Be sure to check out the entire process on my Instagram!
@baker.blooms
What is the hardware handles / pulls?
Love that green. We have two toned our interior house walls with a green similar to that on the bottom half and a couple of shades lighter on the top half and we are loving it. What a fab job you have done and what a difference it makes. Really neat.
Thank you Gail! I love green
love, love it!!!!!!!!!!!!!!!!!!!!!!!!!!!!!!!!!!!!!!! And I love that green!!!
Ahhh thank you so so much!
Really pretty
Thank you so much!
Wow. Turned out beautifully.
Thank you
Love the paint color choice ...and those handles are like a jewelry for the vanity...beautiful!!
thank you!
That looks terrific - I especially love the hardware!
I do too’ thank you!
Wow what a transformation. I love it all, the wood strip addition, the paint, and the hardware. Just beautiful.
Thank you so much!
what color are the cabinets painted please? They look amazing!!!
Thank you! It’s Sherwin Williams Germinating Green
Mirror, shelves and now vanity tie in so nicely! What a unique idea!
Thank you so much!
So awesome, i have a similar vanity with same top. I might want to copy you instead of spending money on a new one. Then i can put that money toward a bidet!!! thanks for the inspiration.
Saving money is the best! So glad you like it!
On to the vanity area! So, we had pulled the old, peeling wallpaper down, I washed down the walls to remove any paste. Primed. Hubs painted a base coat, ceiling, I then sponge-painted using three colors, with a glaze additive, played around with it until I liked the look. I could live with the floor tile, the tile in the shower (which we had added the accent to break it up plus I hated that soap dish in the middle of the wall, it was useless.) The vanity was functional for the space, I didn't mind the Corian countertop, but the sink basin was bad. I originally thought to cut it out and put an undermount sink in, but we couldn't find one to fit because of the beveled edges surrounding the original basin. We started looking into a new countertop. Prices ranged from $900 to $1200 because of the shape, which is called a "banjo"... I couldn't justify the expense for such a small area that only we would see for the most part. Kept looking on line for a sink that would cover the area where the basin was, including the bevel. Found a Kohler counter-top sink that would match the toilet (biscuit) and the shower base I had painted, fit perfectly., so we didn't have to trash the old counter. Found a faucet in nickel, loved the design, new cabinet hardware. Hubs did an awesome job tiling the backsplash, (I designed it). New light fixture looks great!
Our master bathroom was in pretty desperate need of updating when we first moved into our house. And in all honesty, it still kind of is. But since we couldn’t do a full remodel at the time, I decided to prioritize and focus on a bathroom vanity update. It is amazing what a difference it made!Disclaimer: In the name of full transparency, please be aware that this blog post contains affiliate links and any purchases made through such links will result in a small commission for me (at no extra cost for you). As an Amazon Associate I earn from qualifying purchases.
Oh my goodness! When I was asked to paint a dresser for a sweet new baby girl I WAS SO EXCITED! The mother texted me a beautiful photo that had a gorgeous piece of furniture with gold leafing! This is a finish that I had been wanting to try for quite some time! I have done gold leafing in the past but never on a dresser.Something I think you all are going to like about this painted furniture tutorial is that it is painted in DIY chalk finish paint!! My client Brittany encouraged me to make my own diy chalk finish paint. She said she had painted the dresser before with her own chalk finish paint and that is what she wanted on this piece! You never say no to a pregnant woman right!? 🙂 The paint that she used had held up great before! I was all for it! I will admit this was my first time making my own diy chalk finish paint! And it was a great experience!! It actually was better than I expected!Are you ready to learn how to make your own diy chalk finish paint!? AND add gold leaf to your painted furniture!?Here we go!
I found two of these night stands on my local Facebook marketplace and even though they were in rough shape, I decided to get them because it's hard to find a matching pair!
Hello creative friends! Today's project was a "let's see what I can create with this" idea. Actually, I was waiting for the paint to dry and was bored. After a quick search on frames via Pinterest, I came up with this DIY Tray made out of an old picture frame. Here is how it turned out. Super cute and easy!
Spring is around the corner which means fresh air, nicer weather and lovely colorful flowers. I don’t know about you but I love the colors of spring. This DIY is intended to be used for my granddaughter’s 1st birthday party but I thought I’d share it here because I think it’s also a great centerpiece to use for spring or Easter. Imagine sticking a cute little bunny in the center of this hot air balloon. I think it would be adorable.I will be showing two different ways of making this centerpiece, one will be made using a brown paper bag. Yes, you heard correctly, a simple brown paper lunch bag. This is a good way of making it if you plan on using faux flowers and if you’re going to use it indoors or outside if there’s no wind. I suppose if it were windy, you could add colorful rocks or a weight inside of the bag to prevent it from flying away. This method has the balloon tied down with a ribbon in the center of the bag. The weights or rocks would not be visible once you add your flowers.The second method will be made using a small box/planter and floral foam. By making it this way, you could choose to use fresh flowers or faux flowers. I also used a “balloon stick holder with a cup” to hold the balloon in place. For either method, you could use helium or non helium balloons. I will be using non helium and the balloon stick method because I believe it’s a better way to ensure the balloon will stay still. I thought it would be great to show you 2 different ways of doing this and after doing both methods, I preferred the non helium with the balloon stick holder.Alright, let’s get DIYing!
This is a great DIY for both our personal and rental home. Easy to apply and easy to remove. Add a level of elegance to any room. Measure your space to make sure you have enough rolls. On average 3 to 4 boxes is needed.
These DIY Vanity Lights were a bargain project that used up a ton of supplies from my basement. The only things I purchased were the used sconces for $7.50. The light looks fantastic, and was 100% worth the effort I put in.
A vanity tray is a tiny bit of modern magic. It's a way to turn a prized collection of household stuff into a centerpiece for your living room or whichever corners of your home need a little sprucing up. My latest video tutorial features one of my favorite DIY projects, requiring only a few minutes and a handful of easy-to-find materials to put together. It's also infinitely customizable, with easy variations for a bathroom vanity tray or a mirrored vanity tray, and a bit of a recycler's dream if you happen to have a shed full of once-loved frames and hardware. A step-by-step guide is outlined below, along with a list of everything that you'll need to begin building a vanity tray of your own.
As an avid DIYer I always have scrap wood laying around so I decided to try to make a simple stool for my recently made over vanity.
This vanity was rescued from an old house. We purchased it from the people that had been paid to clean out the house. It was sitting in the garage while I waited for inspiration to strike, when a lady who came to purchase a dresser (posted on here, the dresser with material on the sides) asked us to paint it to match a chest of drawers her grandmother had. So, here it goes....
Three packages of Dollar Tree twine wreaths, a small wire wreath form, and some ribbon combine to make a fun and festive Spring wreath!
Our 20 year old ceiling fan broke and was being replaced. Being the crafting person I am, I couldn’t just throw the old fan with lights away. I wanted to salvage all the pieces I could for those future projects you read about on Hometalk.com. I took the whole thing apart and saved pretty much everything except the broken motor and the housing. Many of the parts will become wind chimes at a later date. The blades and glass light covers are headed to my local thrift store.
A client I had in the past msgd me asking for a dresser for her master bedroom! Gave me the general idea of what she was wanting and I got to work on what I thought would be the best one for her. Eventually I found the perfect one! And oversized antique! I love when clients get me to do something colour wise out of my comfort zone!
Transfer a Spring image on a book stack for an inexpensive and simple Spring home accent piece. This is perfect for your french cottage home!
A friend was clearing out her mom’s furniture and messaged me to ask if I wanted an antique bar cabinet that belonged to her great-grandmother. And of course, I did!! I drove straight over to her town the next day and picked it up (before she had a chance to change her mind!). Once I got it home and had a closer look, I was beyond thrilled with the piece. It has a built-in music box!! I have worked with a lot of antique and vintage furniture, but I’ve never seen that before!!!! It also has a slide out serving tray. Jackpot!
This post is sponsored by Rustix. All opinions are my own. Wood walls, wood boards and any sort of wood home accent has become a “thing.” I have to say I think this popular trend is here to stay! We recently swapped out our master bathroom vanity for a larger one, added a checkerboard accent wall and a new light fixture. When Rustix reached out to collaborate with a wood plank project, I knew exactly where I wanted to use it!
If you have been keeping up with me here lately, then you know that we are in the process of making a cat room for our fur baby, Toby. We’ve already done a shiplap wall and wallpaper in this space. So now it is time for my favorite part- decorating and styling it! And even if you don’t have a cat, this could easily be done for a dog too! I thought it would just be fun to show y’all the final product and how it turned out for us.
I have been wanting to update my guest bathroom for several months. My goal was to brighten up the space and bring some life to it. Even though this is just a bathroom I wanted it to feel inviting to us and our guests, not dark and dreary.I wanted to spend as little money as possible on this project, so if you want to see how my husband and I transformed this space for under $30 read below. We are more than happy with the end result, and even though the changes we made were small they made all the difference.
I’m willing to bet that anyone that has worked on more than 3 pieces of furniture knows what it’s like to have a tough project sit… and sit, and sit, just waiting for a lighting bolt of inspiration (or motivation) to hit.
I've see these so many different ways, from covered with twine to wrapped in yarn. My version FABRIC!!
Try this high impact, budget friendly bedroom idea from Haute House Love. Learn how to build a faux headboard with ease using minimal materials and spending only $100.This past fall I took my master bedroom from drab to fab. Along the way I used peel and stick wallpaper and 1x4s to create an easy faux headboard in a board and batten style that makes a huge statement! It was a super easy project that took about 6 hours to complete from start to finish. click here for the full blog post, product links + sources
Learn how to make a lavender shower steamers recipe without citric acid. These easy aromatherapy shower steamers can be made with lavender essential oil or a lavender essential oil blend to help relieve stress and calm your mind. Discover how to make lavender shower steamers. Plus find recipes for lavender essential oil blends you can use to create these homemade shower bombs.
Beeswax wraps are very easy and inexpensive to make. You’ll love this simple linen version of a popular classic for your natural kitchen. Ever since I first saw beeswax wraps I thought I could make them myself. That is what I did over 2 years ago (you can see that post here). I still use them a lot but I needed different sizes. This time around, I thought it would be fun to use one of my favorite fabrics: linen!
When I was pregnant, I knew I wanted to decorate the nursery walls with solid colours. I was reading an article explaining newborns and infants' vision and how the contrast affects the eye and improves the brain-eye connection.It took me a while to find the perfect pattern, as I wanted it to be symmetric on the wall and aligned- without the need of too many marks on the wall
This DIY Painted And Glazed Side Table took a sad thrift store table and turned it into something that is pretty again in a few, short steps. I found this table at my local Salvation Army store. Usually, when I find pieces at this store, they are priced so high that I don’t even get excited about something to catch my eye from a distance. This little guy did catch my eye, but I took my time getting to it, stopping to check out other things along the way.
We’re knee-deep in our bathroom renovation. The cabinets and walls have been painted, and the lights ordered. I knew when we started this we’d have to pay special attention to our old dingy closet, and now, this gal has a whole new look. The closet went from this:
HI! today i will show you quick and simple tutorial on how to make a romantic couple candel holder. You will need just a few tools, but be shure, you and your couple will be impressed by the result!
Y’all know I love coming down to our camper and I love to decorate it just like our home as well. So obviously I needed to have a coffee bar here since I have one at home too. My sweet hubby made this DIY coffee bar dream of mine come true! And it was so easy to create! We only needed a few things in order to make this coffee bar a reality. And even though it is a small space, we still made it work! So that means no matter how small or tight your space is, you can totally create this DIY coffee bar too!
An inexpensive DIY wreath made with mostly dollar store supplies, this flower pot wreath adds so much French farmhouse cottage charm. I have so many spring DIYs and decor ideas at DIY Beautify, I would love to have you stop by!
Time for something fresh that feels like spring for my front door!
In this tutorial, I am showing you how easy it is to make these simple DIY produce bags. You only need 2 very inexpensive items! This post contains some affiliate links which means I make a small commission at no extra cost to you. I love trying to be more sustainable and I love sharing easy ways to do that. Because it’s harder to do when it’s not easy, right? Buying groceries and produce in bulk skips unnecessary plastic. For most of that, I use simple cotton bags that I made from old dish towels. But sometimes, we do need something to hold the lettuce or wet carrots. This is where these DIY produce bags come in! You’ll love that they are very inexpensive and they are easy and quick to make!
I recently purchased a chandelier for our bedroom ceiling. This has some antique gold detail on it and I decided I wanted our bedside lamps to match this. So I decided to try out Rub ‘n Buff on the brushed chrome lamp stands to give them a little transformation!
I love DIY’ing how to tutorials now. BUT…. I’m kicking myself in the butt for not making a proper tutorial on how we DIY’ed this modern farmhouse vent hood back in early 2019. We get asked questions all the time on how we did it. So I’m going to try my best to make one with the few pictures I do have. Being that this isn’t as detailed as most of my other tutorial feel free to leave a comment below with any questions you might have. We would be more then happy to help if you decide to DIY one of these yourself.
Hi! I’ve got them linked if you click on the blue text in the post!
Here are the links to the two sizes of handles:
https://www.amazon.com/dp/B07SR7YCTK/ref=as_glm?_encoding=UTF8&psc=1&linkCode=ml1&tag=bakerblooms-20
https://www.amazon.com/dp/B08D947NP3/ref=as_glm?_encoding=UTF8&psc=1&linkCode=ml1&tag=bakerblooms-20