


Beautiful Hanging Hardwood Pot Rack That's a Great Beginner Project
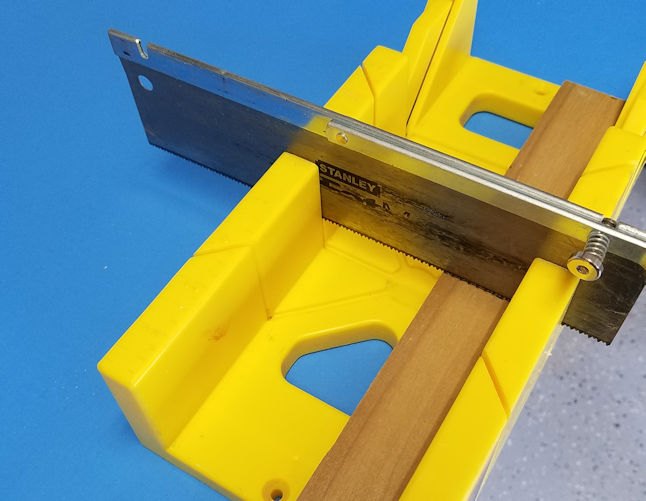
This pot rack is a beautiful and functional piece of kitchen equipment that’s perfect for a beginning DIY’er. In fact, you can make this with nothing but a handsaw, a miter box and a drill, so it’s doable even if you live in a tiny apartment and don’t have the space or money for more tools.

Hometalk Recommends!
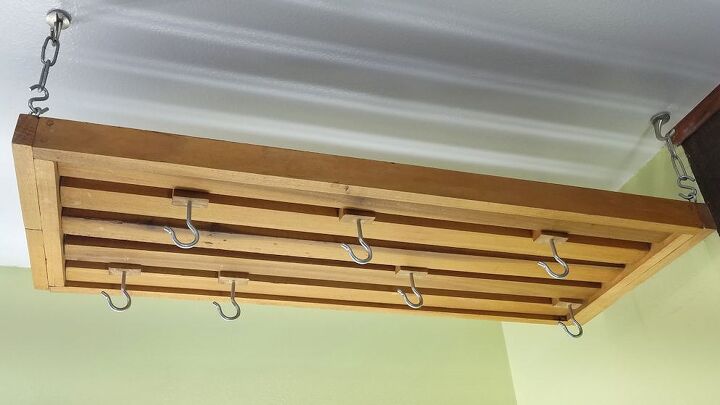
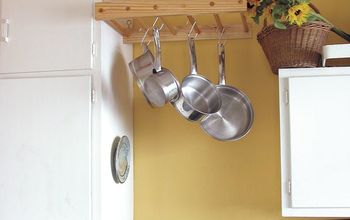
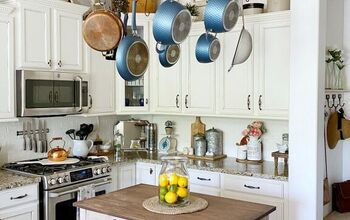
If you like to cook, or just cook a lot, you can’t beat a hanging pot rack — it keeps your equipment in plain view and right at hand when you need it. You just have to find a place to hang it — ours hangs over the fridge because it’s out of the way but still easy to access (and it keeps you from putting a bunch of junk on top of your fridge). I actually built this one more than 30 years ago in my studio apartment, and it’s been in use ever since.
Tools and Design
The hanging pot rack’s design is driven by simplicity and functionality. Everything is made from 2×1 poplar and the rack is held together with ¼” dowels and glue. It is strong enough to hold heavy pots and pans, including cast iron. Each of the “T” hooks can be easily moved to any position along the rails, allowing you to customize your rack exactly the way you want.
This project is doable even if you live in a tiny apartment and don’t have the space or money for more tools. All of the cuts are straight and can be done with a handsaw and miter box. You will need a drill and a set of drill bits to make the holes for the dowels and install the hardware. If you’ve got a miter saw and clamps, you can build this more quickly, but I wanted to recreate the build with just the basics to show you how it can be done.
Materials List: Hanging Pot Rack
You can choose any hardwood you like for the rack. Poplar is one of the cheaper hardwoods, and at the time of this writing, you should be able to build the entire rack for less than $50.
- Poplar Hardwood 1×2 — 24 ft.
- Stainless Steel Chain —1 ft.
- Swag Hooks — 4
- #12 Screw Hooks — 9
- ¼” Screw Eyes — 4
- S-Hooks — 4
- ¼” hardwood dowels — 3 ft.
- 1¼” #6 wood screws — 14
- Wood glue
Construction and Assembly
Step 1: Cut wood
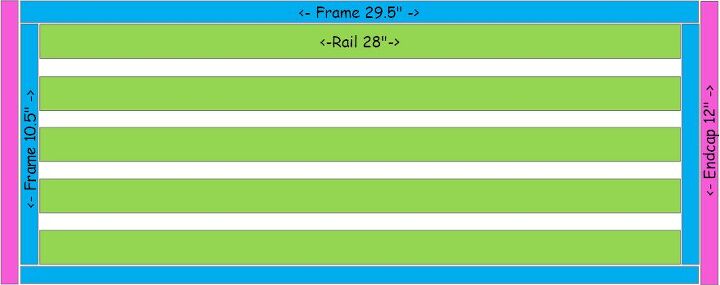
Carefully measure and cut the following pieces from 1×2’s. The total length here is 265 inches. If you buy three 8-foot lengths of wood, you’ll have plenty.
- Rails: 5 pieces 28” long
- Frame long edge: 2 pieces 29.5” long
- Frame short edge: 2 pieces 10.5” long
- End caps: 2 pieces 12” long
- T-hook horizontal: 7 pieces 2” long
- T-hook vertical: 7 pieces 1” long
- Dowel pieces: 28 pieces 1.25” long
Step 2: Mark reference lines
In this hanging pot rack design, the rails are oriented horizontally while the frame is oriented vertically. The most challenging aspect of this build is getting the pieces lined up properly, so drawing some guide lines on the short edge pieces (the 10.5″ pieces) of the frame will help. On one side of each edge piece, draw a line down the middle. This is outside edge and the line ensures that you drill in the exact center of the wood. On the other side, draw two lines, each ⅜” from the edge. This creates an area in the middle ¾” wide, which is where you will align the rails.


Step 3: Assemble the frame.
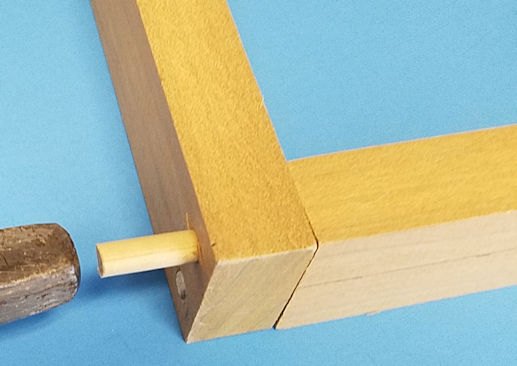
Mark your drill points 3/8 of an inch from the edges of the long sides of the frame. While holding the long side firmly in place against the short side, drill a pilot hole 1.5 inches deep. Obviously, clamps will help with this, but you can manage on any flat surface that’s up against a wall. Next use a ¼” drill bit to widen each hole. Repeat this for all four corners of the frame.
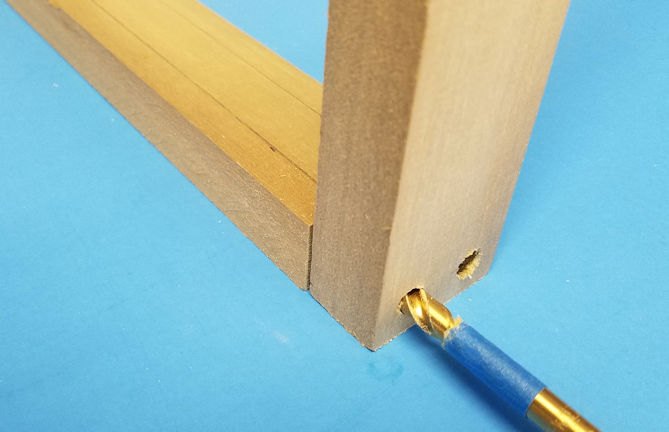
Apply a thin coat of wood glue to two dowel pieces and gently tap them into the holes on one end of a long piece. Align the long piece with a short piece and tap the dowels into the short piece until the dowel ends are flush with the wood. Repeat for each corner of the frame.
Step 4: Assemble the rails
Once the glue on the frame has dried, lay the frame on one of its long edges so that the short edge is vertical. Take one of your rail pieces and set it in the bottom of the frame so that it is within the double lines you drew. Using the same process that you used for the frame, attach the rail to the frame with dowels, making two holes centered on the rail, ½ inch from the edge.
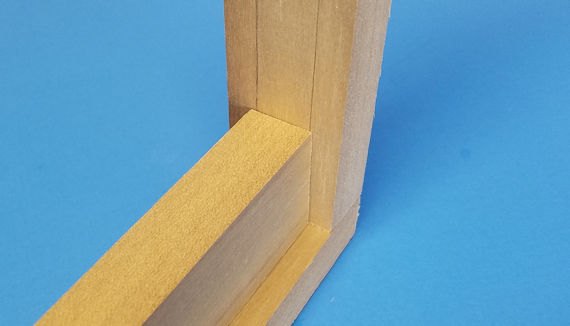
To attach the next rail, use two of your small pieces of wood as ¾ inch spacers. Place the spacers on top of the first rail and then position the second rail on top. Attach the rail to the frame with dowels as you did before and continue for the remaining rails.
Step 5: Attach the end caps
The end caps provide some extra rigidity to the frame and cover the dowels on the end of the frame. Glue them to the frame. If you don’t have clamps, find something heavy to set on top while the glue sets.
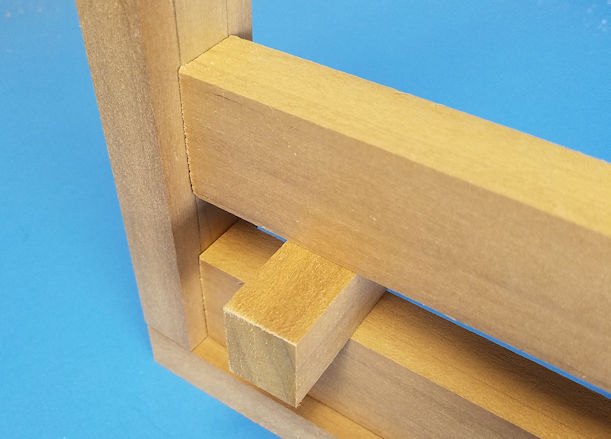
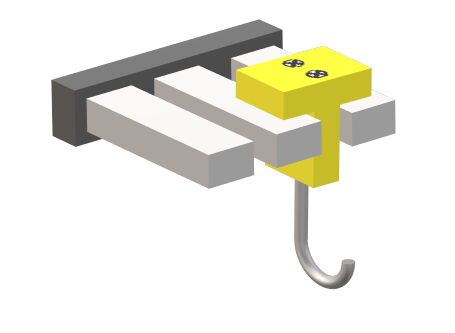
Step 6: Assemble the T-hooks
The T-hooks consist of a 2-inch top piece that slides along the top of the rails, and 1-inch “leg” that sits in between the rails. A cup-hook is screwed in to the bottom of each leg. I used screws to attach the T pieces, because I wasn’t sure if dowels would be strong enough to hold weight vertically. Drill pilot holes for the screws and the cup hook.
I’ve called for seven T-hooks here, but you can make more or less as needed.
Step 7: Finish your hanging pot rack
Remove your pencil lines, sand any rough edges, and apply a food safe oil or wax. I used tung oil, but you have several options.
Step 8: Attach eye bolts to frame
Attach an eye-bolt to the top of the frame at each corner. I recommend attaching to the frame piece rather than the end-cap. (As you can see, in my original build, I attached the bolts to the end cap pieces. This held up just fine for 30 years, but one of the pieces did eventually separate.)
Step 9: Install swag hooks and hang
Decide where you want to hang your potrack, and mark the locations for your swag hooks on the ceiling. Your swag hooks will have a screw attachment and a toggle-bolt attachment, which allows you to screw in to a joist, or to hang from drywall. If you’re not sure what you’re drilling in to, start with a pilot hole. If you hit wood, you know you’re on a joist and will need to use the screw attachment.
Now, hang a length of chain from each swag hook, then use an S-hook to connect each eyebolt to a chain. Note that most hardware stores (including the big box stores) will cut chain for you. You might want to buy chain with a few extra links so you can adjust the height of the rack.
You're done! Sit back, admire your work and start thinking about how you're going to arrange your cookware.
Resources for this project:
See all materials


Comments
Join the conversation
-
I LOVE IT ....Just what I need for my small kitchen.....thanks for sharing .....
-
One if the nicest ones I've seen. Great job.


Frequently asked questions
Have a question about this project?