


Easy Wooden Trunk Makeover - How To Create A Modern Industrial Look
If you're here looking for ideas to upcycle an old wooden chest this post is for you! Today, I'm sharing an easy wooden trunk makeover. If the modern industrial look is your jam, this tutorial will show you how you can easily create that style at home – especially, if you're on a tight budget!This is an abbreviated tutorial. The full tutorial is far too long for me to reproduce on Hometalk, but you can find the detailed tutorial including more photos by clicking the link to the full blog post here: 'Easy wooden trunk makeover' or through the link to the blog at the bottom of this Hometalk post. Thanks for understanding!IN CASE YOU WERE WONDERING: You will find an estimated cost of the project below. If you are a DIYer like I am, you probably already have most of the tools on hand to complete this project. I've estimated for if you had to buy all the tools and materials from scratch so that's why the estimate may seem a little high.All in all, the project cost me around €30.00 plus the time spent working on the project (one weekend). Not bad considering the transformation.
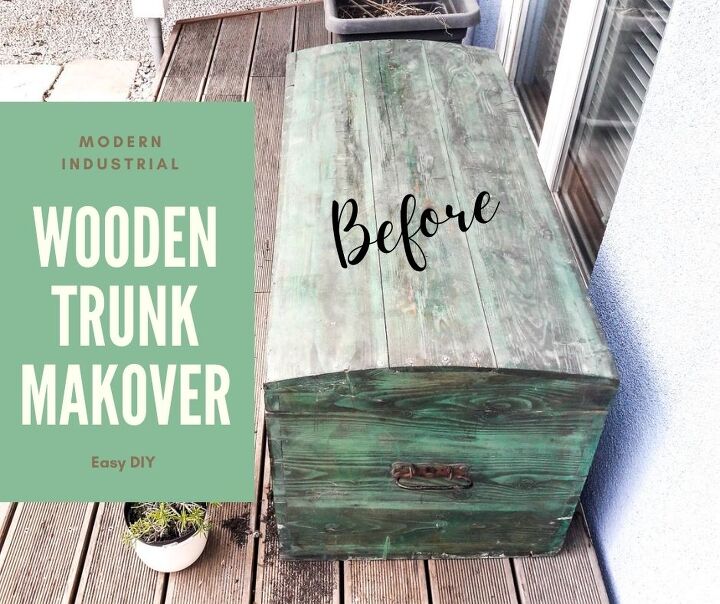
This is how the wooden chest looked before the makeover. (More photos on the blog). I took the photos with my phone just after arriving home with the trunk.

Step 1 - cleaning and sandingClean the furniture inside and out before beginning to sand.You can find a list of materials and sources in the original blog post.I used my handy mouse sander to sand away the green wood stain. I started with grade 40 sandpaper and once the stain was gone, I worked my way up to 240-grade sandpaper which made the wooden trunk really smooth. This pine trunk will also be used as a bench so I needed to make sure there are no snags that will catch on clothes.After sanding, brush the wooden trunk with a wire brush to get all of the sanding dust out of the grain.
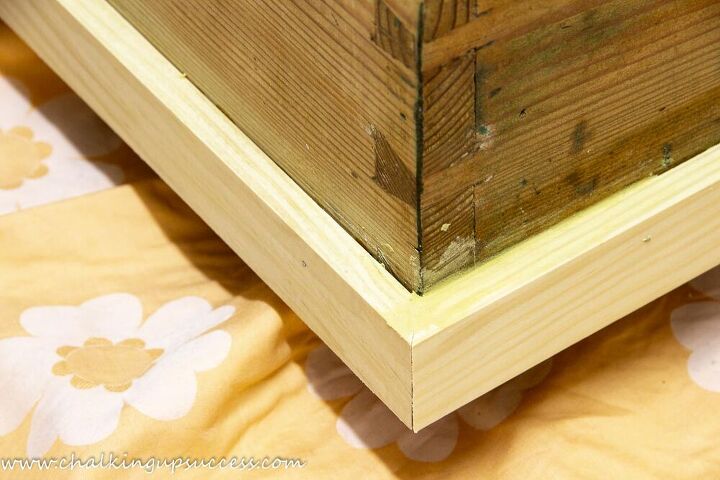
Step 2 - Add trimTo add a bit more interest to this wooden trunk, I added wood trim to the bottom. This is easy to do. For this, you would just need to measure the lengths needed and cut the pieces to size with a mitre saw.You can attach the trim with wood glue first but then add some nails to make sure the trim is attached securely.
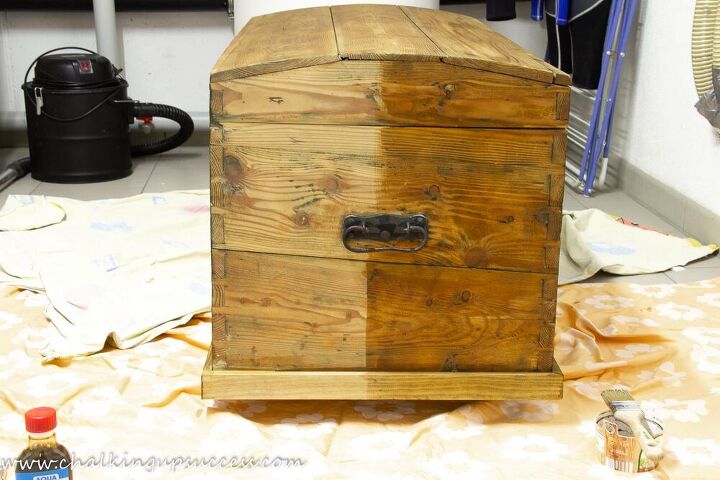
Step 3 - stainingYou can stain the wood with your favourite stain or use a colour that best suits your home style. I'm using wood stain in the colour 'Vintage Oak' for this wooden trunk makeover. I'll be giving this trunk three coats of wood stain.The trim will need a few more coats of wood stain because the new wood is much lighter than the original wood of the old wooden chest.You can see the difference in the colour after just one coat.
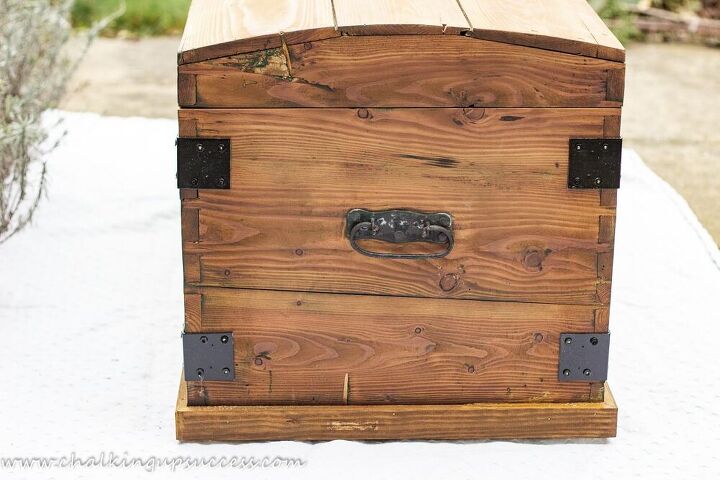
Step 4 - add corner bracketsOne of the last things this wooden trunk makeover needs are some metal embellishments. You often find metal fixings on industrial style furniture.Corner brackets will be perfect for the corners of the wooden chest. If you can't get them in black (I could only find galvanised brackets), you can paint them black using paint for metal surfaces.
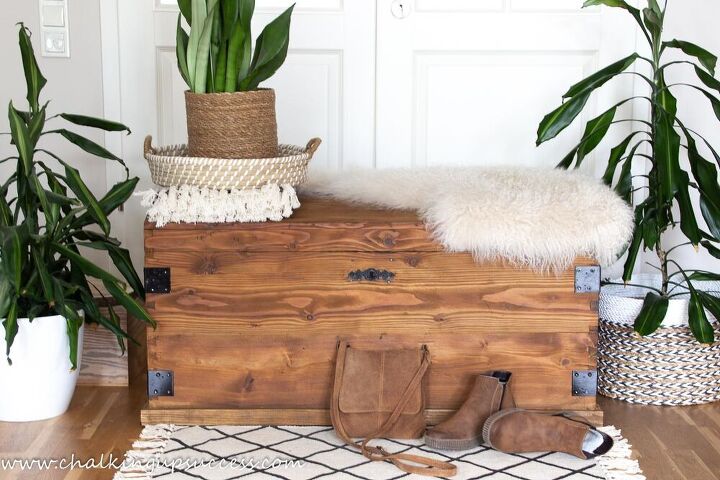
The wooden trunk makeover is finished!We had a quick styling session before the trunk was transported to its new owner in the city.I sent my son a 'before' photo of this wooden trunk but he didn't see it again until it was all finished. He was really surprised to see the transformation and says, it turned out even better than he thought it would. It looks fabulous in his modern industrial style room at the shared house.WAIT!Before you go, if you’re not part of our amazing creative community yet but would love to join us, I would love to have you stop by my blog Chalking Up Success for the full tutorial or to sign up for my latest posts, DIY, inspiring home decor, natural home recipes and more.FREE RESOURCESBy signing up, you’ll also receive a copy of the free ‘Furniture Flip Checklist’ and gain access to all the other printables, e-books and labels in the VIP Resource Library.FOLLOW CHALKING UP SUCCESSCHALKING UP SUCCESS ON YOUTUBESubscribe to my YouTube channel to see more DIY, home decor and crafts - https://www.youtube.com/channel/UC4uyVGrJxoo8-7qlAg5_x-g?sub_confirmation=1 I can't wait to see you there!Join our Facebook Group for creatives - Why not? It's FREE!https://www.facebook.com/groups/organizedecoratecreatechalkingupsuccesLike us on Facebook:https://www.facebook.com/chalkingupsuccess/Follow us on Instagram: https://www.instagram.com/chalking_up_success/Follow us on Pinterest: https://www.pinterest.de/chalkingupsuccess/Phew! That was a lot but thanks so much for your support, I really appreciate it!

Comments
Join the conversation
-
Thanks for answering the question! I may be refinishing pine cabinets in a 108 yr old house and my hubby didn’t think it was possible to restrain them👍🏻
-
Beautiful redo of the chest!


Frequently asked questions
Have a question about this project?
I really liked both the before AND the after finishes, it’s really a lovely trunk😻. My question is, since this is pine, did you have any difficulties in getting the stain consistent?