Asked on Sep 27, 2014

Brown paper floor/wall help

Tina Brooks
by Tina Brooks
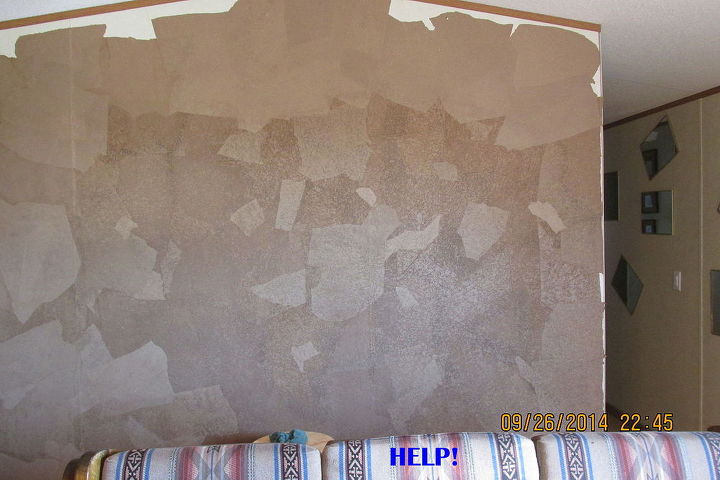
I have purchased a brown roll of paper because I wanted a consistent "vein" look through out the walls and the brown paper bags I was getting would sometimes be "veiny" and others be "flat" looking...I am running into the same thing with the roll paper. I have spent at least 40 hours on 3 small walls...$40.00 in glue 40.00 rolled paper not to mention the time...can someone help..how do I get the consistent vein look...I am inches from tearing these walls down and painting...so frustrated.
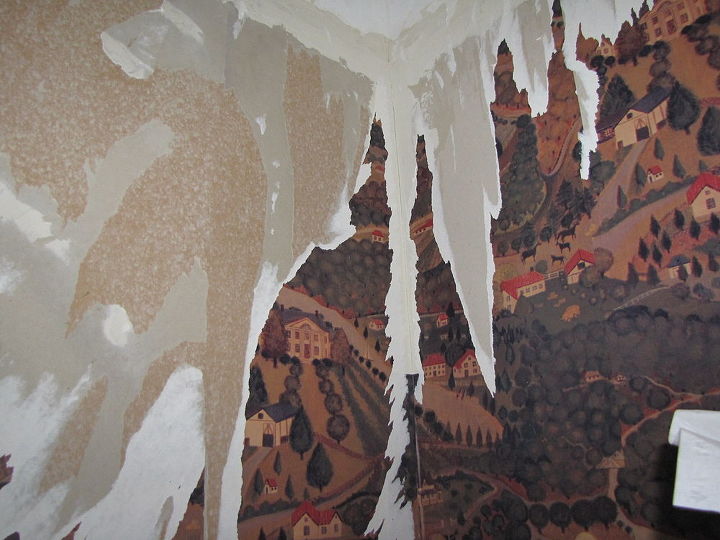
  47 answers
  • Z Z on Sep 28, 2014
    Tina, can you tell us the process you are using? That could be what the problem is.
    • See 1 previous
    • Z Z on Sep 28, 2014
      @Tina Brooks I was wondering the same thing @Lee mentioned, as to the right and wrong side of paper, but I didn't think that was what you felt was wrong since you mentioned veining. The way I've done it was to tear the paper, wrinkle it, then soak it in the water and glue mixture before laying it on the piece I was working on. I've never done something at large as a wall or floor, though I do plan on it someday and then using a water based stain over to give it a more all over cohesive look. Again, as Lee did.
  • Lee Cunningham Green Lee Cunningham Green on Sep 28, 2014
    With the roll, I did discover that one side is different than the other, and when they are wet with the glue solution it is difficult to tell the difference. I stained my floor with a dark walnut stain, and you really can't see the difference now. just a rich dark floor. So if you are tearing the paper ahead of time or putting more then one piece in the glue at a time, you may put the other side up on occasion.
  • AvonelleRed AvonelleRed on Sep 28, 2014
    Have you been wadding the paper up before you put it in the glue/water mixture? The wrinkles are what helps it to look "veiny", to me at least.
  • Tina Brooks Tina Brooks on Sep 28, 2014
    Thanks for the answers, but I'm still hoping for more ideas.
  • Bonnie Medearis Bonnie Medearis on Sep 29, 2014
    I had the same problem with some furniture I was covering with paper so I got out my sander and lightly sanded over it all thus giving the entire surface the same texture and then stained the pieces. You may want to try it on a piece of plywood to see if it gives you the effect you want. Good luck. Sorry, I dont have any photos left of the pieces.
  • Laura Sheehy Laura Sheehy on Sep 29, 2014
    What I did was make sure to tear, not cut, the paper, wad it up so it's more pliable, then after dried, I used a shoe polish, practice different colors and just rub it in circles with a sponge. At least that is what I found worked for me
  • C C on Sep 29, 2014
    I've never done the brown paper technique... but did veiny walls in my office with paint. So much easier, faster, and cheaper. I combined a small amount of paint and paint with lots of faux glaze {$40/gallon}, then rolled it on the wall, pressed wrinkled plastic over it & peeled it away.
  • AvonelleRed AvonelleRed on Sep 29, 2014
    So I was covering some boards with the brown paper over the weekend, and I figured out that, in addition to wadding up each paper piece, tearing instead of cutting, and so on, that overlapping the papers by quite a bit actually helped to achieve a better overall look. Most of the tutorials I've read about it say don't overlap by much, because overlapping a lot will make it take longer to dry, but in my opinion, it ends up looking much better if you do overlap a lot, and you will also have less spots to have to go back and cover due to shrinkage once the glue/water dries. Your mileage may vary.
  • Elaine Simmons Elaine Simmons on Sep 29, 2014
    I think it helps to have a rough surface to begin with. I did a bathroom about 10 years ago only did it with copper leaf paint and gold spray paint. I have never done anything where I got more compliments on than that room. Even though you think you might have crushed the paper enough, I crushed it so much that my hands got tired. As AvonelleRed said, it is important to tear instead of cut. I used the roll of brown paper that you buy at the $ store and I even put some rosin paper up along with the brown paper to give it more texture.
  • Marilyn Roenneburg Marilyn Roenneburg on Sep 29, 2014
    Sorry, but my post isn't of any help, but more out of curiosity about this procedure, as I have never heard of this process before. So, is the point to achieve a wall that gives the illusion of being old and cracking, or marble like, and how hard is it to remove years later when your sick of it? Also, if anyone has a DYI link to share on this, I would be very appreciative, as I have an older home that actually has some cracking beginning, that I don't care for and thought this might mask those unsightly cracks.
    • Tina Brooks Tina Brooks on Sep 29, 2014
      @Marilyn Roenneburg It is to give a "leather look" but mine looks more like "stones"......It's cheap, it's a great cover-up for any wall and there are different techniques. I did this years before in a house I was renting and instead of using glue, I used starch in the bottles and mixed it with water and put my "wadded" up brown paper in it and attached it to the wall getting all the air bubbles out. Stayed up for years and then when we moved, I just grabbed big pieces and pulled it off the wall. No damage whatsoever. This time I own the house and I am using elmers glue/h20 and then staining it and when that is dry I will polyurethane it so I can wipe fingerprints off. It's VERY time consuming, but VERY cost friendly. Last time I didn't have the issue of it all not being "veiny" looking, but this time has been totally different. However, my husband hadn't seen how far I had finished it and when he came in, he really liked the "stone" appearance.
  • Lth543108 Lth543108 on Sep 29, 2014
    The tutorial I used was Bonnie Manning brown bagging. Instructions are on the web if you google it. My bathroom walls turned out great.
  • Jana Roberts Davis Jana Roberts Davis on Sep 29, 2014
    After you tear the paper burn the edges a little.
  • Sun One Sun One on Sep 29, 2014
    Not sure my post will add anything, but from what I can tell from your photo, you used both sides of the paper, which gave you the variation of color. I can't see that you have much veining either. This is what I did. I used wood glue, not measured carefully, but about 3:1 water:glue. Before I tore the paper from a kraft paper roll bought at Lowes I chose the side I wanted UP and marked the other side with a ballpoint pen, just swirls, etc. enough so that after soaking I could see at least a bit of ink marking on the down side. If I couldn't see the ink I tossed it. I wadded my paper and allowed it to soak in the water/glue mixture for at least 3 to 5 mins. I applied straight glue to my treads (I had a horror of it not sticking), squeezed the paper really hard to get the drippy wet out of it, unwadded, and applied. I had planned on staining, but liked the natural, soooo. I also put some of the paper in a plastic bag to save for repairs if ever needed I would have matching paper. My only regret is now that there are two boys, 12/11, living upstairs that have an affinity for boots, white risers wasn't the best idea. I also used upholstery tacks as an accent. Oh, I also used a brown watercolor pencil to "adjust" some of the veining.
    • Tina Brooks Tina Brooks on Sep 29, 2014
      @Sun One Sue, I tried that one side same side...didn't work. It just didn't seem to matter what we did. Now, one thing, you said you left it in the glue 3-5 minutes...I could only leave mine in for seconds or it fell apart...maybe a better quality paper next time....
  • Sun One Sun One on Sep 29, 2014
    Marilyn Roenneburg - I feel rather certain it would hide cracking, after filling in the cracks with putty or spackling. When I was doing research my search terms were variations of faux leather paper walls floors. I first saw this technique using tissue paper, paints and stains to achieve a leather look -- on HGTV about .. gads 15? years ago. Soon I am going to be starting a wall using tissue paper.
  • Jasmin Jasmin on Sep 29, 2014
    I found that when I did these faux looks - you can only use one certain side of the paper. Seems there is often a coating on one side and not the other, so my "guess" is that a few times, the "other" side of the paper was used. Best to not use sides with any sort of coating on them.
  • Tris Smith Tris Smith on Sep 29, 2014
    Make sure that you are wadding up the paper good before you apply.
  • Debbie Miller Debbie Miller on Sep 29, 2014
    wadding the paper , tearing it into similar sizes, and DO NOT look for consistency... look at the uniqueness and uniformity of the project. It's supposed to be fun not a nightmare
    • See 1 previous
    • Debbie Miller Debbie Miller on Sep 30, 2014
      @Tina Brooks It's really hard, I did this treatment on a LONG kitchen wall...when I finally let go of it being perfect, it turned out awesome...There were a few place I wasn't happy with so I hung a picture on the spot!
  • Bev Deardurff Bev Deardurff on Sep 29, 2014
    I kept instructions on brown paper flooring I remember using brown paper, teariing it, and wading each piece up. I can't remember what kind of glue was used. Possibly wall paper glue. I don't remember if you dipped the paper in the glue or if you spread the glue on the floor and then on top. over lap the peices . I don't remember if you applied a coat of glue or not. Let that dry. Apply 2 to 3 coats of polyurathane Let each coat dry . Sand with a 200 grit sand paper. Dust it. Apply polyurathane, etc. Don't sand the last coat. These instructions are as close as I can remember. Bev Deardurff
  • Linda Linda on Sep 29, 2014
    I did this years ago on a bathroom. If I remember,,the more you make the size of the pieces you tear the same,,the more the veining looks like marble. When I finished mine I did 2 coats of polly on it,,,waiting for each coat to dry before the next. It was beautiful and looked like highly polished stone. oh and the glue I used was Elmers white glue, watered down. If you want it not to look so random be sure you use the same side of the paper all the way through the project. I was worried a little about the moisture in a bathroom with the paper,,but after 3 years in the home an it being my master bath,,I have to say it held up great.
    • Tina Brooks Tina Brooks on Sep 30, 2014
      @Linda thank you! I have finished the walls and am applying fruitwood stain and I think I will do another suggestion that was to use a darker shade on the lighter paper....I was glad to hear your bathroom is holding up because I really wanted to do my little bathroom...when I get brave enough and a LONG time after I FINALLY finish this little DIY, lol!!
  • Lex263207 Lex263207 on Sep 29, 2014
    Completed this process this week. I tore my pieces smaller than most tutorials I've seen. I had some paper from different sources, so I knew to expect variations in color. I didn't like it, so I stained the whole floor in one color, then I stained a second coat in a darker color over the lighter areas. I had to let it sit for a few minutes. I then dabbed it off with a cloth to see if the coverage was ample. I eventually went back over the entire floor, but I came out with a pretty consistent look. I am attaching a couple of photos where you can see the difference before & after the multiple layers of stain. And yes, I did mean to use the words. This is in a upcycle boutique where I sell repurposed items.
    • See 5 previous
    • Heliane Ripley Heliane Ripley on Feb 25, 2015
      I think it looks great ! @
  • Christine Jess Danbrook Christine Jess Danbrook on Oct 02, 2014
    There is two sides to the paper, one side has a rougher texture and other smooth. If you don't want the mixed finish you have to make sure you have the same sides up. Choose which one you like the best and then apply. it will look amazing when your done no matter what...
  • Pam Pam on Oct 02, 2014
    I have done this on table tops, cabinet tops and my coffee table. I can tell you that the dark and light look depended on how much Mod Podge or glue mixture I used to attach the brown paper. If I used a little and stuck it down, it came out light. If I really soaked the paper before attaching it, it would come out darker. I wanted the mixture so I would use less glue, by that I mean I put glue on table and then the paper on top and smoothed it down with dry rags to make sure it was attached well. Then, when all was covered, I tore smaller pieces of paper and put glue on the paper so as to saturate it more and then placed them at random over the table to have darker colored mixed in to look like stone. P.S. I didn't scrunch up the paper first. I wanted a smother look to the stone look.
  • Buster Evans Buster Evans on Oct 02, 2014
    A friend of mine did the brown paper bags and used wax shoe polish (in the flat tins) to color it either in neutral, or light brown, to brown.. Looked like LEATHER it was awesome.. I found some marble colored gray/blue wall paper, several rolls of it at the thrift store... there was one thing I discovered about tearing, when you tear it upward it leaves the white paper showing and downward the colored part is left showing.. Overlap and if you want veins connect pieces in the direction of the vein you want.. when you color it the vein will show... make your pieces all different sizes but use you edges to make the vein effect... If you dont like a spot just glue another piece over it.... We used regular white glue and water to make the adhesive... does not take a lot of glue just keep it shaken so its mixed well...
  • Tina Brooks Tina Brooks on Oct 02, 2014
    Thank you everyone!!! I have said "enough" I am not going to beat myself up anymore, lol!!!! I have the paper in place and am now staining with a fruitwood stain...I think i'll add 2-3 and then poly, I will let everyone know how it looks! Thank you everyone for all your help, it was very much appreciated!
  • Vickie Goyen Vickie Goyen on Oct 16, 2014
    I also think you have to tear each piece in the same direction-either pull towards you and down or tear up and away from you
  • Shiree McCarver Shiree McCarver on Feb 15, 2015
    For the best result you need to ball the paper then smooth out to get the veins, also it helps to try to utilize paper from the same roll, because no two papers are alike unless they came off the same machine.
  • Marci N Marci N on Feb 17, 2015
    I have heard, not tried it yet since I moved from the house I did this in. But if you rub it with wax -have no clue what kind- but it will then look like burnished leather instead of suede. You can paint over the paper too, Though I loved the look. If you wanted it all the same shade you would have to be very careful to only use the one side of the paper, and yes the same roll too.
  • Marci N Marci N on Feb 17, 2015
    I took another look at your picture, I think the problem is that you need to add in the old paper to the middle. That way it look haphazard instead of one thing then another. The top is different paper, you could simply finish the top with the darker paper and it would look OK. Or a big painting on the wall will make it look cool. Love your couch. If you want to be artistic leave the dark and paint indian ponies running across it.
  • 153091 153091 on Jul 12, 2015
    Can't imagine but I have also read the brown paper may have a backside and frontside...that may also give the different look!
  • Betty Anne Bayer Betty Anne Bayer on Sep 06, 2015
    I have done this with the front of the bar, and then the floor..... Looks totally different in each application. The papers, glue, how long you leave the paper in the glue mixture,how much you scrunch up the paper, staining.... factors that all affect the loo. I personally love the look of imperfection
  • Eileen M Eileen M on Sep 22, 2015
    I also read that the paper has a top and bottom. I did a whole floor with this method and it came out awesome. It looks like leather. But I liked the variation between pieces of paper. Once it was stained it looked terrific. If you want the pieces to look the same your going to have to be careful about making sure the same side is up.
  • Abby Normal Abby Normal on Dec 08, 2015
    I think I seen somewhere that they balled up the paper first then smoothed it out before gluing down.
  • Elaine Simmons Elaine Simmons on Dec 09, 2015
    Yes, Abby Normal is right. You have to put it in a tight ball, then smooth it out, then apply. Here is a pic of my bathroom that I did about 12 years ago. It had a rough texture on the wall anyway so that helped give it some dimension. I also used some red rosin paper and I spray painted in gold and applied copper with a brush. This is a little outdated now but you get the idea.
  • Allinthefamilysingers Allinthefamilysingers on Jan 18, 2016
    hey it could have a grain like corduroy fabric I was wondering can the brown bags be painted? i do not want my walls that dark thanks much.
  • Allinthefamilysingers Allinthefamilysingers on Jan 18, 2016
    hey i meant to tell you i think your wall looks good by the time u finish and stain it. i seen on carol duvall she put brown wax shoe polish over hers and it would catch in the creases and make the lines stand out It looked really good and unusual Pretty TOO MUCH HARD WORK NOT TO USE I THINK IT WILL HAVE YOUR OWN PERSONAL TOUCH WHEN U GET THRU WITH IT. MAKE IT YOURS.
  • Linda Linda on Jan 19, 2016
    I did a bathroom with the brown paper..I found the paper has a direction to it,,like a fabric with a nap..also leave the pieces crumpled up over night before straightening them out an putting on the glue...this will give you more of a rock look which is what I was going for and then put poly over everything in a satin finish,,, and it looked great...wish I had pics but sold the house a couple years after completing the redo. If your going for the leather look...less crumpling,,,,and it will still give you the shading.
  • Les and Gina Les and Gina on Jan 21, 2016
    I did the same thing in my house, I painted the lower 1/2 a dark chocolate brown and papered sack the upper 1/2 and put a pinecone border between the two. When you tear up your paper you have to soak them in warm water for at least an hour then when you squeeze out the water and apply your paste and apply it to your wall you should see the veining. When I did mine I used 3 different colored sacks a lunch sack color a grocery store color and wrapping paper color it looked great very rustic don't give up.
  • Jo earp Jo earp on Jun 14, 2016
    tear off the paper.. wad it in a ball to get the veining.. drop it in one equal part of water and polyurathane. make sure it gets soaked... take it out , un wad it and apply to the wall.. you dont have to stain or glue to the wall the water mixture does it all... we did a hall way doing this and it was beautiful..... looked like cowhide... stunning...
  • Kim Kim on Jun 14, 2016
    I did my walls years ago, used pieces of the paper waded, then applied with wallpaper paste. After it dried I applied a water based polyurethane. The final touch I stained it to give it some depth. Looks like leather walls.
  • Sun One Sun One on Jun 15, 2016
    the paper has a front and back side. determine which side gives the appearance you like, then mark the back side you have chosen with a pen. (mixing "sides" gives that blotchy look), after that proceed with the crumpling and the soaking in your glue/water mixture. be sure to only soak for a few short minutes. I haven't tried it, but I understand that you can add dye, food coloring, even coffee, to your glue/water mixture. Oh! do Not use any oil base products in the procedure.
  • Trae Trae on Jun 17, 2016
    I mixed a bit if paint in withe glue to give it a uniform color...
  • Julia Julia on Jun 18, 2016
    Tissue paper is the easiest way to get that look! And way cheaper!
  • Sun One Sun One on Jun 20, 2016
    Based on my projects, tissue faux leather adds more texture, not veining; requires painting, glazing and top coat. While you can do other things to the kraft paper it only requires a top/sealer coat for walls/several coats of floor finish for floors.
  • Tina Brooks Tina Brooks on Jun 20, 2016
    Thank you everyone!!!
  • Lori Otto Lori Otto on Nov 05, 2016
    Use a tinted gel over the top