Asked on May 17, 2015

Replacing/repairing dryrotted fabric on outdoor furniture

Judith
by Judith

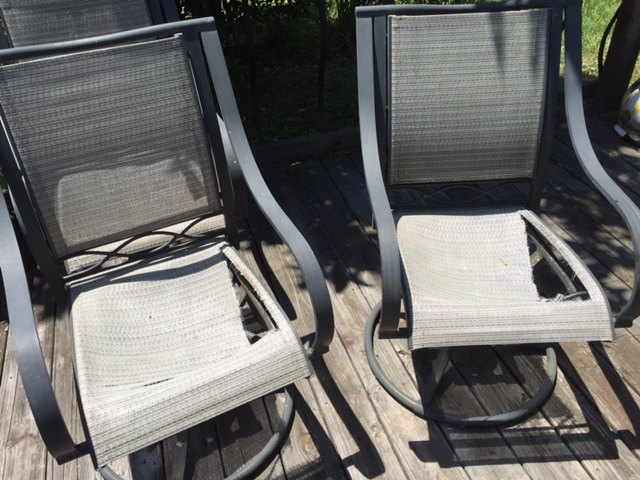
We have four swivel chairs and a lounger where the fabric has dry rotted and when we sat in them - all of them - we went right through! Does anyone have any money saving ideas for saving these items? They're metal frames, and still in good condition - except for the fabric!


Best fabric replacement!

Give your outdoor furniture a second chance with Ostlttyn Zero Gravity Chair Replacement fabric that Amazon reviewers swear by!


  25 answers
  • Milknhoneycreations Milknhoneycreations on May 18, 2015
    This happened to my chairs as well... so upsetting. following!
  • Carole Carole on May 18, 2015
    Replace the fabric seats with wooden slats would be my thoughts on it.
  • Sandi Sandi on May 18, 2015
    I have almost identical patio chairs and we easily replaced the seat fabric when it got old and ripped. Take each metal side rail off - they just unscrew from underneath - and slide out the fabric. There's a thick rubberish spline holding it in. Use the old torn seat to cut out new ones and hem the sides just as the old ones were . Note that there's a distinct front and back in the fabric seat, this caused me problems initially because I didn't notice until I tried to put new seats together. I found outdoor upholstery remnants at fabricguru.com at very inexpensive prices. Make sure to leave the side hems open at the top and bottom so you can slip the spline back in. Then slide the new seats back onto the seat side rail. Truthfully this was the hardest part since the fabric wanted to bunch up but just persevere! Screw the rails back onto the chair and enjoy!
  • Hope Williams Hope Williams on May 18, 2015
    Hi Judith. Go to JoAnns on capital Circle and find a close out or discontinued outdoor fabric screen material. (That's what was used in the first place.) then just replace it. Get coupons off their website too. And wait till a sale is going on. This is key to saving the big bucks. PS. Just up the road from you in T'ville.
  • Leslie Hahn-Waldrop Leslie Hahn-Waldrop on May 18, 2015
    Heres an idea..wood slats....I think someone else mentioned it but this link will help you see what it would look like and instructions. Very cool look if you dont want to do fabric. http://www.hometalk.com/diy/-2445917
  • Mandy Brown Mandy Brown on May 18, 2015
    Sounds like Sandi has the answer. I would only add that you may want to look for outdoor fabric like Sunbrella or similar. Where I live we have a few warehouse discount fabric stores that sell fabric for a lot less than the big name stores. Regular fabrics are not treated to withstand the weather and may mildew if left out.
  • E Phillippe E Phillippe on May 18, 2015
    I just purchased some marine canvas, a Sunbrella fabric from Sail Rite........wayyyyy cheaper than fabric stores AND has a ten year warranty.
  • Cassie Hames Cassie Hames on May 18, 2015
    Good source for discount outdoor fabric is FabricGuru.com
  • Matina Matina on May 18, 2015
    Great suggetions!
  • Ida Granny Ida Granny on May 18, 2015
    I replaced my chairs with yarn, " like on the old lawn chairs" . Upholstery would be the easy way to go. Post when you get them done.
  • Lynda Dexter Lynda Dexter on May 19, 2015
    replace the fabric with shower curtains. It is water resistant, sturdy and you can find beautiful patterns.
  • Norma Granados Norma Granados on May 20, 2015
    My son had the same problem with aluminum chairs. he used a 1x3 PVC board that has wood like look, he cut the board at the same chair width and separated the boards with two Scraps of the same 1x3 to make it even the space between the boards. He predrill the boards and the aluminum chairs using Stanley steel screws attach the board to the chairs.
  • Cindy Nelson Cindy Nelson on May 21, 2015
    I have almost the exact same 4 chairs. They were left when my renter moved, so I took them. Was wondering how to replace the torn, rotten fabric. Acquired some faded square lawn cushions from my neighbor. So here goes....paint chairs, put down metal slats (husband does metal work), and paint the cushions with waterproof paint. Instant makeover! Thanks for all the bloggers' ideas.
  • Dawn Rodriguez Dawn Rodriguez on Jun 28, 2015
    How about macromay? Not spelled right!
  • Big26234979 Big26234979 on Jun 25, 2017

    I took the chair apart ,then wrapped a strip of shower around the frame 3 times put screws back in. ( the screws actually hold the fabric on my chairs). I used more fabric by wrapping several times, but this kept me f r om having to sew!

  • Stephanie Crist Roby Stephanie Crist Roby on Jul 08, 2017

    What's a strip of shower?

  • Meu49045124 Meu49045124 on May 15, 2020

    Sure would be nice if those who've already done this posted pictures! Does no picture posted mean it didn't turn out too well?

  • Stacy Rice Stacy Rice on Jun 10, 2020

    We just did this with ours. Feeding the fabric back on the metal sides of the seat had been the biggest challenge we encountered. I went to JoAnn and got an outdoor canvas. I did double it up on the seat for additional support. We also painted.

  • Trish Sutton-Chisenhall Trish Sutton-Chisenhall on Aug 14, 2020

    Do you have directions on how to do this? And tools?

    • Vich Vich on Jun 05, 2021

      We just did this repair. There are many YouTubes but very few that consider the pitfalls that can make a 4 hour task into it a difficult 2-day chore.


      They make it look easy. Because they don't make the rookie mistakes, they don't clue you in what to avoid. So here goes:


      Each of these "tips" was learned the hard way. Taking to time to read this over-long post may save you many hours and maybe a failed project.


      Sling chair repair pitfalls & tips:

      1. Get the width right! Measure center-to-center and add about 1/8" to allow material to loop the spline. We made the first 2 slings too tight (19 1/4 wide, which was 1/32 under center to center of the old one) and reassembly was quite difficult. We made the next one 20" and it sagged badly after assembly; we had to cut the seams & re-sew at 19 1/2 which was perfect.


      2. Replace your spline! It's $1/ft and only sold in 25' lengths, yet requires 32' for all 4 chairs (check the calculator for your chair), so we skipped this. However, it's necessary if your chair has a lot of curves! The original will be stiff and out-of-round shape; this makes re-stringing nearly impossible. Our millimeter spread measuring tool shows the old one is 4mm x 5mm. So the original was about 4.4mm (just under 3/16) - meaning 5mm won't fit!


      3. Ordering Spline: We first ordered 3/16" (5mm) replacement spline on Amazon because that seemed about right on a tape measure, but it was noticeably fatter when it arrived AND FEEDING IT WAS EVEN HARDER - impossible to feed around the curves! However, we found a China seller (KOMORAX Store) who cheated a bit so it's about 4.2mm (under the advertised 3/16), about the same as our original but round & more flexible because it's new. Shipping took 2 weeks to arrive, but worth it! After that, it took just 5 minutes for me to re-string both sides. It was still a bit difficult to get past the curves, but still just 1 minute for the first side and 4 for the 2nd (it's got more tension).


      Although we did the first 2 with original spline, it took 30 minutes applying all my considerable strength with my wife feeding the other end, using large plyers etc. Each chair was an exhausting workout, risking ripping the material. The correct spline size on the last 2 chairs made all the difference!


      Also our replacement material is a bit thicker, making oversized splines even more unviable.


      4. Vaseline helps. Also using your 2nd hand to sort of "press the material" around the center curve, in one fluid motion for each inch or two, while pulling from above and someone feeding it from the front.


      5. End-caps: The old end-cap plugs all broke no matter how carefully we tried removing them, and finding an exact replacement proved impossible for us. Plummer's putty works great to plug the end-cap holes; I just pressed the tops of the old plugs over the putty. The point is to keep the water out & not have scratch-hazards. Maybe later I'll glue the caps in place and paint the lighter colored plumbers putty brown to match, after it dries (takes a couple months to cure).


      6. Thread color: The thread color we picked (orange/yellowish) is fairly visible on close inspection so any sewing mistakes are noticeable . Beige would have blended better. Note: Be sure to buy UV and outdoor rated tread. Also; some thread thicknesses aren't for home sewing machines. If doing it again, I'd probably go to JoAnn's for a spool that fits our machine as we had to load it into the internal spool - which has it's own tension & jamming challenges.


      7. Unevenness shows: On one chair, I didn't pay close attention to the top for evenness (left top vs. right top) after treading the slings. It's about 1/4" lower on one side. It's very noticeable because the reveal-gap from the top back-bar is about 3/4" so even 1/4" difference catches the eye even from a distance. It's impossible to adjust once it's tight.


      8. Cutting out the old fabric: Pulling it out takes considerable force. Its nearly impossible around the center curve unless you cut right up to the bar, but be SURE to leave a good length that's left wide, so you can grip it with large plyers and have room for new gripping when it rips.


      9. Paint: We repainted using several coats Rust-Oleum satin Dark Walnut paint/primer, but also applied separate primer underneath, after light cleaning & sanding & rinsing & drying. Rust primer on the rusty bits, self etching metal primer on the rest. Self-etching primer doesn't doesn't replace sanding, but I figure it helps. It's really for raw unpainted surfaces so maybe regular primer is better - as I understand it there's acid that helps it adhere. Sanding may seem optional with self-etching primer but could save you from a much harder sanding chore in a year of removing all the now flaking paint!


      Spray painting only added about $20 (4 cans) and 2 hours to the project but was soo worth it. I used multipole thin coats - re-painting missed areas after 5 minutes to dry a bit. Thin coats dry very quickly. I used smooth with somewhat medium-speed pass from an equal distance.


      Note: Use a respirators! That stuff's nasty on the lungs. Surgical masks don't do squat.


      They look like new - maybe better!


      10. The spreader bars. People have reported great difficulty with installing them. I didn't have an issue by using reversing our clamp to make a spreader. Some also use a car jack. There's a special tool, but for 1-time use it's not worth the purchase or rental.


      The first spreader bar can be twisted in *before* screwing the 2nd side in place. The 2nd spreader can be pounded in with a mallet (see photo below), using clamp-spreaders to get it most of the way there. Some touchup paint needed for the scraping.


      Alternatively, we tried bending the bar then pounding it straight after on 1 chair. This works, but I found the other method easier. The damage to the chair is minimal and simple to re-paint.


      11. Don't remove both sides! Loosen the 2nd for painting in the cracks, but it's way easier to feed the material to a side-runner that's mounted to the chair. The 2nd one will need 2 people to hold it in place & feed & pull. I managed it myself, but when my wife was around to help it went far easier for her to feed the material & help hold the bar steady a bit.


      12. Material quantity: Buy extra material. We used "Phifertex Stripes Vinyl Mesh Raleigh Willow 54" Fabric" from Sailrite.com for $23/yd. Our chairs needed 3 yards and bought 4; wishing we had 6. Once we started sewing, we made matching umbrella holder and covered 2 patio chair cushions, but wish we had enough for pillows. So we're ordering more and have to pay twice; plus there's more waste when cutting from 2 rolls.


      For one thing, I'd like to make Velcro-attached seat tops; to protect from So Cal UV rays destroying these in another 5 years.


      Also; there's a trade-off on Phifertex ($14/yd) or Phifertex II (same as their Stripes - $23/yd). We felt the extra stiffness of Phifertex II made it more difficult to re-thread, but is far more durable. In fact, Sailrite.com only recommends it for sling chairs. However for chairs with a lot of curves, someone who's not strong may find it too difficult to reassemble. Phifertex I is technically good enough for sling chairs. Your call. After learning the tricks to ease the restringing it, we're glad we got the stiffer & more durable one, but it still took good strong handling to rethread. I suspect that many of the people doing videos use the more pliable (less durable) alternative, making it look so much easier than what we experienced, even after learning some tricks.


      13. Hem bar cut: Cut hem fold-over short of the spline channel.


      Most videos say to create a folded hem-bar at top & bottom to prevent fraying. However this creates a 4-layer section at each corner that has to feed thru the slit. At the least, this makes for a far more difficult threading process, at worst it simply won't fit. In our case, we had to cut the stitching, cut that final inch out of the hem, and re-sew with just the spline channel having material (ie: 2 layers to the very end).


      Frankly; the Phiphertex II (or Stripes) material is so durable, you're probably fine just burning off the frays because there doesn't seem to be extra weight at the very top or bottom. In fact it's rare that your body even touches those sections if your chair has a final steep curve like ours, but the hem does look nice.


  • Will Haryson Will Haryson on May 14, 2021

    We use these chairs

  • Johnavallance82 Johnavallance82 on Jun 05, 2021

    Hi there,

    Use a Sail Canvas, or Deckchair Canvas or other weatherproof material that is made to be used outside all year!

  • Deb K Deb K on Jun 05, 2021

    Hi Judith, hope this helps you out,

    https://www.youtube.com/watch?v=6HAUe6E6FP8

  • LWONG LWONG on Jan 03, 2023

    I have the exact same chairs, same fabric, same problem. Check https://www.patiochairsupplies.com/

    I sized the chairs and the replacement fabric fit perfectly. They have many pattern options. The key is you must have a 24" spreader bar which you can buy at Harbor Freight for less than $10.