Fab Furniture Flippin' Contest

I recently joined a Facebook group that does monthly contests for furniture makeovers.
The Fab Furniture Flippin' Contest Group
I thought, "I'll wait a few months and join in on a contest later, when I have time".
Ummm, I joined the first one that came my way.
I couldn't resist.
I joined it for three reasons:
1. The name of the contest is "Icing on the Cake".
Hellooooo, I love cake.
2. D. Lawless Hardware sponsored the project and we were able to use their hardware.
Their pieces are fantastic and the prices are crazy low!
3. The project was about embellishing furniture, so I got to use a new Velvet Finishes product that isn't even on the market yet!!
So exciting!!
I can't wait to share it with you!! Eeeek!!!!!!!


The minute I read the criteria for this contest, I knew exactly what I wanted to do.


Embellish.


Really, it's one of my favorite words.


Embellish, like the beautiful icing on the cake.


Let me share what I did.


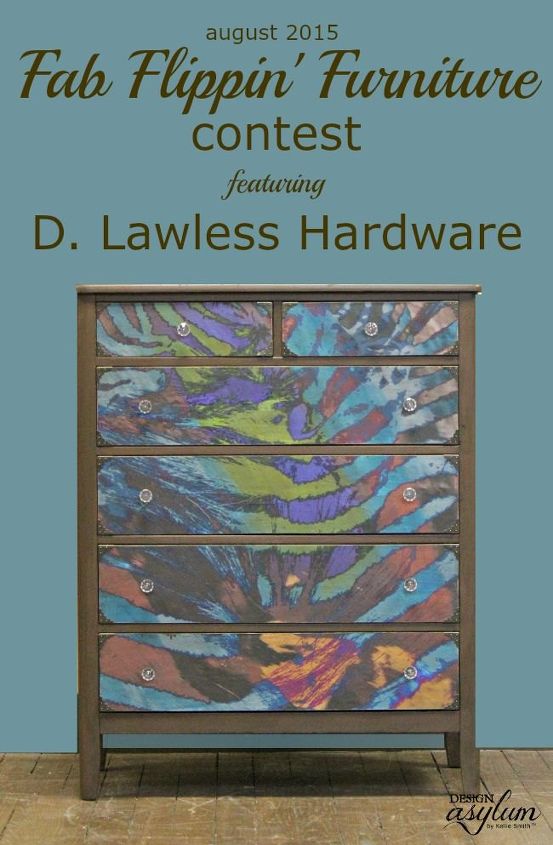
I started with an old chest of drawers that was in terrible shape.


The Accomplice had pulled all the veneer off the drawers and it had been sitting in the studio for several months, waiting for a plan.


To prepare for this project, we painted the entire piece in Velvet Finishes Prestigious.
Some of you know that I have a business partner, my friend Melanie Honig, in a textile design design business.


I wanted to embellish this chest with a piece of Smith-Honig art.


Our website is almost ready and we are suuuuuper close to launching our products.


I'll fill you in on that later...


For now, check out Melanie's travel blog at Rover at Home. You will love her.


Here's the S-H pattern I chose...
Gorgeous, right?


I had this printed on matte paper at a local print shop. I determined the drawers overall size and had the piece printed a little larger.


I had a little leeway on where I started using the pattern, since it was larger than I needed. I determined I wanted to begin the pattern 6 from the bottom of what I had printed.


I measured 6 across the bottom and made a line with a straight edge and trimmed.
After I trimmed that off, I had the bottom edge for the bottom drawer.


To cut the pieces for the actual drawer fronts, I used the drawer to make my cutting marks.
I simply lined up the drawer straight on the paper, marked with a pencil and cut. After I removed the drawer from the paper and before I made my cut I lettered "R", "L" and "B" for right, left and bottom.


Because of the pattern, I had to be careful to keep it all straight!!


It would have been a disaster if I had glued one on upside down....


Now for the exciting news that I have to share.


We are introducing a decoupage product for your furniture makeovers!!


And this ain't yo mama's decoupage.


Our new DECOPASTE product will be on the market in just a few weeks.


It's ready, we are just waiting on the labels!!


It's so new I do not even have a photo to share! Trust me when I tell you, the product is fantastic and is much less expensive than some of the other decoupaging products on the market.


Just like Velvet Finishes paint, it is incredibly easy to use.


Woo Hoo!


So...


To apply the DecoPaste, 'paint' it on with a Reviver, or other, paint brush, fairly thick. It dries really quickly so apply your paper immediately. Start in the corner, keep one paper edge straight on the furniture and smooth as you go.


EASY!!!!!


Allow to dry, preferably with some weight on the piece, such as books. We used old encyclopedias we have and let them sit for about 10/15 minutes.


Now for the secret to making a furniture makeover with DecoPaste look amazing....


SANDING.


Sanding the edges is the key.
I use a Ryobi Corner sander but you could also use a sanding block.


Hold your sander at a 45 degree angle to the edge you are sanding and make light downward motions on the edge. Sand the edge of the paper off so that you no longer feel the edge of the paper. The sanding will remove any overage you have. It will also make the paper seem as though it is actually the drawer front, rather than a drawer with paper attached.


HOW COOL IS THAT!?!?!


Real cool I tell ya!!!


Since I wanted this to have an aged appearance, I glazed the drawer fronts with Enhance Dark Glaze. You can see in the photo above, when you sand the edge of the paper, you see the white underneath. It looked fine but it wasn't the look I was going for.
You can see here, the difference the glaze makes. The left side is the paper as printed and the right side shows the glaze.


As you see, the top row is actually two drawers. I did the exact same process as before. I used the drawer to measure and cut the strip the full width of the paper.
HOWEVER...


In-between the drawers is a three quarter inch strip of wood.


After I DecoPasted the first drawer, I cut the three quarter inch piece off before I did the other drawer. This kept the pattern aligned. Had I not done that, the drawer on the right would not have the correct pattern flow.


After the 'embellishment' art was applied, I glazed the hull of the chest also. The dark glaze over the Prestigious doesn't show much, but it adds depth to the finish, which I like.
The Enhance Glazes are also added protection for the paint finish.


Now check this out...


These gorgeous little corner pieces from our fabulous contest sponsor are quite cool, no?


I just tapped the nails in with a plastic tipped hammer.
You need to know that D. Lawless Hardware doesn't just have drawer pulls and knobs.


They have pie safe tins, wooden furniture appliques, casters and furniture legs....I could go on and on.


The corner pieces are under the jewelry box category. The website reads 'box corners' but I thought they would look fabulous on a drawer.


And they do!!!


For the drawer pull I chose a small acrylic knob.
The perfect knob for this project!


Since I covered the previously drilled holes for the knob, I wanted to be careful not to tear the paper covering them, when putting the new knobs on the piece.
I took the screw that came with the knob and pushed gently from INSIDE the drawer. I pushed against my finger so as to only make a dent, not go through the paper. I only wanted to mark where the screw would go. After I made the mark, I pushed the screw through the paper from the OUTSIDE of the drawer. I did not want the paper to tear outward, but inward.


After I made the hole, I put the knob on correctly, screw through the back towards the front.


So what do you guys think of the makeover?
I did ok, right?


And I seriously hope you have already been to the D. Lawless Hardware site by now.


Trust me, you are not going to believe the selection, the style and the prices!!


So let me introduce to the Fab Flippin' Furniture Contest hosts...
The featured hosts for this month are Michelle at Dandelion Patina and Evey at Evey's Creations.


Be sure to check out their projects as well!


And if any of my blogger friends would like to join in on the fun, contact Stacy at info@anatasiavintage.com or Evey at info@eveyscreations.com and they will get you hooked up!


SPONSORSHIP DISCLOSURE


Some or all of the hosts of the Fab Furniture Flippin' Contest receive monetary and/or product compensation from the sponsoring brand, D. Lawless Hardware, in order to complete their themed projects. D. Lawless will also provide the prize package for the contest winner.


Kellie from Design Asylum Blog
Want more details about this and other DIY projects? Check out my blog post!
Go
Frequently asked questions
Have a question about this project?
  2 questions
  • 56294920 56294920 on Jan 12, 2016
    Gorgeous! The colors are so rich and tropical. You did an amazing job and the little corner details really finished it off. LOVE. I'd like to see that original fabric as curtains. One question (important): How did you get such a large print made? Do regular copy places do printing that size?
  • Larry threlkeld Larry threlkeld on Feb 05, 2016
    Thought your Fab Furn piece with the Smith-Honig print was really wonderful. How woulg I go about getting something like that or similar. I'm a novice-hack in S GA. Many thanks. Larry T
Comments
Join the conversation
4 of 14 comments
  • Deb Deb on Oct 11, 2015
    I love this! Beautiful work and such a great idea. Nothing better than refurbishing than throwing away....
  • Chris aka monkey Chris aka monkey on Jan 08, 2016
    @Kellie from Design Asylum Blog this is stunning and i am so happy that you gave several shout outs to D. Lawless Hardware they are the best people and the product is well made and the prices very very affordable xx
Next