Fix Leaky Faucets

BrightNest
by BrightNest
WHY DO THIS?
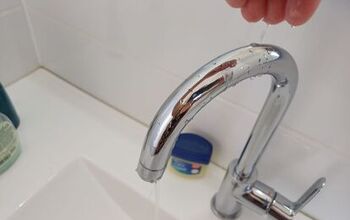
A leaky faucet that drips one drop per second will waste over 27,000 gallons of water in a single year. You probably wouldn’t let a leak go for a full year, but it certainly puts a new perspective on that dripping noise! Save some water and preserve your sanity by fixing any leaky faucets in your house.
Learn how to save water and fix your sink: http://bit.ly/FinallyFixYourLeakyFaucet
WHAT YOU'LL NEED:


-Flathead Screwdriver


-Phillips Screwdriver


-Crescent Wrench


-Plumber's Grease


-New O-Ring (For Compressions Sinks)


-New Sink Cartridge (For Cartridge Sinks)


-Sponge


-White Vinegar


-Ceramic Seals (For Ceramic-Disk Faucets)


HOW TO:


1.) Turn off the water to the sink.


There is usually a local shutoff valve below your sink. Turn it clockwise to turn off your water. Note: If your faucet doesn’t have a local shutoff valve, you’ll need to turn off the supply of water to your entire house. Once the water is off, turn on the faucet to relieve any extra pressure.


2.) Plug the drain.


You’re going to be removing small pieces of sink hardware, and the last thing you want to do is lose one down the drain! For extra protection, put a towel or rag overtop the open drain.


3.) For compression faucets.


You can identify this type of faucet because it will always have two different handles – one for hot water and one for cold – and there will be a metal “stem” beneath the handles (see picture next to this step). If it has two handles but no stem, it isn’t a compression faucet. When this type of faucet leaks, a blown or damaged O-ring is almost always the culprit.


4.) Remove both the “hot” and “cold” faucet handle and set them aside in a safe place.


Note: You may need to remove a screw on the side of the handle before you can remove it. In some models, this screw is located behind the handle’s cap (it often has a “hot” or “cold” label on it), which can be pried off with a flathead screwdriver.


5.) Underneath each handle, you should see a metal or plastic valve stem (it looks really similar to a tire valve). Using a crescent wrench, loosen the valve stem and then remove it. On the bottom of the piece you just removed, there should be a washer and an O-ring. Remove both of those from the stem.


6.) Apply a little bit of plumber’s grease to the bottom of the stem, and then add your new O-ring. Then reassemble everything in reverse order.


7.) For cartridge faucets.


You can identify this type of faucet by the cartridge beneath the handle (see picture next to this step). When this type of faucet leaks, you generally need to replace the cartridge or the O-ring around the cartridge.


See the remaining 7 steps on BrightNest! http://bit.ly/FinallyFixYourLeakyFaucet
BrightNest
Want more details about this and other DIY projects? Check out my blog post!
Go
Frequently asked questions
Have a question about this project?
Comments
Join the conversation
Next