


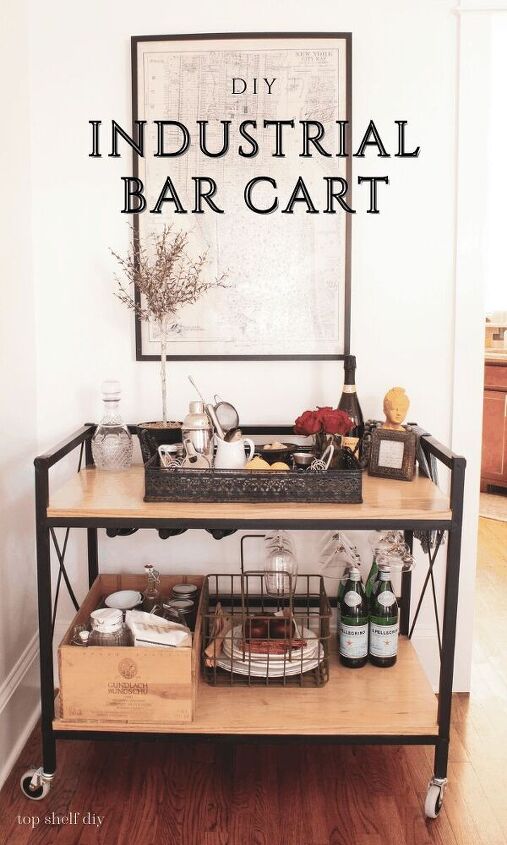
DIY Industrial Metal Bar Cart
Build a fabulous metal bar cart without any welding equipment!
I’ve always wanted to make a bar cart out of mixed metal and wood, but since I don’t own any welding equipment that dream has eluded me…until now 😀
It all started last week when I stumbled across this coffee table tutorial from Mike over at Modern Builds. By inserting wood dowels in 1x1 aluminum tubing, he was able to assemble a table frame using only basic wood screws. Genius!
Here’s how I took this concept and ran with it.
Inspiration for this bar cart
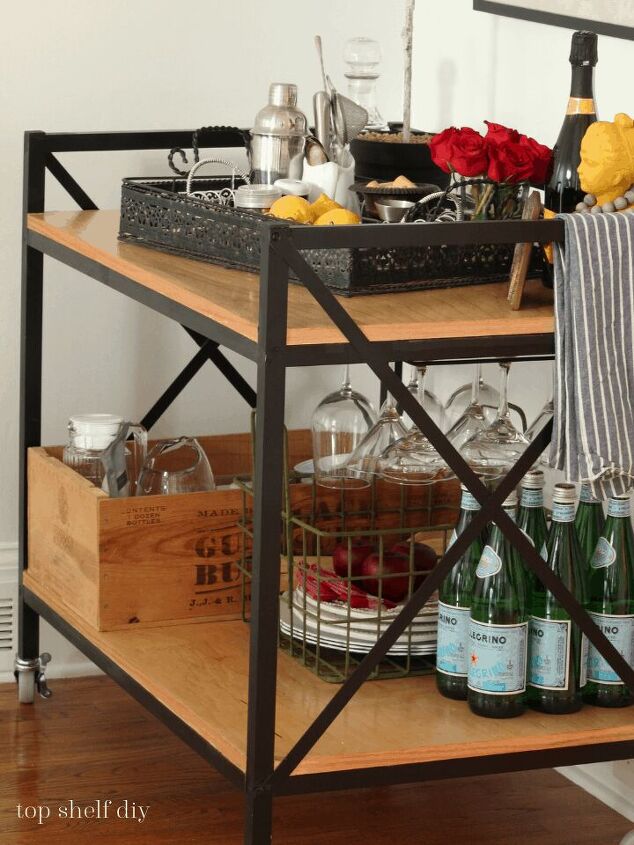
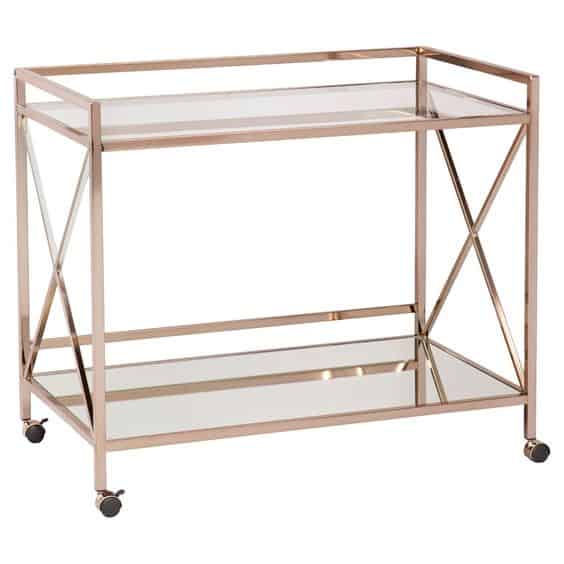
I was inspired by this bar cart listed for $214. My favorite parts are the X-braces on the sides; I was hoping to recreate the look using flat strips of aluminum.
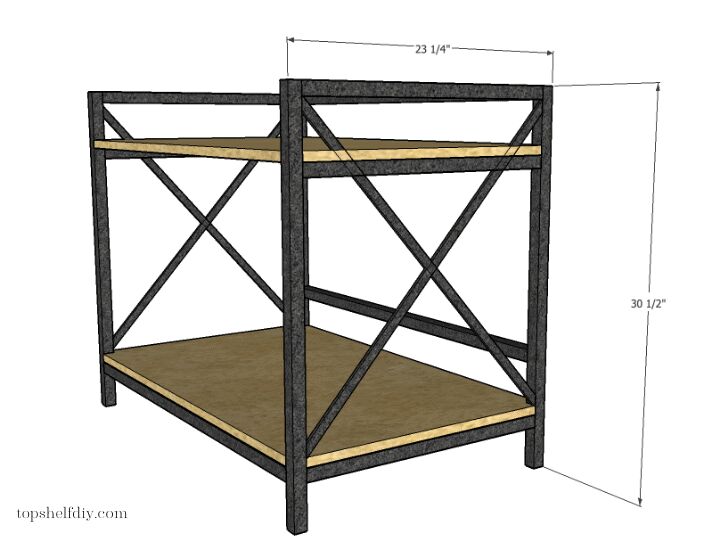
The dimensions in my plans are very similar.
My cart cost roughly $350 in materials and took several days from start to finish. Yes, it would have been cheaper and faster to just buy the inspo cart, BUT, I like knowing this piece is one of a kind. And now I can build metal furniture without welding!
I do think a custom metal bar cart like this would fall into the $500-$3,000 range. So in my mind this is still a good deal!
What aluminum tubes and dowels to use
These plans use 1x1 aluminum square tubing. You could probably use tubing larger than 1x1" if desired, just modify the plans accordingly.
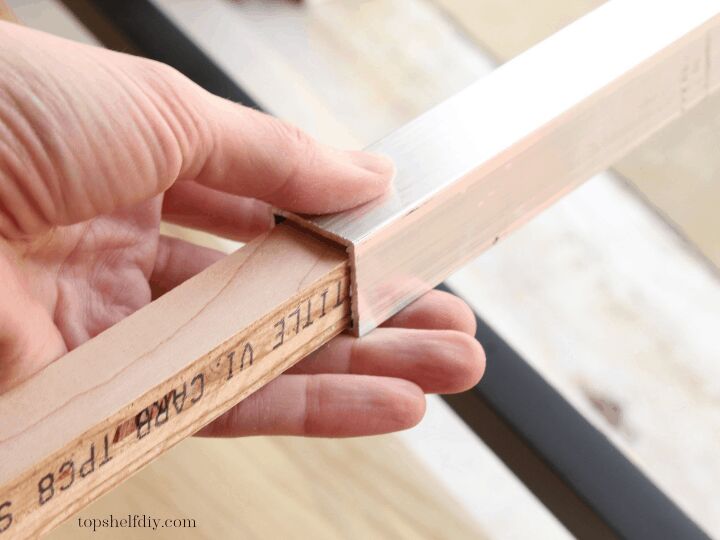
Initially I used 3/4" square dowels purchased from Lowe's, but they snapped under the pressure of my wood screws. I swapped them out for dowels made from scrap 1x6 pine. These worked perfectly.
You can make your own dowels from any scrap wood as long as it's 3/4" thick. Rip to 3/4" wide on a table saw.
Setup for this project
I highly recommend creating a jig to make the assembly process easier. A little bit of prep will save you lots of forehead smacks down the road.
A jig will keep your pieces from shifting as you screw them together, ensuring everything stays level and square. Make your jig by drilling scrap wood onto a work surface. Here's what mine looked like:
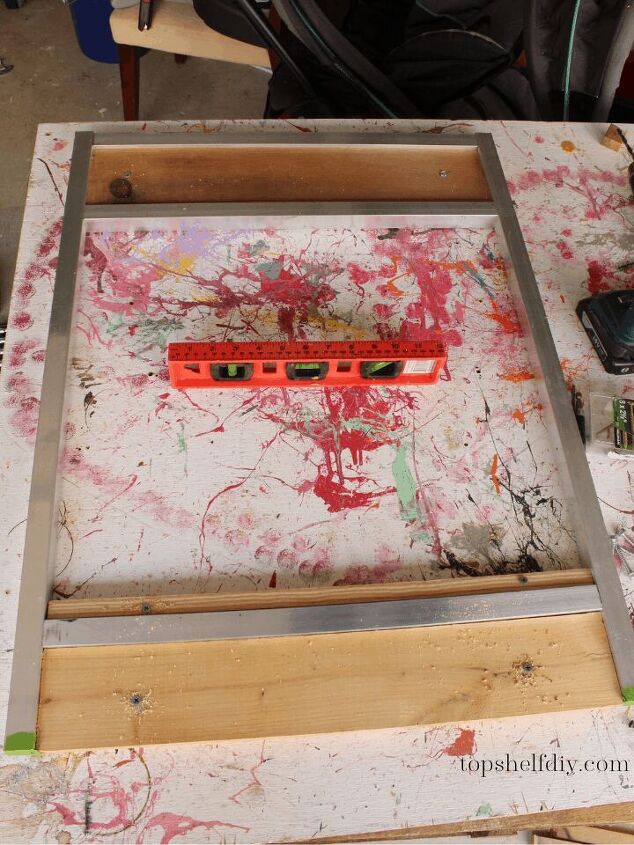
Note they are cut exactly to the inside width of the legs (21 1/4"). Face clamps are also your best friend.
How to join aluminum without welding or brazing
Making your metal frame is a snap once you get into a rhythm. Here are the steps I followed to secure my pieces together.
- Insert dowels into aluminum tubing.
- Apply small piece of painter's tape to the end of your tubing so your dowel rod stays in place.
- Place aluminum tubing in jig; clamp in place as needed.
- Mark and pre-drill your holes, making sure to go through the entire thickness of your tubing. Use a countersink drill bit so your screws end up flush with the surface.
- Slowly drill 3.5" wood screws through aluminum tubing.
- Offset screws by at least 1/2" so they do not collide.
- Apply small amount of wood filler once all screws are inserted.
⚠️ IMPORTANT: you'll need to remove two pieces in order to dry fit your walnut shelves. Don't add wood filler to your screws until after this step has been completed. See plans for further details.
Now let's get building!
Tools needed
- Miter saw
- Hand saw
- Table saw
- Measuring tape
- Power drill
- Jig saw
- Orbital sander
- (1-2) face clamps
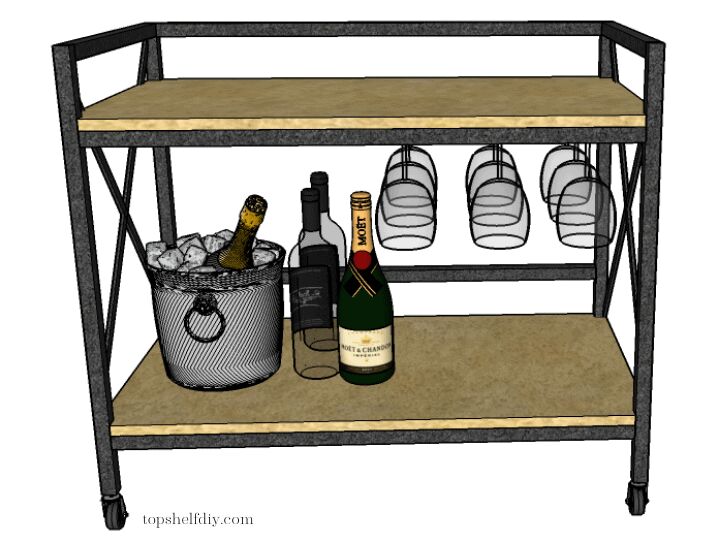
Bar cart accessories
- Wine glass rack
- Under cabinet wine bottle mount
- Wine crate courtesy of my Craigslist "dealer" -- you can read more about her here.
- Metal tray, vintage female bust, metal milk crate, thyme tree, and decanter were all purchased at Out of the Cedar Chest, a local antique store. If you live in the Atlanta metro area you should definitely check them out!
- New York Map from IKEA but it looks like they no longer carry this version.
If you're on a budget, you can keep the costs down on this build by using a plywood veneer less expensive than maple ($60-$70 per sheet). The 8-foot aluminum tubing pieces are $20 each, which was another major cost for this build.
⚠️ IMPORTANT: wear safety glasses, a face mask, ear protection, and a neck covering while cutting your aluminum with your miter saw. Protect anything in your workspace that you don’t want covered with tiny pieces of aluminum – they fly everywhere! Cut slowly with your miter saw to avoid kickback.
Cut list
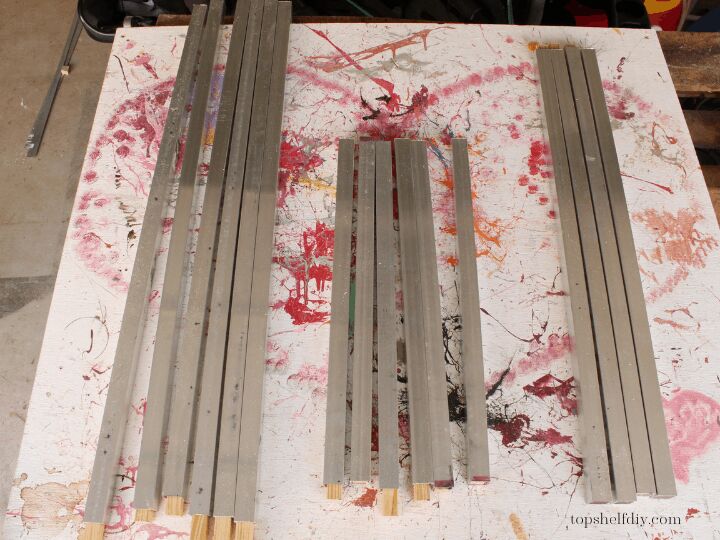
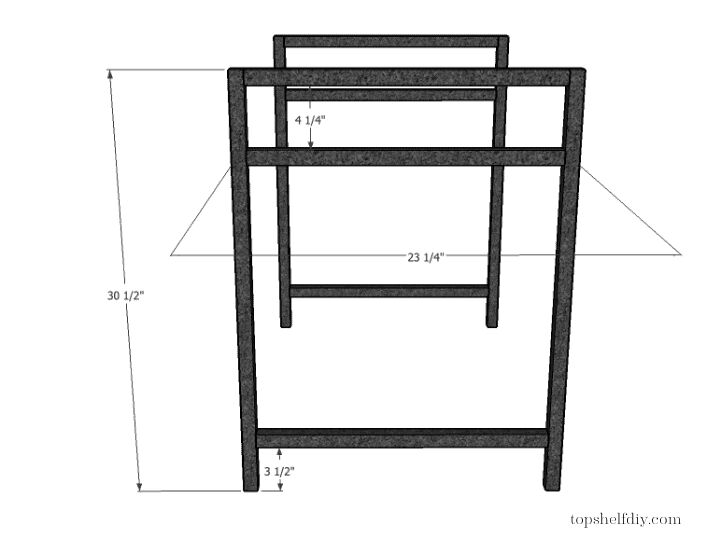
- 4 – 1x1 aluminum tubing @ 30 ½" (legs)
- 4 – ¾" dowel @ 30 ½" (inside the legs)
- 6 – 1x1 aluminum tubing @ 21 ¼" (short cross beams)
- 6 – ¾" dowel @ 21 ¼" (inside short cross beams)
- 6 – 1x1 aluminum tubing @ 36" (long cross beams)
- 6 – ¾" dowel @ 36" (long cross beams)
- 2 – ¾" plywood veneer @ 38" x 23 ¼" (shelves)
- 2 – 1x6 pine ripped to 4 ¼" wide by 21 ¼" long (jig)
- 2 – ¾" dowel @ 21 ¼" (jig)
Instructions
Step 1: Prepare your shelves
Rip down your large sheet of plywood. I had Lowe's rip my pieces for me (place painter's tape along the cut line to avoid tearout).
Using a jigsaw, cut out a 1x1 square in each corner. Repeat for second shelf.

Add edge banding to the exposed edges of your plywood shelves. Sand, stain and apply finish as desired. Start the staining process now and work on assembling your legs while layers of stain are drying.
Set shelves aside.
Step 2: Cut your aluminum tubing and dowels
No special tools required here; a regular miter saw will do the job. Cut slowly. Insert dowels into aluminum as shown.
Apply painters tape to the ends of your aluminum tubing to prevent the dowels from sliding out during assembly.
Step 3: Assemble your frame
Starting with the shorter side pieces, begin screwing your aluminum tubing together. Mark and pre-drill each hole, then secure with 3 1/2" wood screws. Use a countersink drill bit if you prefer the screws lie flush with your aluminum surface.

Step 4: Attach your shelves
In order to set your wood shelves in place you'll need to temporarily remove two of your aluminum pieces. These are the pieces.
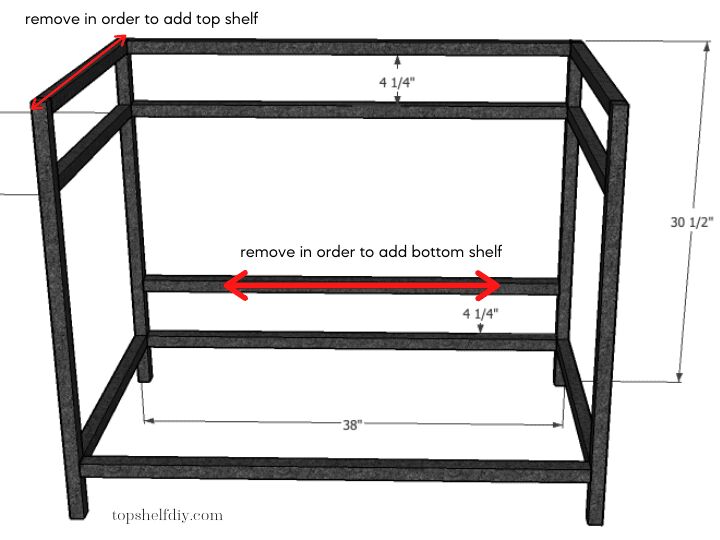
Secure the underside of your shelving to your frame using ¾" corner braces.
Protect the surface of your wood from spray paint. Fill in any screw holes with wood filler and sand.
Step 5: Add your x-braces
Mark your angles on 1/4" thick aluminum flat strips. Clamp to a work surface and cut with a hand saw. DO NOT use a miter saw as this could cause serious injury. Attach to the side of your cart using 1" wood screws and construction adhesive.
Step 6: Paint your cart
Wipe down your metal with acetone to remove any residual residue. Apply coat of Etching Primer followed by 1-2 coats in your color of choice.
Step 7: Add casters and bar cart accessories
Finally, the best part! Attach your casters by screwing them into your dowels. Attach aluminum tubing end caps to the top of your exposed legs.
Add a wine bottle rack, wine glass holders, and any other tools you'll need to mix some banging cocktails!
If you'd like to download the free plans for this build head on over to Top Shelf DIY and subscribe -- they're included in my Printables Library.
Cheers,
Erin
Resources for this project:
See all materials


Comments
Join the conversation
-
I think that yours turned out better. Thank you for sharing.
-
Fabulous!! I agree that yours is much nicer than the one that was your inspiration. Great job and I love 💕 it!! Thank you so much for sharing. 🙂


Frequently asked questions
Have a question about this project?