


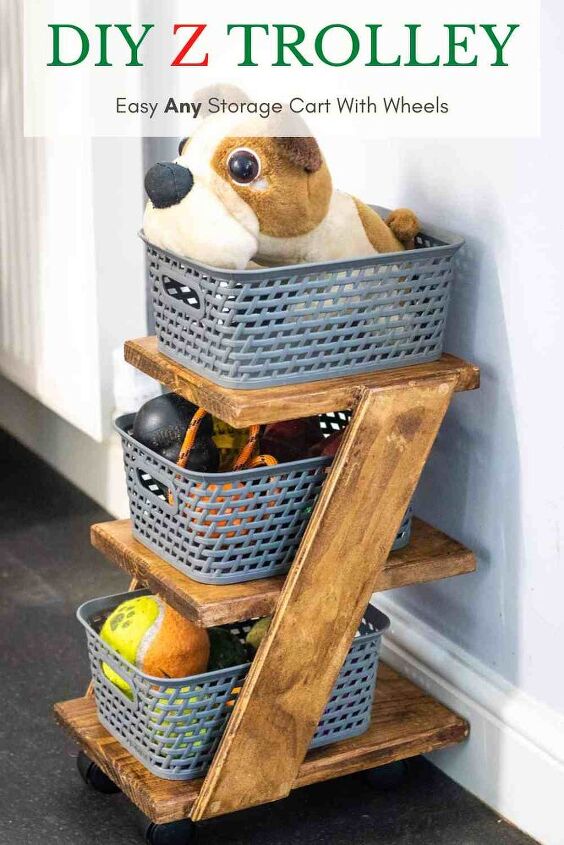
DIY Z Shelf 3 Tier Trolley for 4L Basket Storage
This easy DIY Z shelf 3 tier trolley has endless storage uses around the home for plastic baskets. You won't need to learn how to make a basket, because I've designed it to fit both 4L Curver and Wham Studio boxes. Includes free plans with step by steps and alternative tools you can use. Note, this project is not sponsored, but does include Amazon affiliate links for tools and materials I have used.

I've been meaning to make a fruit and veg rack for quite some time. So, after a bit of serial pinning on veg rack ideas on Pinterest, I narrowed it down to two.
One was to have a lidded potato box on top, which I still plan to make, and this DIY Z shelf basket caddy because it was really easy and uses offcuts. *I'm avoiding all shopping trips while it's not safe to venture outside.
And getting back to me staying at home; I spotted Tesco had some small and really cheap baskets by Curver and Wham World for £1.50-£2. It just made sense to save some time build a DIY wooden 3 tier stand for plastic organized baskets. Also, that way, ANYONE can make them with basic tools, too!
What Can I Use This DIY 3 Tier Trolley Shelf For?
While trying to describe the end-use for my DIY Z shelf 3 tier caddy tray, I struggled to narrow it down, because it could be used for SO many things. Here's what I've thought of so far for my DIY basket shelves:
- DIY bedside trolley (and it's easy to make 2)
- Farmhouse style tabletop cupcake stand
- Small afternoon tea trolley for sandwiches, cakes, etc
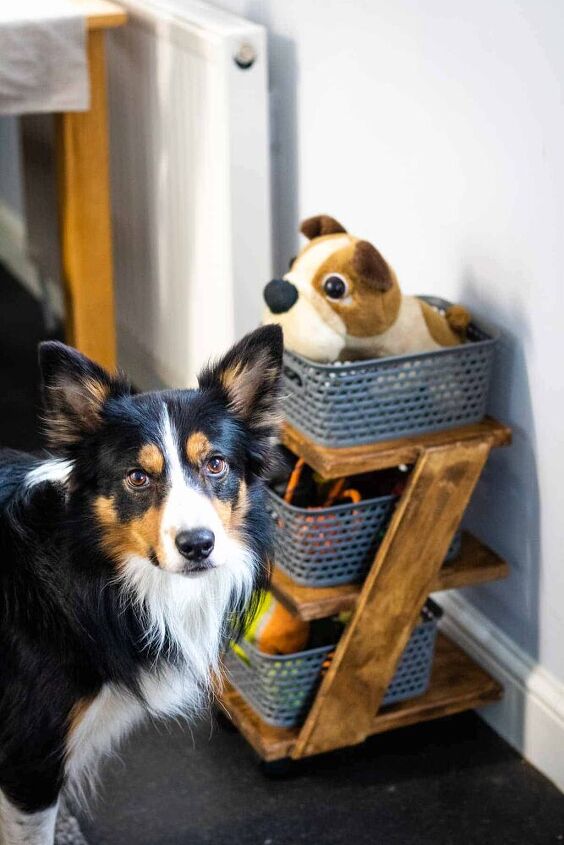
- DIY dog toy basket
- 3 tier fruit basket
- Rustic 3 tier cake stand
- DIY fabric basket
- Wooden bathroom trolley
- DIY end table trolley
- 3 Tier shoe box shelf
- Any hobby trolley for sewing, knitting and other knic-knacs
- Design it larger for a DIY bar cart drinks trolley
- I could go on... and on... and on!
But for me, what I love about this design so much, is the Z shelf frame, which was fun and unique to make. Of course, you could cut an easier straight vertical support to screw to all three shelves instead.
Free Plans and Cutting List
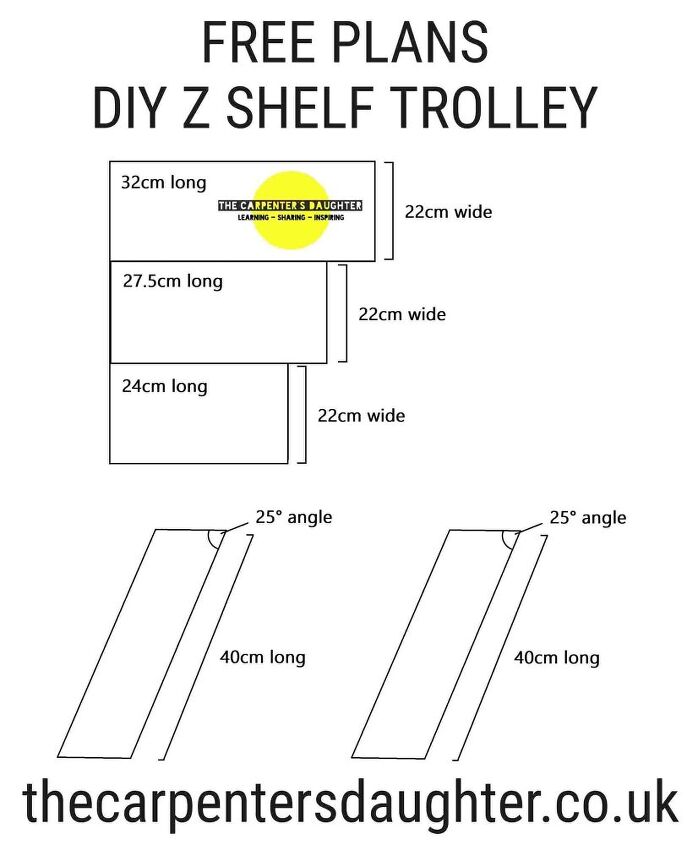
Please only treat these free plans as a guide, as many baskets will differ in measurements. For example, Wham sell at least two different shapes for their 4L boxes, which are more like trays.
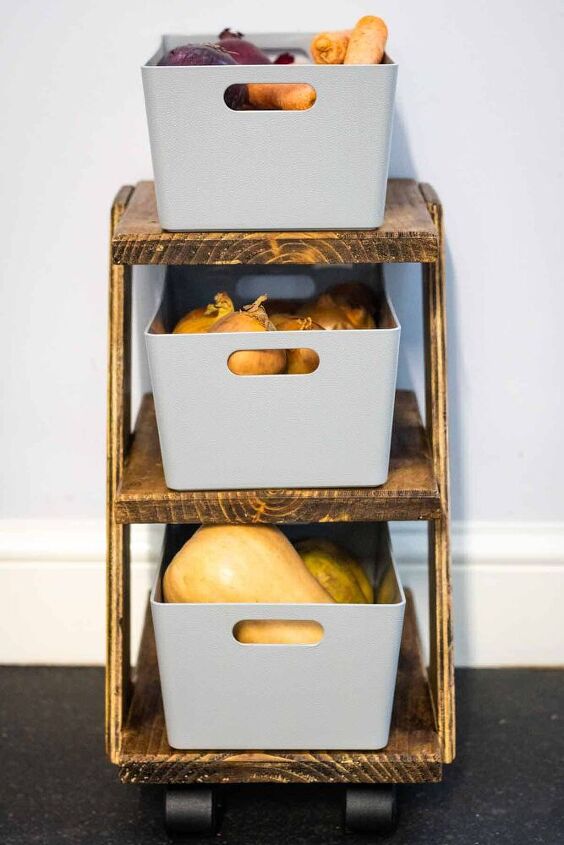
Also, with it being staggered Z shelving, the bottom shelf is longer, so it can't topple over. The middle one is slightly shorter, then the top shelf is the shortest.
All 3 DIY Z shelf baskets are identical in size for ease. You're more than welcome to shop around for bigger plastic woven baskets to fill the space of the bottom shelf. But, if you want uniform baskets, then, this design will suit any smaller than the following measurements:
- 15cm high
- 22cm wide
- 24cm long
Tools & Materials I Used For My DIY Z Shelf
Please note that as an Amazon Associate, I earn from qualifying purchases made through links.
- 220mm x 22mm staircase timber, or similar board (I used offcuts)
- 12mm thick strip of plywood (Or similar offcut that's roughly 1200mm x 85mm to mitre and cut in half)
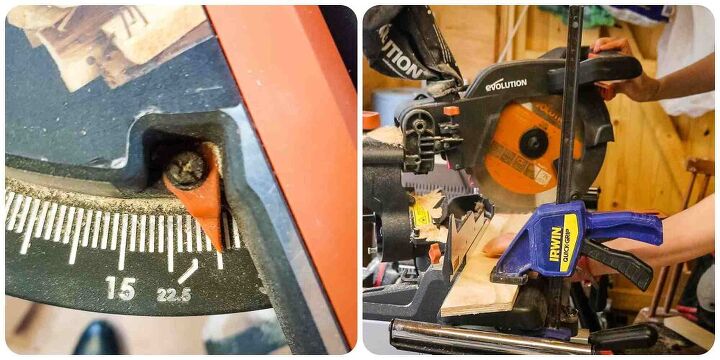
- Mitre saw or hand saw
- Sliding bevel *(if you don't have a bevel mitre saw)
- Clamps
- Sawhorses or workbench
- Wood glue
- Combi drill
- Tape measure
- Countersunk bit
- Wood screws
- Orbital sander
- Palm router (or sanding block)
- Chamfer router bit
- Castor wheels
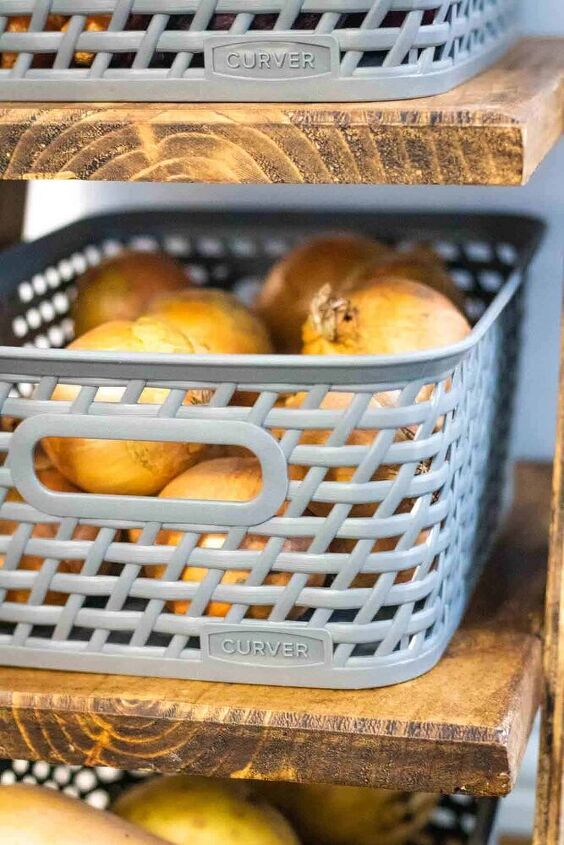
- 4L Curver baskets* or 4L Wham Studio Grey Boxes*
- Dark furniture wax
- Lint-free cloth (or even better, an old cotton shirt or rag, which is cheaper!)
- 3mm wood drill bit
- Wood filler
- Ear defenders *PR gift
- Safety goggles *PR gift
- Dust mask for sanding
Tips For Buying Storage Baskets For Shelves
Please note, this project is in no way sponsored by Curver or Wham. There are MANY different brands available, so I suggest you check out Poundland, or supermarkets because I found mine on sale at Tesco.
Or Recycle Old Drawers
Alternatively, you could recycle old drawers from a tatty sideboard, like my upcycled plant stand. This would work better drawers that aren't that wide, otherwise, you'll need to add more supports.
Tips For Cutting Wood
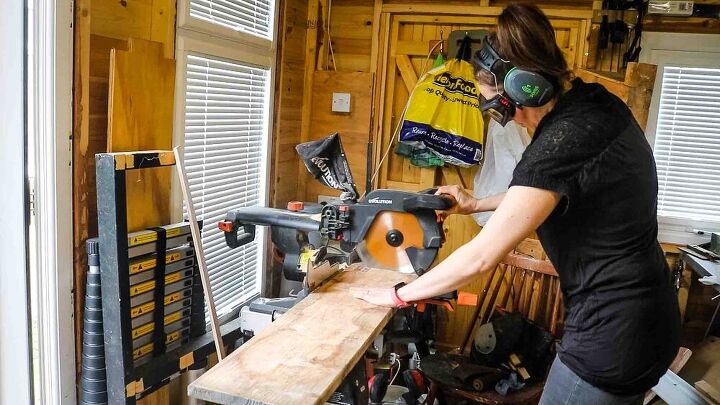
For quickness, I cut all three shelves and supporting strips with a mitre saw, which also cross cuts (AKA, makes straight cuts).
The reason I preferred this, is that, when I came to my angled supports, I was able to set it up to 25° just once. Then make my 4 cuts quickly.
If You Don't Have a Mitre Saw
You can still make my z shelving without a mitre saw, but you will need sliding bevel and a protractor to set it to 25°. Then use your bevel to draw your pencil lines like this, then cut with a hand saw.
How to Build an Easy DIY Basket Shelf
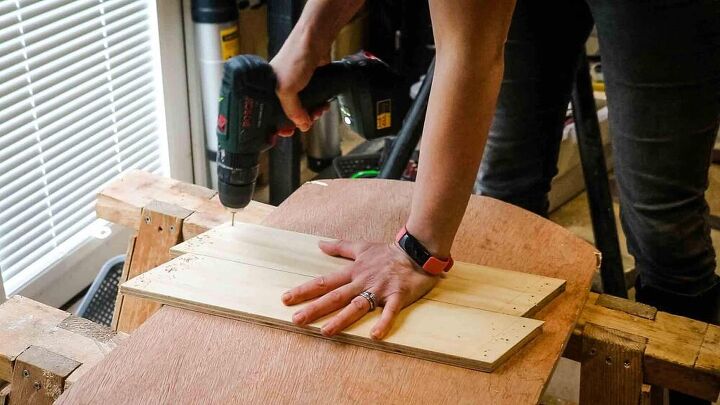
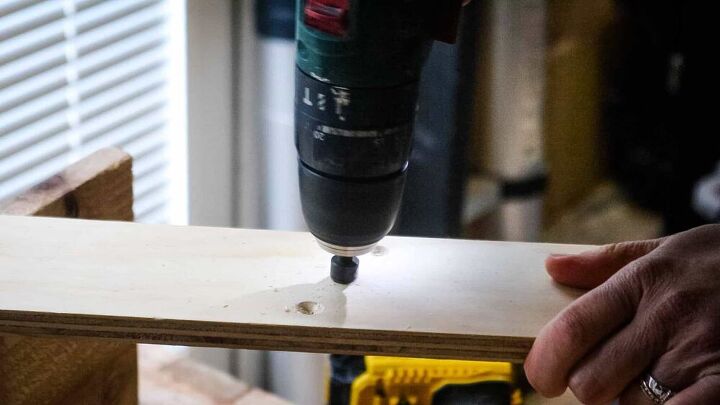
Once you've made your cuts, you'll need hold one of the shelves towards the bottom of each support (top and bottom), and draw the thickness of the shelf on it. That way, you know where to drill 3 holes for screws.
Below, I used a 3mm wood drill bit, and drill straight through. Then use a countersunk bit to grind the wood down a bit, so you can bury the screw heads for filling.
Combi Drill Setting
Set your combi drill to drill mode and setting 2 (1 is usually for masonry).
Gluing and Screwing
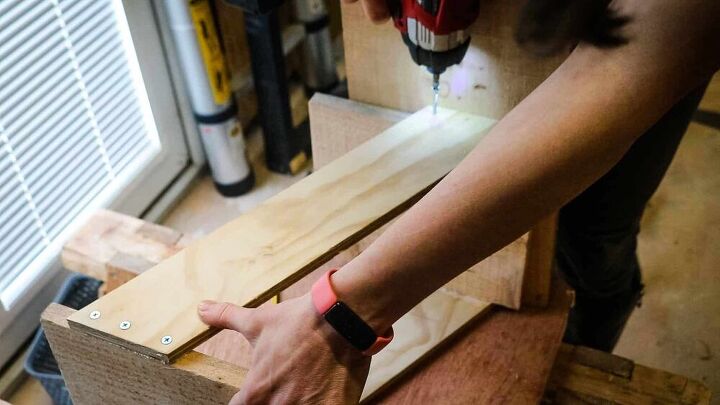
Firstly, below, you'll notice I later countersunk my work. But assuming you've done it, I then applied wood glue before lining up my supports with my top and bottom shelf.
For support placement, I made sure the top and bottom of my supports were 3cm in.
To screw, I trapped a flat piece of wood between the Z shelf and my legs to level the support.
Placement Tips
Make a 3cm pencil line and drawer along it for reference if you accidentally move it while screwing. Also, add the middle screws in first, then you can level the shelves up properly.
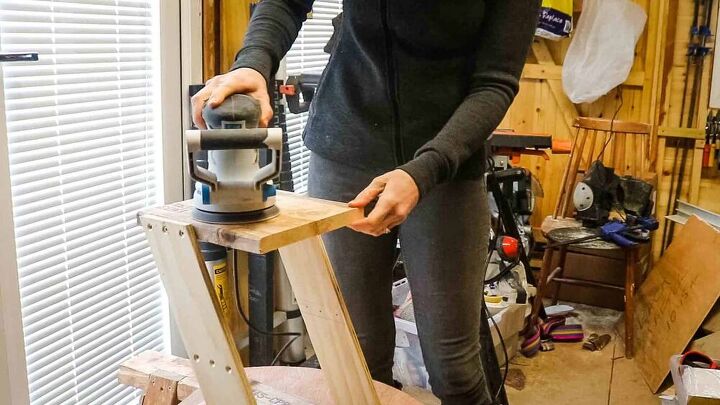
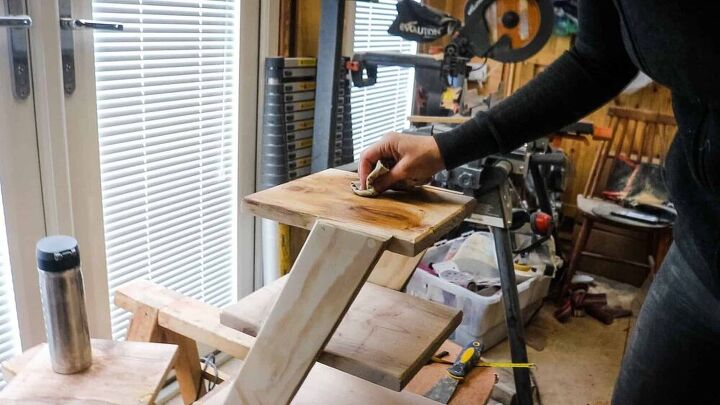
Sanding The Wood
Firstly, please ignore the drill holes in the middle of the support for now as I'm going to show you the order of which I should have done things. (*That's because I later changed the size of my middle shelf for aesthetics).
Plus, a middle shelf would be in the way for of using my orbital sander! Anyway, back to the project! I went over everywhere with an 80 grit, then moved up to a 120 grit.
Sanding Tip
If you do decide to dark wax like me for ease, then you'll want it as smooth as possible, otherwise the sandpaper scratches will be more visible!
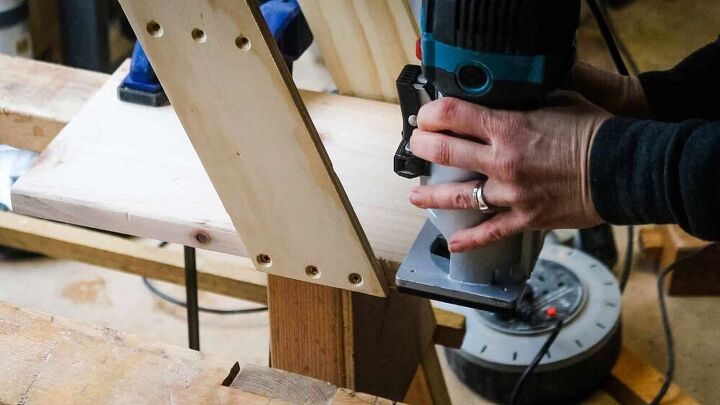
Using a Router to Chamfer the Sharp Edges
Now, if you're new to DIY, a router might not be in your tool box, so hang fire, and I'll show you an alternative.
I used my 45 degree chamfer router profile bit on all of the top facing pieces of wood and the supports. This one needs to go from left to right, otherwise it can bite, which is dangerous. And ALWAYS clamp your project down!
Softening The Edges Without a Router
I do love my palm router as it gives a professional finish, quickly, but I didn't always have one. So if this is you, it'll give it a nice finish by just running along the sharp edges with a sanding block.
Of course, it's not vital for the end-use of this basket caddy. But it's an extra detail if you want it to look more finished.
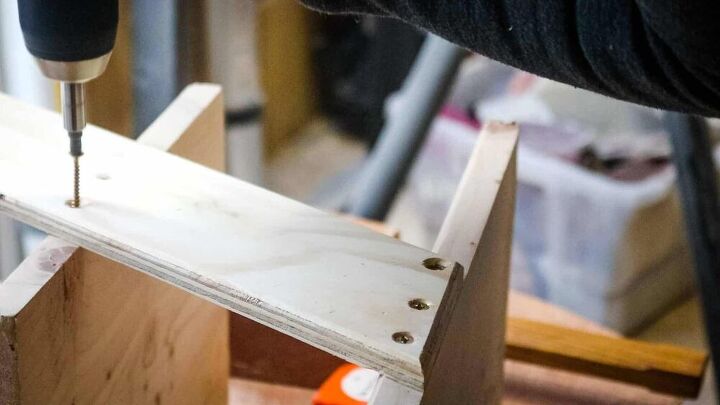
Screwing the Middle Shelf
Now, let's pretend, for continuity's sake, you've not seen my drilled holes before that hold the middle shelf!
For this, I measured and marked 15cm on the inside of the support from the top and bottom and drew them into two pencil lines. Note, you'll have two lines on the back of each towards, which gave me the exact thickness of my shelf.
I then lined up my shelf with the pencil lines from the inside, so I knew where to screw on the outside of the support.
Again, imagine the middle shelf is still there, as I didn't pre-drill these holes as they were less likely to split, unlike towards the end of a cut.
I then screwed the shelf in as I could see where they needed to go from the outside, but then I suggest you:
- Remove one screw
- Then countersink it
- Pop the screw back
- Repeat with the other two screws
- Then do the same on the other support
Filling Screw Holes
Unless you've been pristine in your screw placements, you might want to conceal the screws with filler.
Remember, that the colour of filler depends on your finish look. I chose a natural colour quick set filler, which sets in 30 minutes and blends in with the wood.
Or, you could use a slower drying one, or even white multipurpose, if you know you're going to paint it.
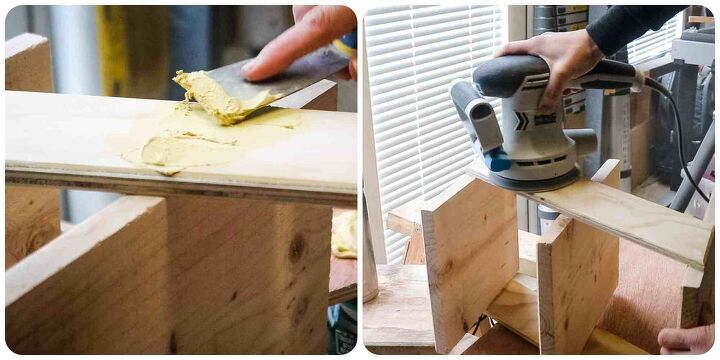
Sanding Filler
Once the filler has dried, it was time to sand it again to ensure there were no protrusions.
Finishing Your 3 Tier Storage Shelf With Baskets
You can add various finishes to your shelf. Often, I make my own chalk paint recipe in whatever colour I want, which is much cheaper than Annie Sloan.
Sometimes, I use satinwood. However, I wanted something quick and easy, because time is money, too.
Above, I just rubbed over it with dark furniture wax using a lint free old rag. It really needs 30 days to fully cure, but I'm not that patient and used it right away. * Or sometimes, I mix white spirits with dark wax for a dark wax glaze and apply with a paint brush.
Waxing Tip
If you're worried about it being too dark and would like more control, then I suggest you clear wax it first. Then repeat with dark wax. If you still feel it's too dark, you can rub again with clear wax.
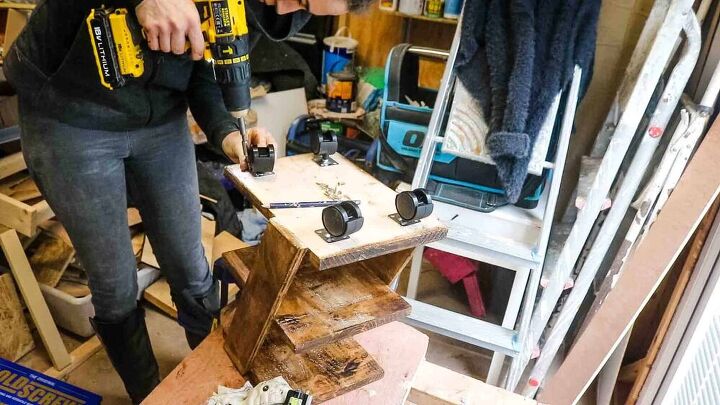
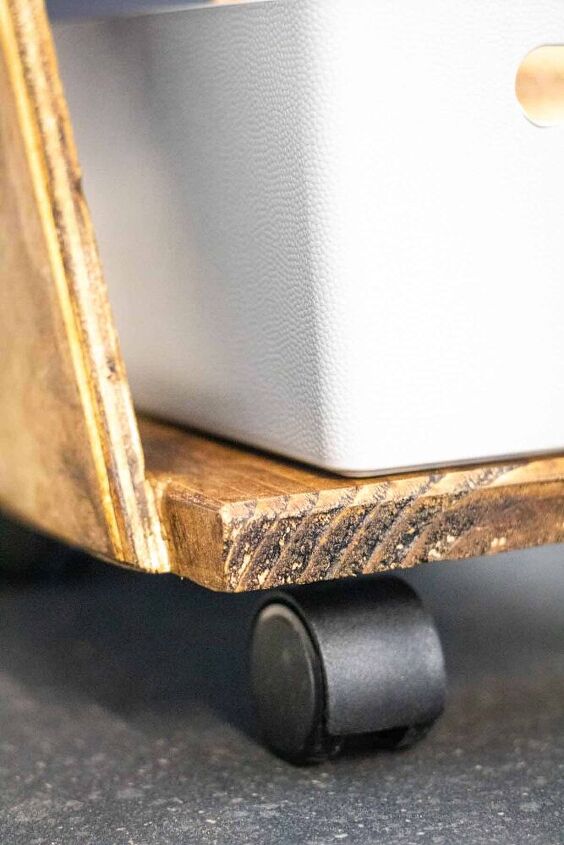
Adding Castor Wheels
If it's got a thick enough base, then why not add some castor wheels for mobility, or some short hair pin legs for extra oomph?
I bought these REALLY cheap on Amazon and set them back in each corner by 3cm using a combination square and some short enough screws.
Tip
If you add them close to the edge, I recommend pilot holing, too.
Total Cost of this Z Frame DIY Trolley
And this is how it came out, at a total cost of £6.43, excluding cost of tools and how I had a stockpile of offcuts.
However, you could easily make a pallet wood Z shelf trolley, but if joining strips together, I recommend screwing a couple of strips underneath to keep them together, too.
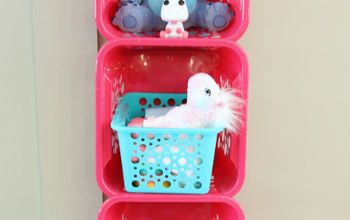
Also, here's the Wham basket version! It just goes to show how versatile this zig zag shelf cart trolley is. And how it makes a super easy beside table and more.
What would you use it as?
Even Cheaper DIY Trolley Cart Ideas
As I previously mentioned in the cutting list section, please treat this as a guide. The two simple 25 degree supports could even be screwed to:
- An IKEA tray, by drilling through plastic sides, but I recommend using washers as well, to prevent breaking them
- Box-shaped food tray
- Decorative shoe boxes, covered in fabric or
- Wallpapered cardboard boxes
- Paper mache boxes
More Scrap Wood Project Ideas
- DIY kitchen recycling bins
- Easy DIY dumbbell rack tree for 3 sets
- DIY countertop kitchen tea towel ladder
- Wall mountable coat rack and dog lead holder
- DIY desk monitor stand
- 50 more Scrap wood projects to improve your home
How to Make Your Own Trolley For Basket Storage
Prep Time
1 hour
Active Time
1 hour 30 minutes
Total Time
2 hours 30 minutes
Difficulty
Easy
Materials
- Timber (see cutting list)
- Wood glue
- Wood screws
- Castor wheels
- 4L curver baskets or Wham Studio baskets
- Wood filler
- Dark furniture wax
- Lint free cloth
Tools
- Mitre saw
- Clamps
- Sawhorses or Workbench
- Combi drill
- Tap measure
- Countersunk bit
- Orbital sander
- Palm router
- 45 degree chamfer router bit
- 3mm wood drill bit
Instructions
- Cut the wood as per my free cutting list in the post above.
- Drill 3 screw holes at the top and bottom of both support pieces, then countersink them.
- Mark 3cm from the bottom front's shelf and 3cm from the back to the top shelf.
- Glue and screw the supports in line with the pencil lines, ensuring your supports don't protrude and are flush with the top and bottom shelf.
- Repeat with the opposite side.
- Sand the entire wood, including the middle shelf you haven't screwed on yet.
- On the back of the supports, mark 15cm from the top and bottom.
- Line up the middle shelf with these pencil lines, then you can see where to screw the shelf from the outside.
- Note, these will also need countersinking, but not predrilling.
- Go over all of the sharp edges with a 45-degree chamfer bit to soften, or hand sand.
- Fill all of the screw heads with wood filler and leave them to dry before sanding.
- Rub everywhere with dark wax using a lint-free cloth and rub any excess off.
- Flip the Z trolley upside down and screw the castor wheels in the corners, set back slightly, using a combination square, and place your baskets on your shelves!
Pin This DIY Dog Toy Trolley
Or any hobby trolley!
Resources for this project:
See all materials


Comments
Join the conversation
-
I like the fact it has wheels, very versatile!
-
I think this can be made larger or smaller, depending on needs. I really like the design. Thanks for the inspiration.


Frequently asked questions
Have a question about this project?