


My Walnut and Concrete Dressing Bench

by
Zac Builds
4 Materials
$120
10 Hours
Medium
So I've been wanting to make a cool dressing bench for a little while now. I just wanted a nice place to start my day by putting on my socks and shoes. That's not too much to ask for is it? No, I didn't think so.
A reader of my blog asked me to try and do some more project involving concrete. So after some thinking and some sketches I came up with the design for this walnut and concrete dressing bench.
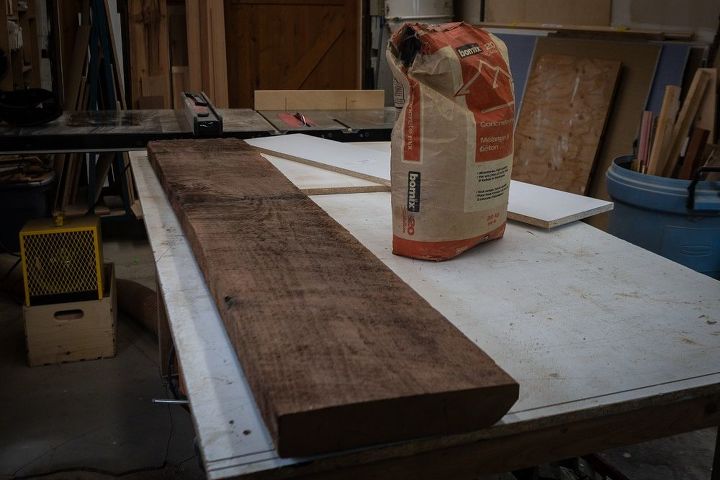
Here's what I started this project with. A single piece of 2" x 11.5" walnut that's 6' long. 1 Bag of concrete mix I had left over from a job and some scrap melamine sheets. Melamine is the stuff that you make the inside of cabinets with.
The only thing that I had to pay for was the Walnut, which ended up costing me an eye watering $120 CAD. Is it just me or is wood WAY too expensive these days?! Seriously, 120 bucks for 1 piece of wood?
The concrete was going to take a long time to dry so I decided I would do that first.
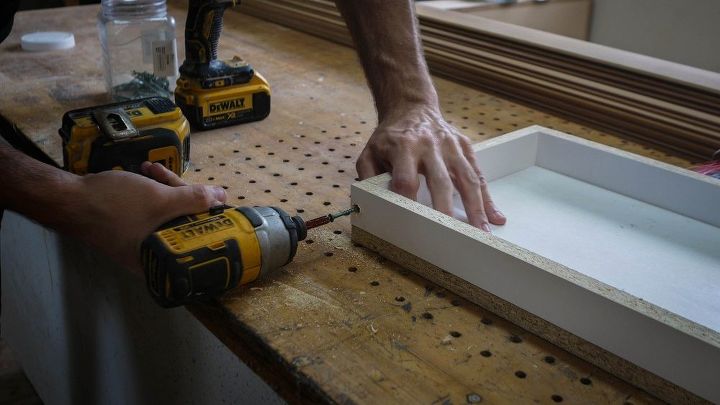
In order to form the concrete leg I was going to need a mold. That's what the scrap melamine was for. I used melamine instead of ply wood because it has a perfectly smooth surface that wouldn't stick to the concrete once it was dry.
I cut the melamine into a box that was 17" x 1.5" x 9" on the inside and screwed it all together to make my mold nice and strong.
Ok time to get DUSTY. Concrete dust is incredibly fine and loves to hang in the air for a long time. You're going to want to wear a dust mask for this part, even if you're working outside.
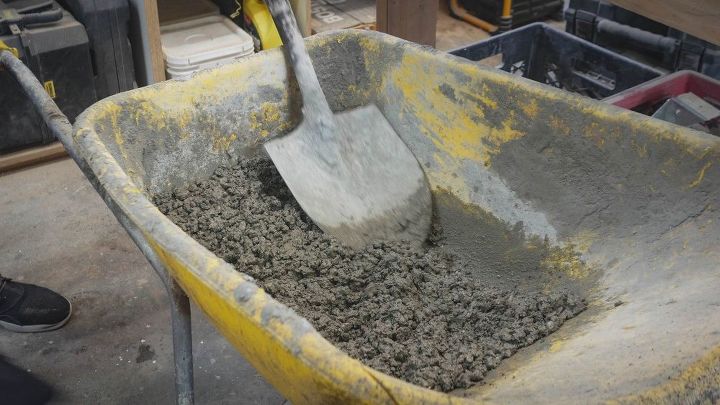
I poured my concrete into a wheel barrel and got to work on mixing it up.
After adding some water and mixing my concrete this is what the finished consistency looked like.
Err on the side of it being a bit too dry if you're following a long at home.
You can always add more water, but it's impossible to take it out. For reference that is about half a bag mixed up and was only a little bit more than I needed. You'll need more than you might think.

I filled the rest of the mold with concrete and smoothed it over with a large flat trowel.
Depending on the look you are going for you may want to spend some time agitating your concrete to try and work out any air bubbles trapped in the concrete. I repeatedly raised and then dropped the mold from a half inch above the table to help vibrate out any air bubbles.
After air bubbles stopped surfacing I worked the top with a trowel for a couple of minutes. Pressing down with the trowel and sliding it back and forth to remove any excess concrete from the mold.
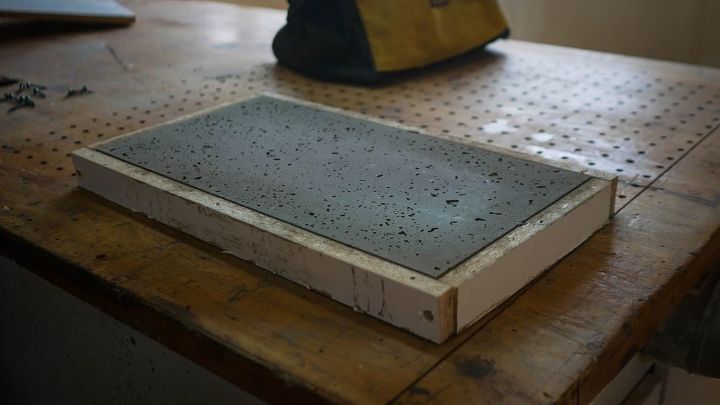
Fast forward 24 hours later and the concrete was dry enough that I could undo the mold and check out my finished leg.
It has this awesome potmarked texture. I really like how it turned out. As the concrete continues to cure it will dry to a lighter shade of grey.
At this point the concrete is actually still quite weak so I was very careful handling it. After removing the mold I took it outside and put it back in the sun to continue to cure. I waited 72 hours before I brought it inside and even then it still wasn't fully cured.
Ok enough concrete. I write a wood working blog, I should probably have some wood working somewhere in this post.
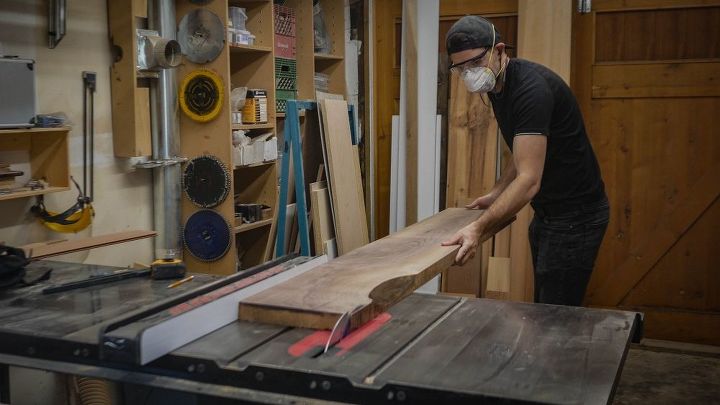
Using a combination of a table saw and planer I smoothed out my rough walnut lumber into a perfectly straight and flat piece of furniture grade walnut.
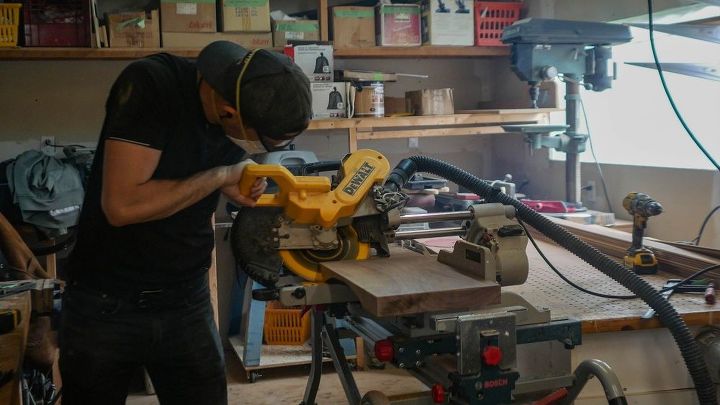
Now that I had a long straight piece of walnut I needed to create that waterfall edge. I had to "fold" the wood in on itself.
To accomplish this I needed my handy sliding miter saw. I measured 18" from the end of the board and made a single 45 degree cut across the width of the board.
Then I rotated the blade 90 degrees so that it was cutting a 45 degree angle in the opposite direction.
I had to make both of these cuts slowly and carefully, any mistakes would ruin my waterfall look.
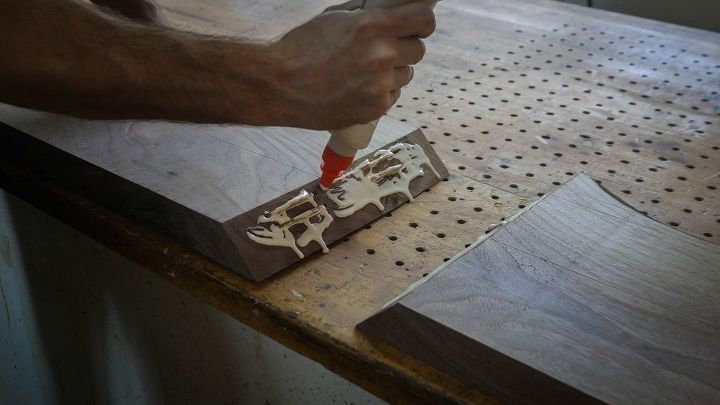
Ok so now I have 2 piece of walnut, but I dont want 2 separate pieces of walnut. That wouldn't make for a very enjoyable benching experience. I had to join the wood back together, and for that I used a biscuit jointer. A biscuit jointer makes pocket grooves in wood so that you can slot in wooden "biscuits".
I made 8 biscuit pockets, 4 on each piece of walnut. Each pocket on the first piece had a corresponding pocket on the second piece of wood. The wooden biscuits served to bridge the gap between the pocket pairs.
I inserted 4 biscuits into one of the pieces of wood and slathered the whole thing with carpenters glue. I spared no glue as you can see here. *insert Jackson Pollock joke here*
Thankfully I measured my biscuit joints correctly and everything lined up. After that it was just a matter of carefully aligning my two pieces of walnut so that they sat as flush with each other as possible.
Ever wanted to see what my face looks like when I'm turning a very small handle as hard as I can? Well here it is!
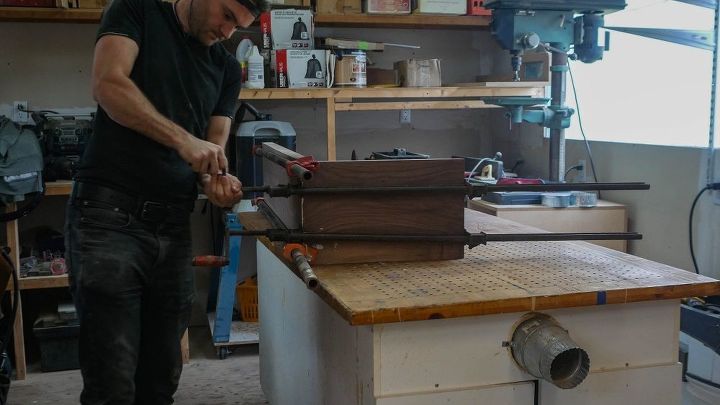
In order to prevent anything from moving while the glue was drying I used long bar clamps to clamp everything in place. I really wish I had some 90 degree clamp to use here, but I don't. My system worked, it's just a bit of a pain to setup.
At this point I left for the night to give the glue a chance to dry.
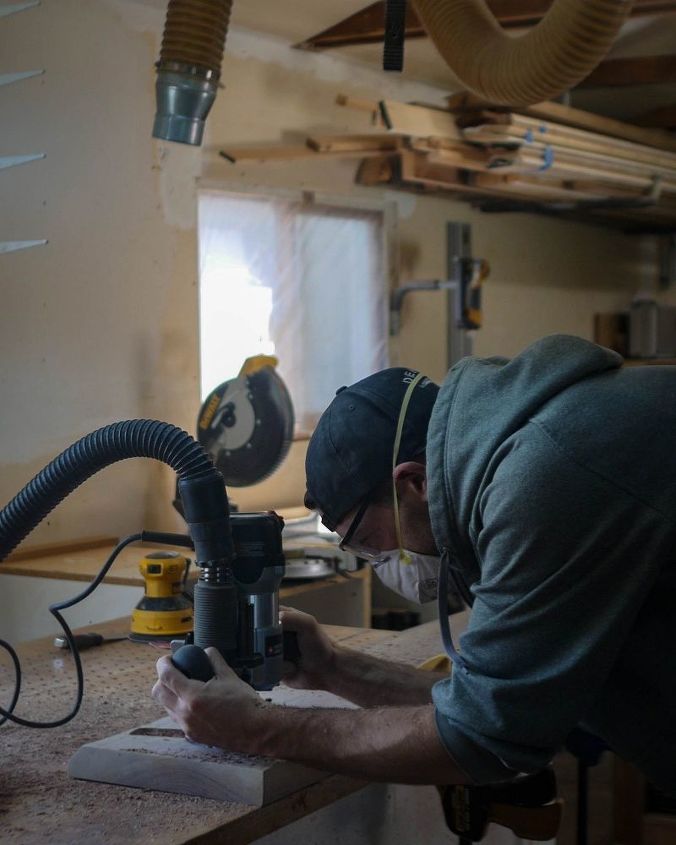
Next I used a plunge router to create a pocket for my concrete leg to fit into. I didn't want to use any mechanical connection to hold the concrete leg in place, just gravity and friction, so that I could remove the leg if I ever needed to move the bench.
After I had the pocket cut, I grabbed the concrete leg to test fit it. Hurray! It fit on the first try!
Because there is no mechanical connection holding the concrete leg in place, just friction and gravity, I had to make this tight pretty tight to avoid any movement in the finish product. I'm happy to say the finished product is strong and sturdy.
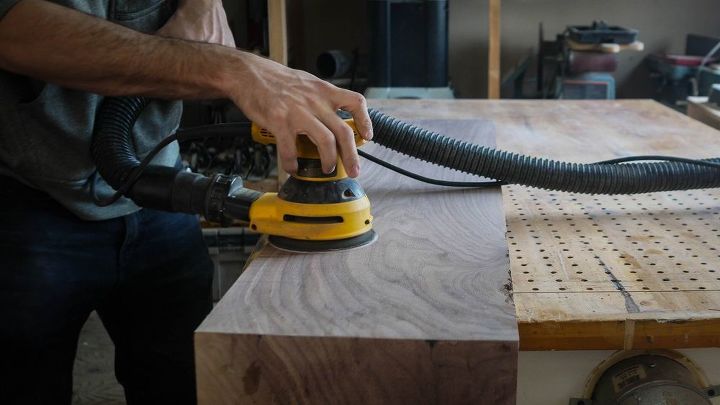
Finishing time! I gave the whole thing a really good sanding with my random orbital sander. I started with 80 grit sand paper to remove big imperfections and shape the edges of the bench. I rolled the sander from the vertical surface to the horizontal surface to help shape the water fall edge as well.
Then I moved onto 120 grit sand paper and finally to 220 grit sand paper. By the time I was done sanding it was smooth as a babies bottom. (Note to self: Find an expression for smoothness that sounds less "pedo-y")
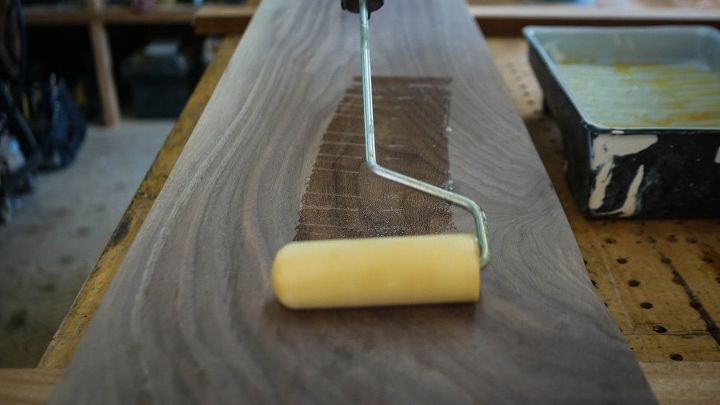
To protect and seal my bench I wanted to apply a clear coat to it. I used this Hybrid Oil Floor Varnish with a satin finish. I use this stuff on almost all of my projects. It gives a nice sheen that isn't too glossy and it dries really quickly which makes doing multiple coats a breeze.
I grabbed my mini roller and rolled it onto the flat parts. To reach the corners I used a 2" paint brush.
I got a little lazy here and used a foam roller (it's all I had on hand), but really, a low nap regular roller would've been ideal. The foam rollers can leave little bubbles which need to be sanded out between coats. If you miss one it can get trapped under layers varnish and become permanent, so I had to be careful to avoid that.
dgjh
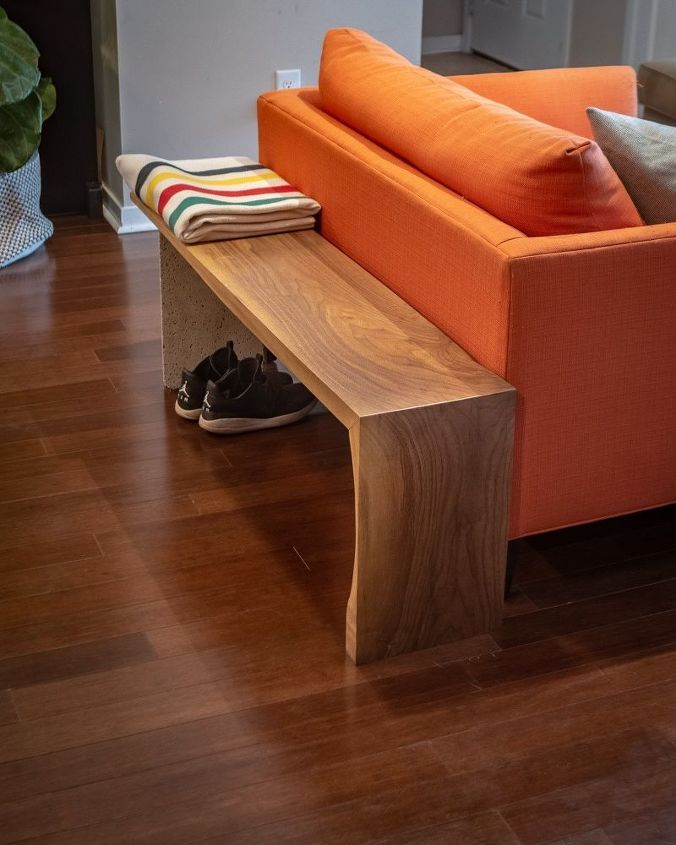
Here's the finished product. I'm super excited with how it turned out. Not only is it really cool looking, but it works great and I use it all the time!
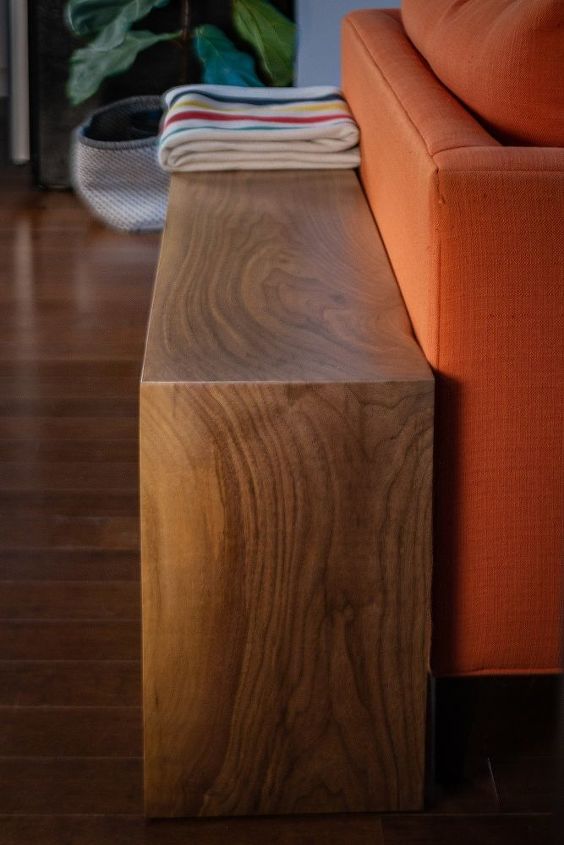
This is the waterfall edge I kept talking about before. As you can see the grain pattern is uninterrupted as the wood turns 90 degrees.
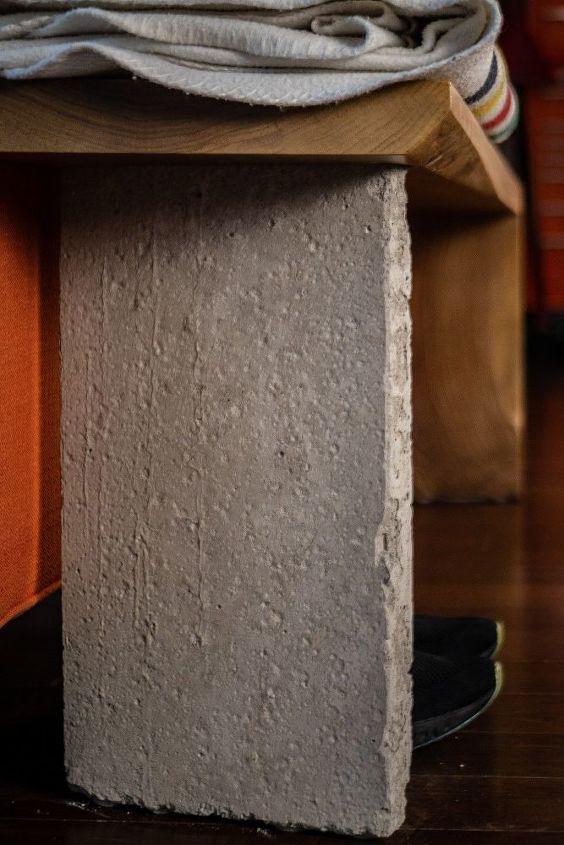
I also love how the concrete leg turned out. The texture is super cool and the colour is great too. A bench with one waterfall edge is cool, but two is just excessive. Plus, you know, a u-shaped bench is a bit of a snoozefest.
Thanks for checking out my build! There are more steps and pictures on my blog at ZacBuilds.com
Want more details about this and other DIY projects? Check out my blog post!


Frequently asked questions
Have a question about this project?