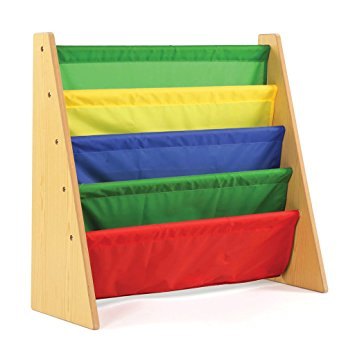
This is what I would like to reproduce
How do I create this kids bookrack?

by
Shui
+4
I would love to DIY this kids bookrack but have no idea where to start. Can someone help me and let me know what materials i need and step by step instructions?
Thank you

with out seeing one from the back side, or top down the fabric panels may be stitched together. if that is from a catalog are the dimensions given...width, ht?
You will need a yard-long measuring ruler, a soft pencil, a saw, a drill with an appropriate drill bit to fit the 10 1-inch long wood screws, a screw driver, medium to very fine sandpaper, wood sealer, paint or wood stain is optional, 1 solid wood piece that 24-inches square and 1/2-inch or 3/4 inch thick, and 5 dowel rods at least 3/4-inch in diameter and as long as you want the book case to be minus 1-inch. You might want to get wood glue also but if you glue you will never be able to take it apart. You're best choice of fabrics will be any upholstery weight fabric, or rip stop, or denim, or canvas. I would go with upholstery weight fabric or canvas because I hate to sew rip stop. The amount of fabric that you will need will be based on the effect you want and how long you are planning the book case to be. Oh, a sewing machine and thread to create the channels you need to insert the dowel rods in.
Starting at the top edge of your wooden square, measure 4-inches from the left edge and mark. Do the same on the bottom right end. Connect the dots with your yardstick and soft pencil. You now have an angled line that is 4-inches inset from the top and bottom. That is where you will saw the one board into 2 boards for the side supports. The 4-inch will be your tops and the 20-inch will be the footings.
You only need to do this on one piece of wood if you use masking tape or clamps to hold both pieces of wood together. With your pencil mark both the top and the bottom pieces of wood at 2-inches in from the angled side and connect the dots using the yardstick. Next measure 2-inch down from the top using that line you just made and make a small x. The next mark, will measured from the one before at 6-inches lower from the mark before it. Repeat the 6-inch measure until 5 x's marked. Tape or clamp the boards together and use the drill to drill the hole for the wood screws. You can also drill the starter hole for the screws into each end of the dowel rods. When you do this make sure the hole is in the center of the screw. You can get an easy measure by outlining one end of the dowel onto a small piece of paper, cut the circle out of the paper, folding it into half twice so you have a quarter of a circle. Use it as template for centering the hold at the end of the dowel. I found it easier to use a starter hole in the dowel when working with them. A starter hole is really nothing more than a very small nick in the wood just large enough to place the point of a screw into. Remove the tape or clamps.
Sand all the wood pieces until smooth and without trace of pencil marks. Now is the time to stain or paint or seal.
While the paint or sealer is drying you can begin working with the fabric. You will be making what are called channels that the dowels will pass into. All channels need to be large enough to accept the dowels with room to spare. I do this by tying a string around the dowel. I use a double knot and and then slip the loop I just made off of the dowel. I cut the loop in half and measure it then I had 1 inch to it and that is how much fabric I will need to create each channel. You want the channel to hang loosely on the dowels. Make your first channel at the end of fabric, measure 22-24 inches and make your second channel. Continue marking the distances the same until you have made 5 channels.
After the finish has dried on the wooden frame attach the dowel rods, using the screws to one side only. Slip the fabric over the dowel rod using the channels. Attach the dowel rods to the other end piece and you have your book case.
By the way, you could also do this by using pipes and pipe fittings or pvc and pvc fitting.
you might look on pinterest, under kids sling bookrack.
or try googling it
Here's a similar idea-http://www.domesticimperfection.com/2014/03/how-to-make-book-slings/