


Sturdy Garage Storage Shelves Using 2x4s
In this HT tutorial, I show you how to build sturdy garage shelves from 2x4s and plywood.
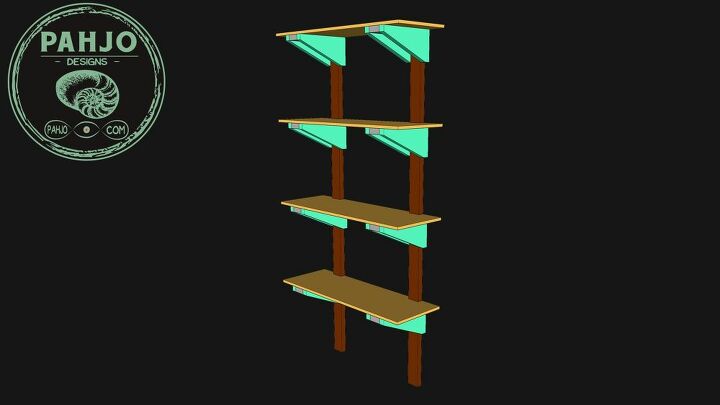
This sturdy DIY garage shelving solution is strong, versatile, and expandable. Also, it can be built for a single shelf or across an entire garage wall. The DIY garage shelves can easily be moved to accommodate larger items and make efficient use of wall space.
Overview
First, I like to be organized. Furthermore, the first step to organization is creating a home (garage shelves) off the floor for each item.
I am a native of South Louisiana, which means I own lots of outdoor cooking equipment for boiling crawfish and other seafood.
Moreover, my outdoor cooking equipment and ice chests currently reside on top of my garage refrigerator or on the garage floor.
So, I decided to build sturdy garage shelves from 2x4s in order to hold my ice chests and outdoor cooking items.
Additionally, I used scrap plywood and particle board for the wall mounted garage shelves.
Side Brackets
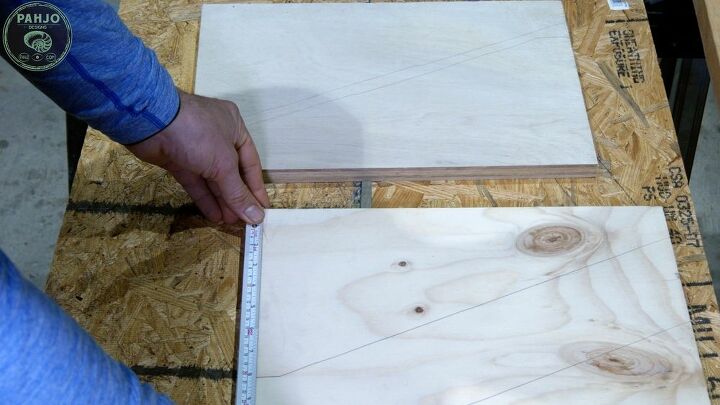
First, I used a square scrap piece of 3/4″ plywood for the garage shelving brackets. Also, this plywood happened to be large enough for 2 brackets. Ultimately, I cut the plywood to be 16″ wide.
Next, I used my tape measure to mark a line 8″ down from the top corner, 1.5″ across from the previous mark, and finally 1.5″ down from the top of the opposite side.
Conveniently, the 3/4″ plywood was a square. This allowed me to reference the 90 degree angle on 2 sides.
Then, I used a marker, a ruler, and a combination square to connect the lines.
As a side note, I made a few brackets from scrap 1/2″ particle board because I ran out of 3/4″ plywood; however, I didn’t use them – yet. If you plan to use this material as a bracket, be sure to laminate 2 brackets together with glue and brad nails to make one bracket. Ultimately, 1/2″ thick particle board is not enough strength to use as a bracket.
Cut Out Brackets
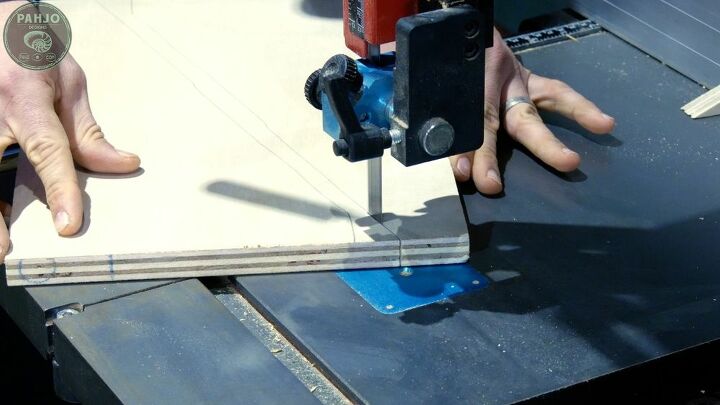
I used my bandsaw to cut out the DIY garage shelves. However, a jigsaw works just as well if not better.
Additionally, you need two side brackets to make 1 shelving bracket.
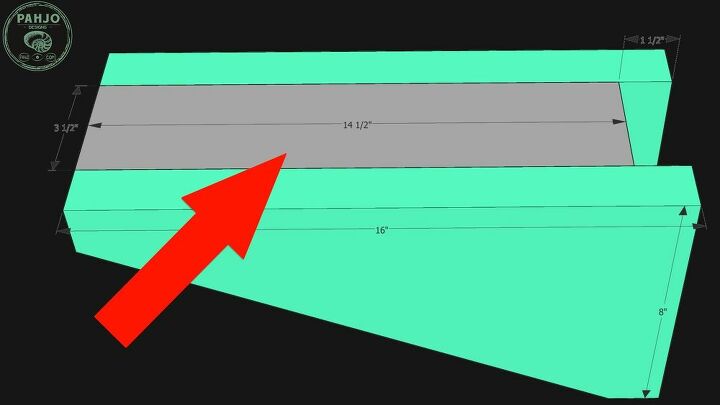
The middle support bracket for the garage shelves stabilizes the bracket and creates a flat surface for the shelf. Basically, I used a 14.5″ scrap 2×4.
First, I gathered a scrap 2×4. Next, I measured and cut to length on my miter saw.
Then, I used the first 2×4 as a baseline to cut the additional middle supports. Obviously, this helps keep things consistent and speeds up the process.
Lastly, I cut 1 middle support bracket for every bracket.
Bracket Assembly
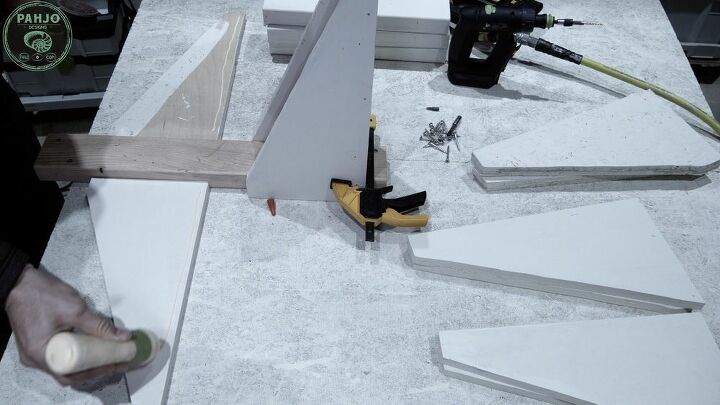
As a quick note, I painted the garage shelving side brackets and middle support with leftover paint in my workshop. Of course, this is not necessary.
Additionally, I used a scrap piece of 2×4 to serve as reference during the bracket assembly. This is the 2×4 in the pictures below which is not painted.
First, I placed the 2 side brackets on opposite sides of the reference 2×4 with the inside of the bracket facing up.
Due to my paint miscalculation, I did not paint the inside of some side brackets and the top of the middle support 2×4 to conserve paint. These parts of the bracket are not visible.
Next, I ran a line of glue along each bracket. However, I forgot about the 1.5″ of space I needed to leave for the support 2×4. I simply used my finger to push the glue away from the reference 2×4 approximately 1.5″.
Then, I placed the middle bracket on top of the reference 2×4 and closed the side brackets on them. I used a clamp to hold it in place.
Securing Garage Shelves
While the clamps secured the side brackets, I secured the garage shelves.
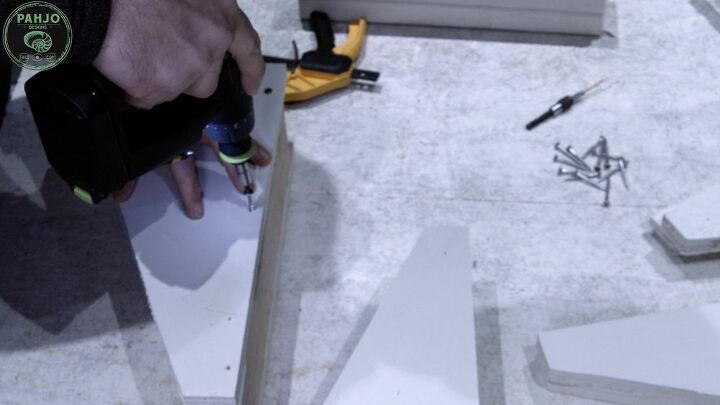
First, I drove 2 brad nails in per side. Then, I loosened the clamp and removed the bracket from the reference 2×4.
I verified I had 1.5″ of space between the back of the middle support 2×4 and the back of the side brackets.
Next, I drilled 3 pilot holes per side and secured it with screws.
Then, I verified the bracket fit nice and snug on the reference 2×4.
I repeated this process until I had 8 brackets.
Prepare Wall Support 2x4s
For these DIY sturdy garage shelves, the wall support 2x4s must be attached directly to a wall stud.
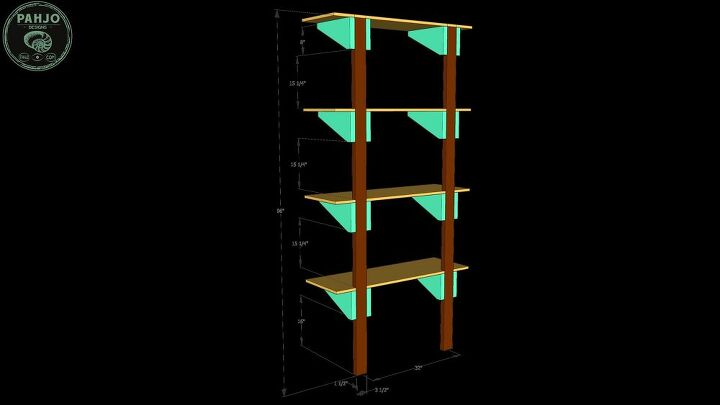
Since I installed this system in a small space, I only needed 2 8′ 2x4s to vertically attach to the wall at 32″ apart.
As a side note, wall studs are spaced 16″ on center behind sheetrock. I find it more than sufficient and sturdy to space the wall support 2x4s 32″ apart.
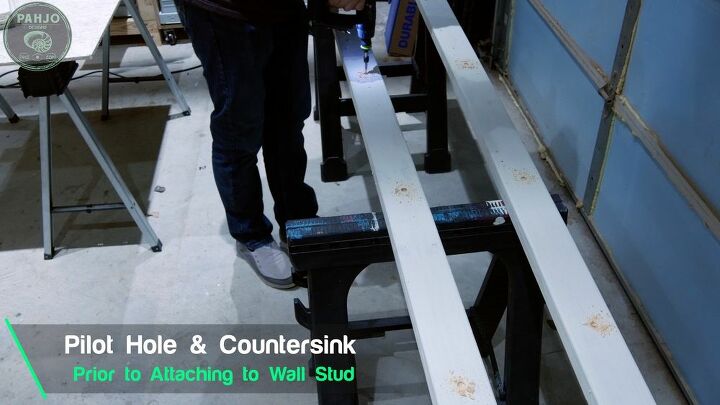
First, I used a 1/8″ drill bit to predrill 4 pilot holes spaced around 2′ apart. The spacing doesn’t need to be exact.
Next, I used a countersink bit so the screw does not protrude the surface as this may cause the shelf bracket to be uneven.

Finding Wall Studs with a Magnet
Obviously, finding studs is an important part of building sturdy garage shelves from 2x4s. In order to find wall studs without a stud finder, I used a neodymium magnet to locate the sheetrock screws.
Essentially, sheetrock screws are used to secure sheetrock to a wall stud. Neodymium magnets lock on sheetrock screws very easily, which helps me determine the location of the wall stud.
First, I run the neodymium magnet horizontally on the wall and slowly work my way down with each pass.
Next, I use a nail to mark the location of the stud through the center hole in the magnet.
Then, I repeat the process further down the stud to get another reference nail.
As a last step, I use my 4′ leveler to mark a line down the center of the stud.

First, I place the wall support 2×4 on the line with my leveler on the side to make certain it remains square.
Next, I use a 3″ screw to secure the 2×4 to the stud.
Attach Brackets
After both wall support 2x4s were secured to the wall stud, I attached the garage shelf brackets.
First, I marked the top of each support bracket according to the drawing below.
Next, I placed the brackets on the 2x4s. My brackets had a snug fit, so I didn’t need to use a clamp to secure them.
Then, I drove in 2 screws per side on the first bracket.
I placed the leveler on top of the bracket and repeated the same process for the other bracket while keeping everything level.

Securing Top Shelf
First, I used my bandsaw to cut 2 notches 1.5″ deep according to the diagram below. I used 1/2″ particle board for the shelf, but 3/4″ plywood can be used as well. In fact, the drawing and my DIY plans for this project have 3/4″ plywood as the top shelf.
Then, I used 2 screws (front and back) to secure the shelf to the middle bracket support.
Final Result
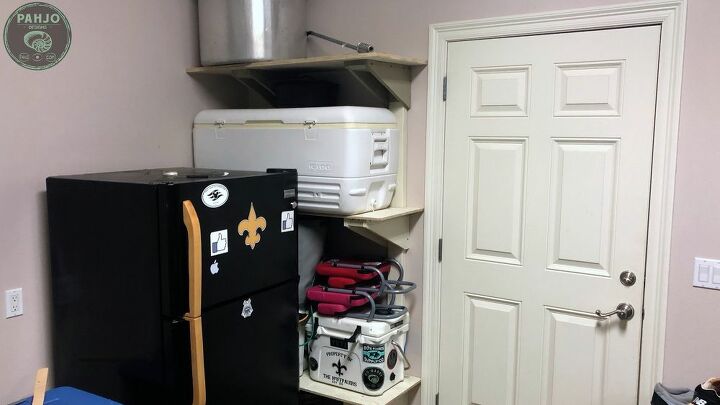
These garage shelves provided a home for my ice chests and outdoor cooking equipment.
Also, I like this garage storage solution because I can easily expand the system to other parts of my garage. In fact, I plan to do just that in the coming months.
In summary, this was a very easy DIY project and it turned out great.
I've created FREE DIY Plans for this project, so be sure to head on over to my blog and download a copy.
Leave a comment below and let me know what you think about this project.
Consider subscribing to my YouTube channel to be notified of future DIY projects.

Comments
Join the conversation
-
Awesome! I want to come over for some crawfish!
-
great job!!


Frequently asked questions
Have a question about this project?