DIY Cupid’s Arrow: Easy Valentine’s Day Project

Cupid and his bow and arrow are symbols of Valentine’s Day. This diy cupid’s arrow is a fabulous Valentine’s decoration to use on your tablescape or within a cute vignette.
I came up with the idea when I was wanting to add a little something special to my romantic table for two ~ for Valentine’s Day.
Since it was for my husband, I didn’t want it to be too girly or feminine.
And what symbolizes Valentine’s Day that isn’t hearts and flowers ~ an arrow! Now that’s NOT considered “girly”.
What’s neat about this Cupids arrow diy is that you can create any color combination you want. This also means they don’t need to be made just for Valentine’s Day.
Sweet!
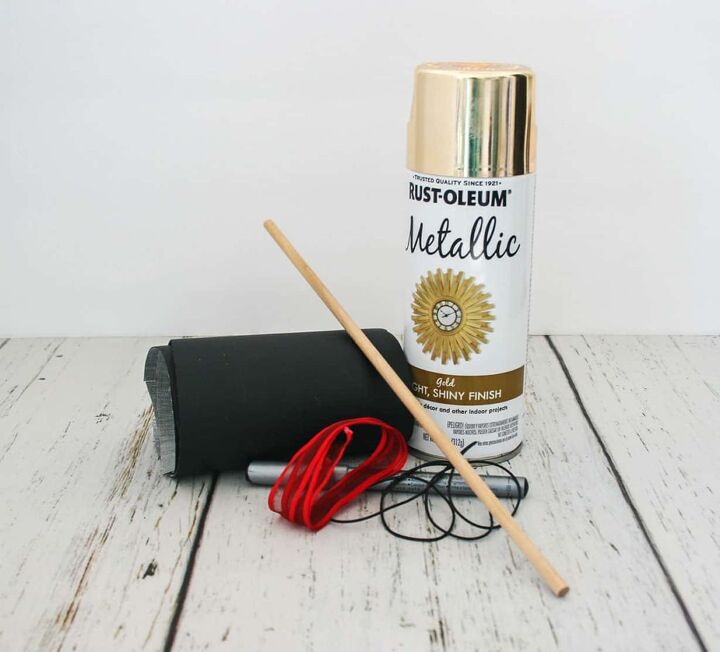
Supplies for DIY Cupid’s Arrow
- Wooden dowel
- Gold spray paint
- Faux black leather
- Black cord
- Red ribbon
- Hot glue & scissors
How to Make a Cupid’s Arrow for Valentine’s Day
Step 1: Painting the arrow shaft
First, you’re going to paint the wooden dowel. I chose metallic gold spray paint, but you can use whichever color you prefer or will work with the color scheme you want to match.
Before you get started, you will need to lay out newspaper or a drop cloth. Also, set up your spray painting in a well-ventilated area or outside.
Spray paint all sides of your wooden dowel with 2-3 coats of paint.
*Tip: I find that resting the dowels across painting sticks works well. That way they don’t stick to the newspaper or drop cloth. Another option is to stick them facing up in styrofoam so they don’t move.
Step 2: Making the arrowhead and feathers for your diy Cupid’s arrow
To make the arrowhead and feathers, I used a small piece of fake leather. I really liked its texture.
On the back of the faux leather, draw the outline for your arrowhead. You will need 2 of these per arrow. I suggest cutting one out and then using it as the template for your second arrowhead. That way they match.
Cut twice as many arrowheads as Cupid’s arrows you will be making.
Using hot glue, add glue to the inside two sides of an arrowhead (not the bottom, as we need to leave that open). Place the top arrowhead piece over the bottom piece that has the glue.
Put the arrowhead aside.
Now to cut out the “feathers”.
I found the best way to do this was to cut out a square, fold it in half, and then cut both of the sides at an angle.
With it still folded, cut from the open end at an angle matching the sides, down toward the fold ~ but NOT through the fold.
Make these cuts as wide or narrow as you like.
*My diy Cupid arrows are one-sided. If you want yours to be double-sided, it’s best to put two feather sections back to back and then make your cuts. That way you can glue them together later and they will match up correctly.
Step 3: Creating the band just below the arrowhead
When you look at arrows, there is often a band of rope just below the arrowhead, as that was how the arrowhead was tied onto the shaft. Now it’s just decoration.
To create the look of the arrowhead being tied onto the shaft, you will need to add a band just below Cupid’s arrowhead.
I used a small section of black cord.
To determine where you need to add your band, slip the shaft into the arrowhead opening and lightly mark where the arrowhead meets the shaft.
You will start your band just below this mark.
Place a dot of hot glue below the mark and attach the cord. Then add a tiny drop of hot glue and wind the cord tightly around the shaft for about .5” to 1”. Add one more dot of glue to secure the cord in place.
Step 4: Add the arrowhead and feathers to make Cupid’s arrow
First, slip the arrowhead onto the shaft where you just added the band. Then glue it in place, and seal the opening by adding a little hot glue inside. Squeeze the opening closed until the glue dries.
Next, add the feathers.
On real arrows, the feathers are not at the end of the shaft, but a little way down. Put your arrow flat on your work surface and slide the feather’s under the shaft until you are happy with the placement.
Add a thin line of hot glue to the middle of the feathers and attached the shaft.
*Make sure that your arrowhead and feathers line up.
Step 5: Embellish you diy Cupid’s arrow
Now for the fun part ~ embellishing your diy Cupid’s arrow.
I thought it would be a sweet sentiment to write a nice note on my arrow. It’s very simple to do. Just take a permanent pen and write very carefully.
I then added a small bow made from a piece of ribbon and glued it close to the writing on the arrow.
I love how it turned out!
Isn’t this an easy diy cupid arrow diy Valentine decor craft? I’m thinking of making ones with pink arrowheads and brown feathers.
Whadda you think?
Check out other easy diy projects:
- Diamond Napkin Rings
- Referee Penalty Flags
- DIY Football Field Table Runner
- Gold Glitter Candle
- Twisted Paper Flower Napkin Rings
- Simple 2-Tier Tray
- Faux Leather Napkin Rings
Enjoyed the project?
Resources for this project:


Frequently asked questions
Have a question about this project?