Funky Fourth of July Tray

Think of the Fourth of July. What comes to mind? Probably a colorful explosion of fireworks against a perfectly black sky. Maybe a crowded backyard at sunset, red solo cups in every other hand, the air slightly smoky as hot dogs and burgers hiss on the grill. Maybe it’s a street lined with families waving tiny flags as giant papier-mâché floats crawl by. Maybe you’re thinking of Bill Pullman’s speech in Independence Day and tentacled aliens? Well, I can safely say that when it comes to July Fourth, for me it’s all of the above (yes, even the aliens).
But if you love crafting like I do, odds are you’re also thinking about whether you have time to put in a project before you try to beat the crowd for the local firework show. After all, on a holiday that revolves so heavily around red, white and blue, there’s no way that I, given my fervent color obsession, wasn’t going to be doing some holiday arts and crafts.
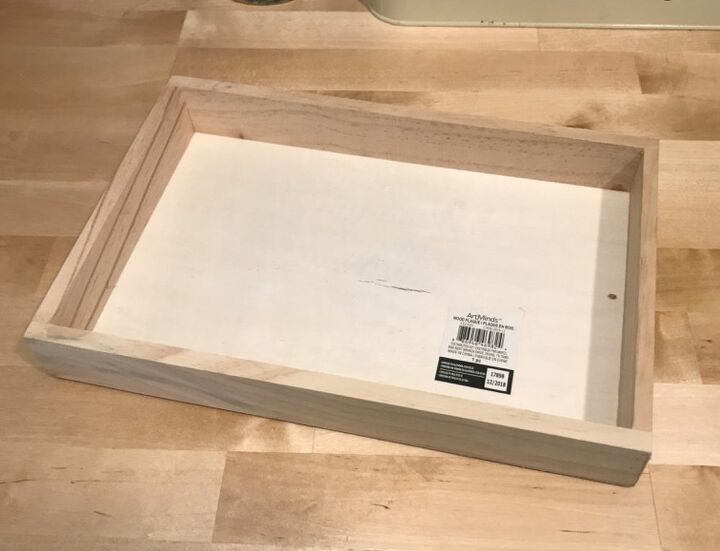
I knew that I wanted to do something small and relatively inexpensive. After all, this was more about the fun of it than actually worrying about flip price. So after meandering through the aisles of Michael’s for a few minutes, I found this! I knew it would be perfect for a nice, stress-free (not to mention patriotic lol) afternoon project.
These little pine trays are a dime a dozen at Michael’s-perfect for a fun, inexpensive craft project! I grabbed it for about $5 (maybe less actually-I don’t keep receipts)
I wanted to make the tray functional and since it didn’t come with any handles, I grabbed these drawer pulls from Lowe’s. I like that they’re chunky but not frilly or overly detailed-I wanted to keep the emphasis on the tray itself.
I picked up these little star stencils from Michael’s. The perfect size for the tray! Also, I think by now you can get an idea of where I was going with this...
So once I got the tray and all the materials home and into the workspace, the first step was to take some fine grit sandpaper and do a full sanding job over the whole surface (pine is pretty cheap and can be a bit rough or have some splinters, and since the plan was to stain the wood, making sure the surface was smooth and prime to accept the stain was crucial!)
The next step was to actually apply the stain. I went with Minwax Gel Stain in the shade Hickory. I applied the stain to the inside, outside and bottom of the tray. Two coats was all I needed to get a nice, even coverage.
Side note: I am totally a gel stain convert after this! It’s super thick with great pigmentation and it applies almost like a paint.
I used a clean cloth to apply the stain over most of the surface, but the corners were a bit tricky so I used q-tips on them.
After the gel was dry and I was happy with the coverage, I went in with Rustoleum chalk paint in the shade Linen White on the inside. As you can see from the picture above, there were some spots where the stain was visible under the paint, but once I applied two more coats of white, it vanished. I made sure to tape down the inner sides so as not to get paint on them.
So, can anyone guess what I was painting? Hmmm...
It’s not Independence Day without good ole Stars and Stripes, is it? I realized that I didn’t have much in the way of July 4th decor, so what better way to rectify that than to simply make my own?
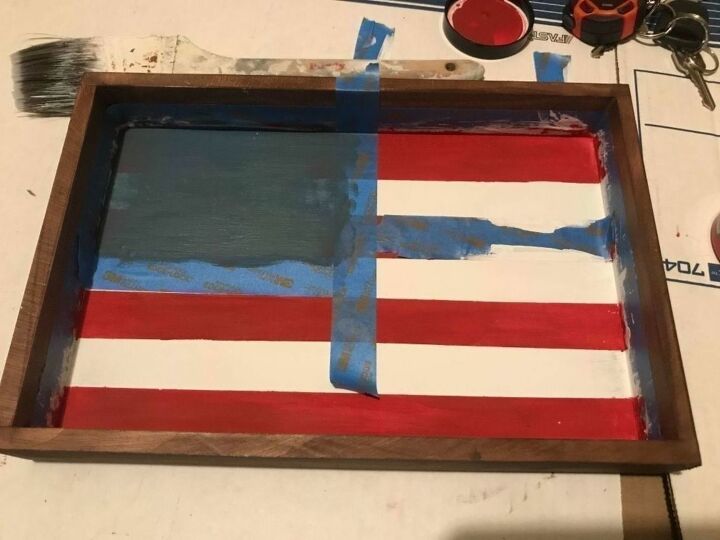
Luckily the tray measured almost 7 inches exactly, so measuring the length of the stripes wasn’t going to be an issue. (I know there’s not thirteen-not trying to be unpatriotic-just knew it would be too complicated to measure out all those little stripes on what was supposed to be a quick, easy project). After measuring, I placed tape over every other inch and then applied Annie Sloan’s Emperor’s Silk to do the red stripes. Super easy application and only two coats were needed.
Next up was to prep the blue rectangle for the stars (obviously). I went in with a mixture of Annie Sloan’s Napoleonic Blue and Graphite to get a warmer color than Napoleonic alone provided. Two thick coats were enough to get a nice, even slate of color without any red or white bleed-through.
At this point, the flag was really starting to take shape! After removing all of the tape from the face of the tray, and touching up some areas where the red had bled through to the white under the tape (yikes), it was time for the most important addition to my little flag! Any guesses? 🤔
My little star stencil was just the right size and I loved how the stars were designed to look slightly worn (see the picture of the stencil to see what I mean). My goal was to make the whole flag look a bit antiqued, so they were perfect! Using the Linen White again, I went in with a stipple-technique using as little paint as possible so as not to get sloppy-looking stars.
After all the paint had dried and I was sure the flag looked complete, I applied a thin layer of Annie Sloan’s clear wax to the whole surface. Normally I would have skipped the wax and just polyed (to make the surface heat and moisture safe) but I wanted to antique the surface so I had to properly prime the flag before I applied dark wax. Those of you familiar with Annie Sloan’s waxes are probably aware that black and dark wax are easier to apply and to keep from overly darkening the surface by applying clear wax first. It creates a kind of shield between the paint and the dark wax so that dye doesn’t overly permeate. It makes it very difficult to get a nice, clean antique look when just going straight in with the dark wax. Also, if you make a mistake somewhere along the line or decide you don’t like the dark/black wax after all, it’s already permeated the paint and you’ll have to start all over! And there’s nothing more frustrating than that. So in short, clear wax first.
The clear wax went on easily and then once I had buffed it and let dry a bit, I went in with the dark wax. If you look at the picture with the dark wax prior to me wiping off the excess, you can see it looks a bit intense upon application. That’s ok! If you find yourself working on your first project that features dark wax, don’t panic when you get to this step. It always looks a bit scary when you apply it, but that’s why, again, applying clear wax first is so important. Why? Well, it actually has to do with the next step: once the dark wax is applied and lightly buffed, I always go in with a little more clear wax and wipe away any excess of the dark. The two waxes will blend and dilute the dark just enough so that the surface is nice and even. The more clear wax you apply over the dark, the lighter the surface. However, if you don’t put down that first layer of clear wax, it’s a LOT harder to blend the dark wax out as it has bonded directly to the paint.
I wanted the flag to look antiqued, not dirty, so I applied just enough of the second layer of clear wax so that the surface was dark but not dingy. In the picture above, you can see the effect of the dark wax after I went in with clear. I loved the effect, especially how it made the red look rich and kind of coppery.
The final two steps of the whole process were to seal the surface so that I could actually make a functional tray that was more than merely decorative, and then to add the handles.
I applied two coats of wipe-on polyurethane with a clean cloth over the whole surface (inside, outside, bottom), making sure to lightly sand between each coat so as not to get a rough surface and to make sure the second coat was properly absorbed. Once it was dry and free of any tack, I went in with the drill and attached the handles.
Now, after roughly four hours of work, the tray was ready and looking great! And I had just enough time to get myself ready for some fireworks!
Enjoyed the project?
Resources for this project:


Comments
Join the conversation
-
 Wendy
on Jul 15, 2019
We may be past the Fourth of July, but I really feel like I need this! Beautiful

-










Frequently asked questions
Have a question about this project?