


Project Guide: How to Make Truly Terrifying Halloween Ghosts
While cute Halloween decorations add some spooky charm to your home decor and are fun to make, hardcore Halloween decorators also like to create a frightening display for their home or yard on Halloween. One of the best way to get your spook on is to arrange realistic ghosts throughout your home and garden. There are several ways to DIY a truly scary ghost, but before you try your own, check out these helpful ghost making tips:

How to Make Truly Terrifying Halloween Ghosts:

1. Buy the right medium for your project
2. Prepare Your Work Space
3. Plan Your Design
4. Prepare Yourself for Working

1. Chicken Wire Ghosts
- Chicken Wire
- Gloves
- Wire Cutters
- Glow in the Dark Spray Paint
- Spotlight or Lantern

Image via Marla
- Make sure to wear protective gloves when working with chicken wire and wire cutters
- Form your shape outside so that you won't have to move it after you've finished, and so that you can use the lawn to stabilize the chicken wire as you build
- Start by cutting your base piece, big enough for forming a basic shape, like a like a tall cone for the skirt
- Form your shape, and then weave the cut end back into the other end, by simply pushing the cut edges through the mesh
- Once you have your base, shape is into the gown or other form you desire, by pinching the wire and trimming it to your shape
- It's easiest if you start with the most obvious shaping point first, like the wide skirt at the base and the pinched waist towards the middle-top
- Add more layers of chicken wire if you want to add more shape or detail to your design
- Once you've finished shaping, you can cover your form in cheesecloth, if you want a more ghostly gauze look
- If you're using cheesecloth, keep the skirts from flying away by sticking them into the ground with tent stakes
2. Packing Tape Ghosts
- Packing Tape
- Plastic Cling Wrap
- A Doll or Manikin
- X-Acto Knife
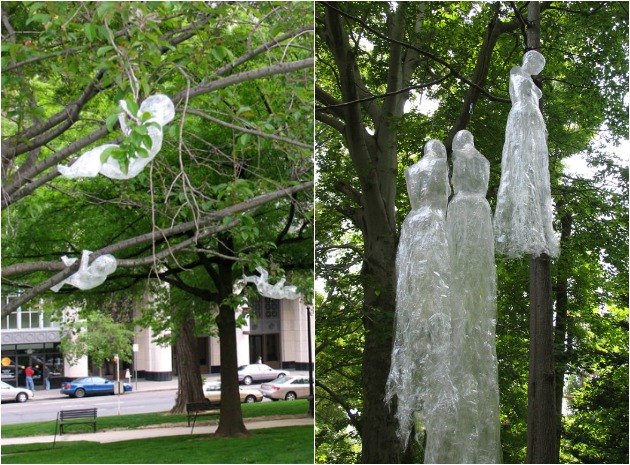
Image via Mark Jenkins
- Pose your object in the form you want your finished ghost to have
- Make sure to wrap your object completely in plastic cling wrap. If you leave any area uncovered, it will make it difficult to remove the tape later
- You'll need to rip off pieces of plastic wrap to cover some smaller, tighter areas
- Cover the whole form in a layer of packing tape. Press firmly as you work because the first layer should be as tight and form-fitting as possible, so that you maintain the closest shape and details possible
- Instead of using the roll of tape to wrap your form, rip off small pieces to use at a time, covering your form little by little
- Cover with a second and even third layer of tape, so that your creation with keep its structure after you remove it from the form
- When your form is completely covered, use an X-Acto knife to carefully cut a seam through the tape in the back so that you can remove the form and free the tape creation
- Cut into the tape in a T-shape, making a cut straight down the back of your form and across the shoulders or arms. If it's difficult to remove, cut two lines down the back of the legs as well
- If you want your ghost to seem transparent, carefully remove the plastic wrap from inside the tape
- Last, match up the seams and tape them together to complete your ghost
3. Cheesecloth Ghosts
- Cheesecloth
- Spray Fabric Starch or Stiffen Stuff Fabric Stiffener
- Balloons
- Plastic cups
- Sharpie or felt
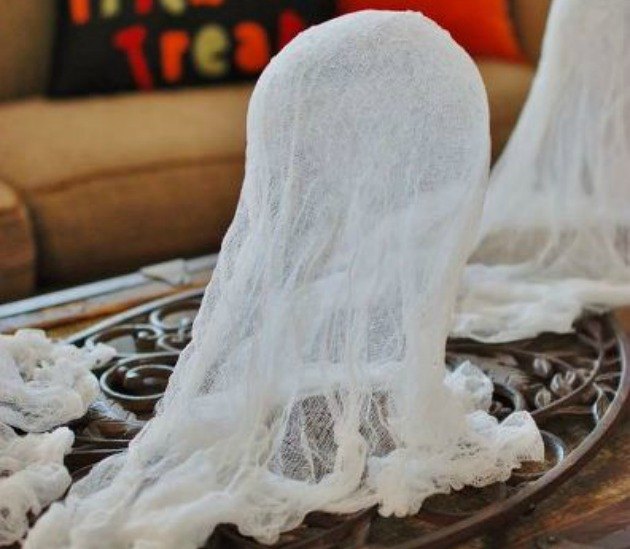
Image via Hunt & Host
- Consider the height and size of your ghost before you start, so that you know what size to blow your balloon and cut your fabric
- If you're using a balloon to create your shape, make sure to measure that the filled balloon leaves you with enough drape in your fabric
- Place your balloon in a cup, or on some taller stand, so that it remains in place while you drape and spray your fabric
- Make sure to do your draping and spraying on a flat surface, so that your ghost can eventually sit level on a table or floor
- Arrange your cheesecloth in the shape you want before you begin spraying starch. Once the spray stiffens, the shape will be fixed
- Leave your ghost about an hour to dry completely
- If you want to add details, do it very lightly with a Sharpie or felt once your ghost is dry
4. Styrofoam Ghosts
- Foam balls or Styrofoam Wig Head
- Lightweight White Cotton Fabric or Cheesecloth
- Scissors
- Sharpie or Black Paper
- Dowels or Garden Stakes
- Spray Adhesive
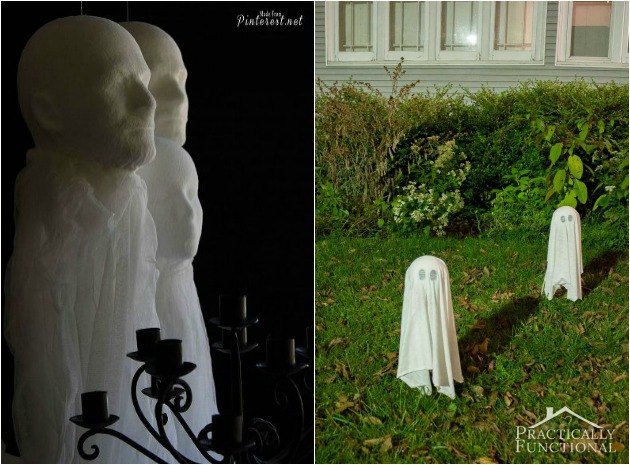
Images via Made From Pinterest and Practically Functional
- Make sure to measure your fabric before you cut so that you don't end up with the dowel or foam head peeking out from under the draped fabric
- If you would rather leave a train or a gauzy trail, leave your fabric long so that it can be bunched or pulled back
- Put any details like eyes or mouths on the styrofoam ball or head before you cover it, so that the expression is eerily muted
- You can stake your ghost in the lawn, or hang it from a ceiling using thin, clear string and hooks
- If you're staking yours in the lawn, make sure that dowel is 3" to 4" into the styrofoam so that it is secure
- For stormier areas, you may prefer to use a garden stake rather than a dowel
- Before adding the fabric to your styrofoam head, spray a layer of adhesive over the area you would like the fabric to cling to
- If you would like the cloth to cling tightly to the whole of the ball or wig head, instead of simply sitting on top of it, make sure to spray the entire surface
- Press the fabric down firmly, so that it attaches at every sprayed spot
- When pushing them into the soil, angle them slightly so that they stick in securely
- Make sure that the dowels or stakes are at least 6" in the dirt

Finishing Touches

Want more details about this and other DIY projects? Check out my blog post!


Frequently asked questions
Have a question about this project?