Upcycled Teapot

I was cleaning out my kitchen cupboards the other day and came across this old teapot. It was purchased about 20 years ago at a car boot sale for £1 when I lived in the UK. Why I bought it I have no idea because I never drink tea. I hated the idea of throwing it away so I thought I would upcycle it into a steampunk-themed teapot.
If you follow my blog you will know I am steampunk mad, so a steampunk teapot was the most obvious choice. And with Halloween just around the corner, you can pop a skeleton into the teapot to make a great centrepiece for your Halloween table.
While teapot has been decorated in a steampunk theme, you can decorate yours in a style suitable to your home decor.
Find a teapot to upcycle
This was the teapot I used, I know some people will be shocked that I would paint over it, but it is no use to me. To decorate the teapot I used some items I had at home in my craft room and used a mixed media art technique. If you have not heard of mixed media art it is using multiple mediums in one project. An example of this is using paper, resin, paint and some everyday items you can find around your home. If you are looking for more subtle ideas, you can always decoupage the teapot.
Decorating the teapot
I used some split conduit that I found in my husband toolbox and used hot glue to attach it around the rim. If you have tried mixed media art you will know that the process is very messy and it will look like something the cat threw before painting. So don’t be put off, keep going it will come together in the end.
To go with my steampunk theme I wanted the surface to have an industrial look. To create the design I used an embossing press and cardstock.
Over the years I have tried a few different types of glue for glass surfaces and found the best one to use is The ultimate crafter’s glue. I roughly layered the pieces of paper over the surface slightly overlapping them. This will add some great texture when painted.
Some of the embellishments I used were made using resin and silicone moulds. The rest of the embellishments were bits and bobs I found around my craft room and workshop.
Because I was going for a steampunk theme, I added some embellishments that looked like plumbing. All the heavy embellishments were added using black hot glue.
I know this looks like a total mess, but I wanted to show you that the process is so simple to do. You are basically adding items to cover most of the surface.
Painting the teapot
You can use black acrylic paint and paint the surface. I have always used gesso in the past for these types of projects but I have found an acrylic paint that works better.
Adding the metallic wax paste
This is where the magic happens in my opinion. I used metallic copper wax paste to highlight all the raised surfaces first. To apply the wax you touch the surface of the wax with your finger and then rub it over all the raised surfaces.
The image below is how it will start to look. Try not to cover all the black paint, you still want some to show in places.
To cover some of the hard to reach areas you can use a small paintbrush and very softly rub it over the areas. The idea is not to paint the wax on.
Metallic wax comes in many different colours, so you can choose one to suit your decor.
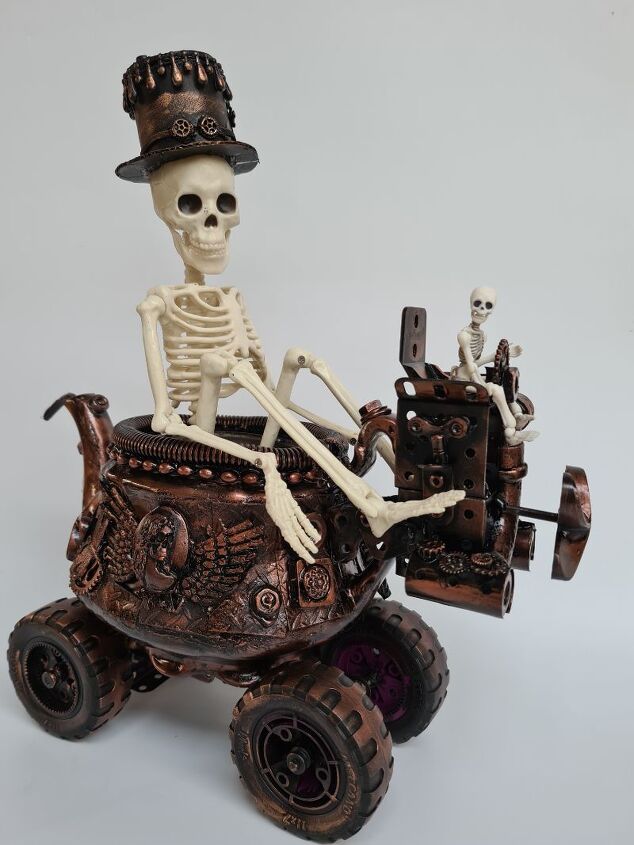
If you are going to use your upcycled teapot as Halloween decorations you can add a skeleton and pose him inside the teapot. I made my skeleton a steampunk hat to add some extra character to my teapot.
Add some wheels and accessories
I got a bit carried away with my upcycled teapot in the end by adding some wheels and an “Engine” to resemble a steampunk vehicle. My son still had an old Meccano set from when he was a kid, it had many missing pieces but still enough to build what I wanted for this project. I put the pieces together to create some wheels for the teapot to sit on.
Next, I built an engine for my upcycled teapot to resemble what I thought a steampunk engine would look like. This was attached to the back of the teapot. I painted and highlighted them with the wax paste in the same way as the teapot.
You can have some fun creating different looks by posing your skeletons.
You can have some fun put the skeletons into different poses.
Hang on to those empty bottles and make your own Halloween themed bottles.
I many more great unique projects available on my website listed below.
Enjoyed the project?
Resources for this project:
See all materials
Comments
Join the conversation
-
 William
on Sep 26, 2021
That is so cool. Looks amazing. I like the steampunk look. Great imagination putting it all together.
-








Frequently asked questions
Have a question about this project?