


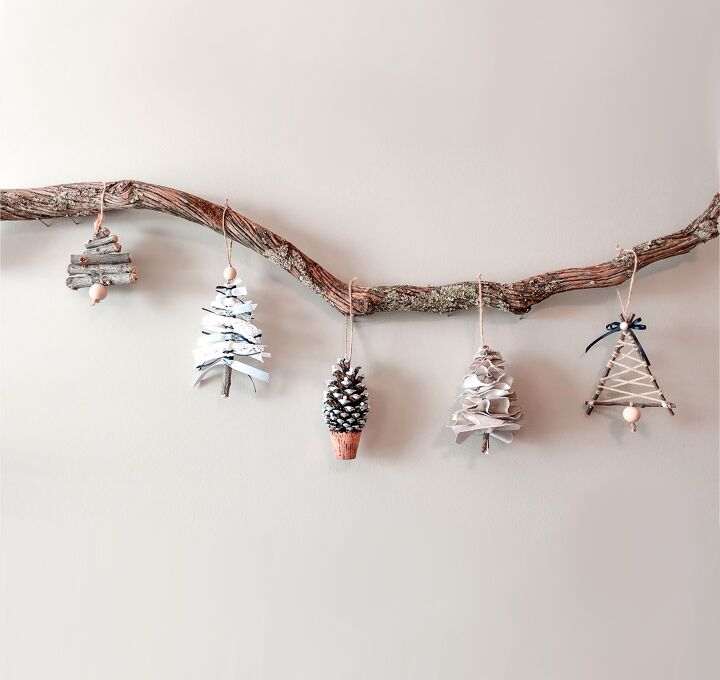
DIY Winter Ornaments!

Thanks for taking a look at my post today. I hope I can give you some simple ideas for Christmas ornaments (that cost next to nothing) with these 5 tree-shaped cuties!
For me personally, I didn't have to buy anything new to make these. Just a quick forage for some twigs and pine cones and the use of some common crafty materials is all it takes to make these easy decs.
If you would prefer to watch my YouTube video of this project, the details and link are provided below 👍🏻
WHAT YOU'LL NEED
- Twigs
- Pine cones
- Twine/string
- Ribbons
- Beads
- Acrylic paint
- Wine cork
- Old fabric/cloth
- Glue
- Garden cutters
- Drill
STEP ONE - YOUTUBE TUTORIAL
As I mentioned above, I have a YouTube tutorial for this project up on my channel now, simply click the video link above 👆🏻
Whilst you're there, please consider subscribing to my channel to catch all my other crafty content ☺️. I post weekly and would love to see you over there in the comments 👍🏻
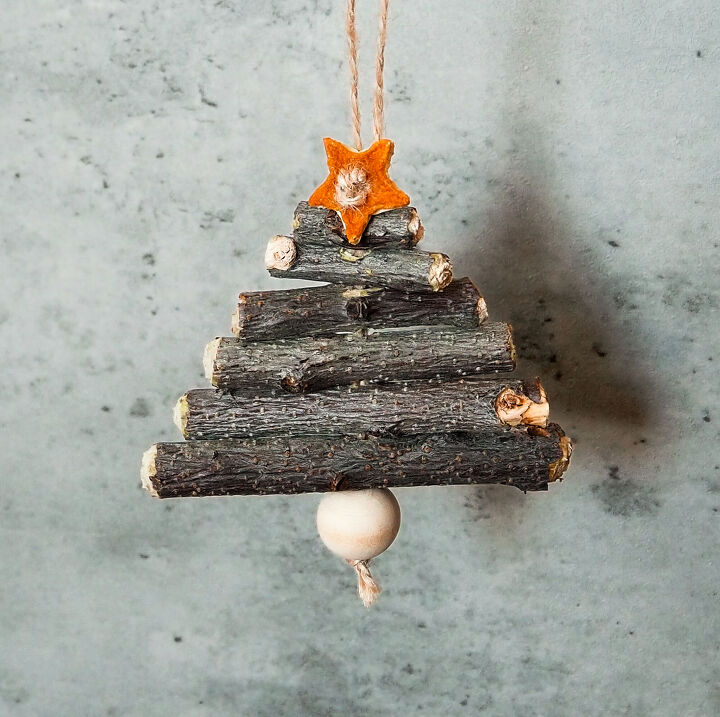
STEP TWO - RIBBON TREE
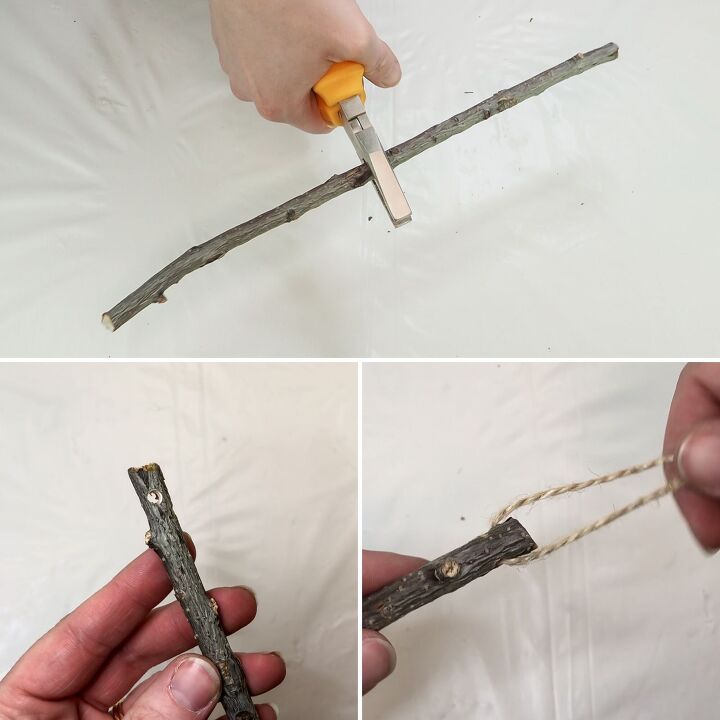
First, chop up chunky twigs to about 6 inches in length.
Drill a small hole through each twig at one end. Make sure the hole is large enough to pass twine/string through.
Then thread a piece of twine or string (I used twine) through the hole that is long enough to loop onto your tree after it has been tied (don't tie just yet...).
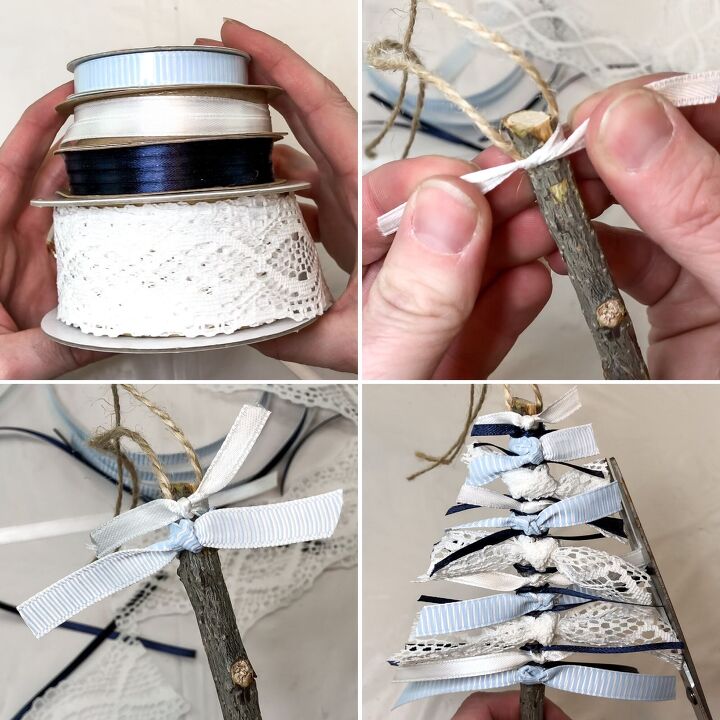
With different coloured ribbons and/or lace, snip off a few short pieces of each kind/colour and start by tying the first one around the end of the twig that has the hole and twine.
Tie the ribbon over the top of the hole so that it flattens the twine against the twig giving the over all look a neater finish. I tied a double knot for each piece of ribbon/lace.
Alternate the colours as you go to give a balanced look to your ornament.
Stop once the twig is approx 3/4s covered and trim the pieces into a triangular, tree-like shape.
If you have some/want to, add a bead to the twine at the end before tying it off.
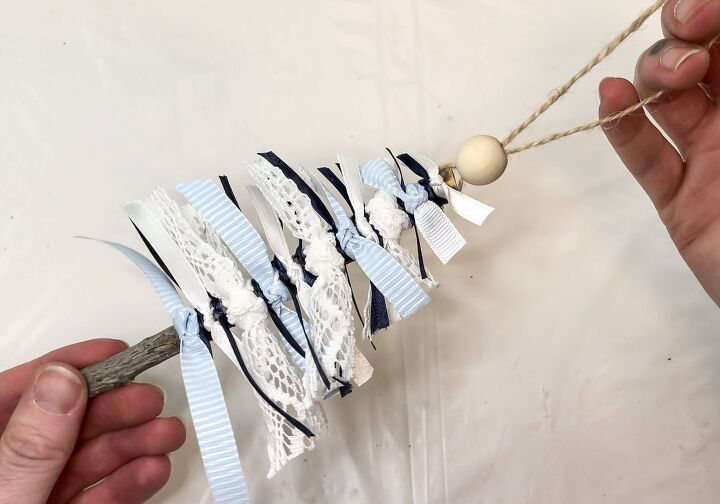
First one done! So easy and customizable to any colour scheme 👍🏻
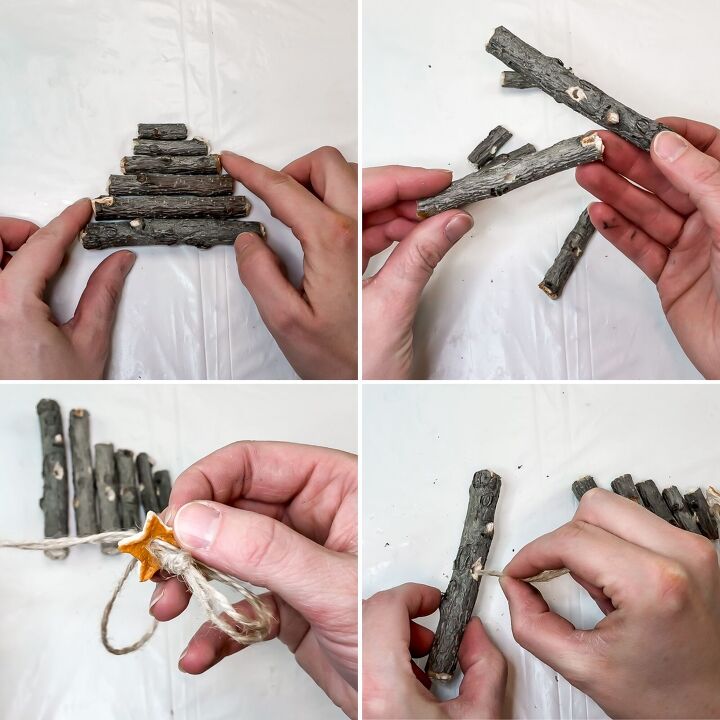
STEP THREE - LOG TREE
In the same way as before, chop up chunky twigs, this time into varying sizes from big to small; approx 4 inches long for the largest and 1 inch long for the shortest.
Drill small holes through the centre of each twig piece, again, large enough to thread twine/string.
Before threading the twigs onto the twine, I add a DIY bead made from orange peel. You may have seen my earlier Hometalk post or YouTube video on how to make these but if not, I've linked it below in case you're interested in see how 🍊👇🏻
After adding my orange peel bead, I thread each mini log onto the twine.
Lastly, I add a wooden bead at the bottom to resemble a bucket and then tie the twine off.

Tree no.2 done! I think this one is my favourite. The twigs spin around independently of each other and I love how that looks.
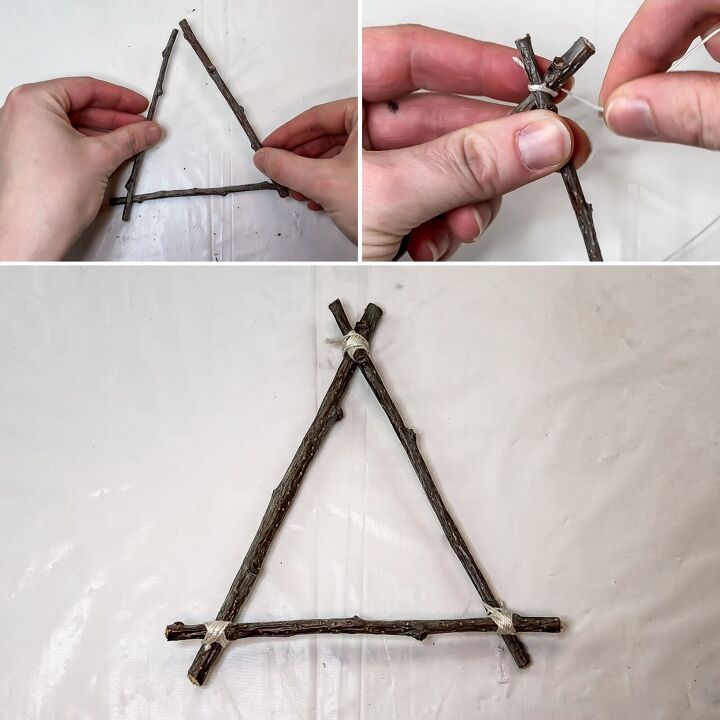
STEP FOUR - WOOL TREE
Chop up thin twigs this time and use 3 per ornament.
Using string, tie each corner together so that the tree frame is nice and sturdy.
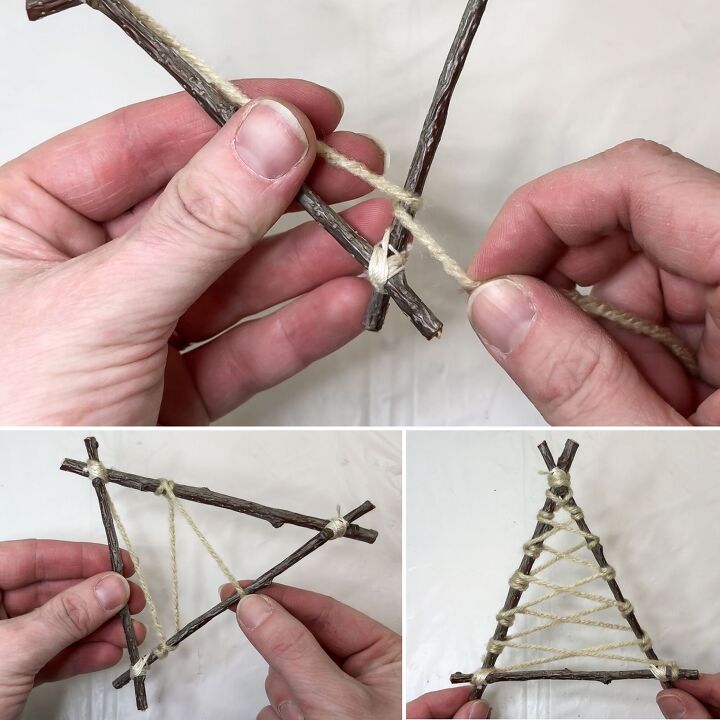
Then using twine, string, ribbon or wool (I chose wool), tie one end to a corner and start wrapping it around the frame in a zig-zag fashion.
I add in an extra loop or two where the wool meets the frame so that it doesn't slide out of place, which I found it wanted to do when I missed this step out first time around.
When you reach the top of the tree, loop around the frame and zig-zag back down the opposite way to create a criss-cross pattern.
Tie the wool in place at the opposite corner to the one you started in.
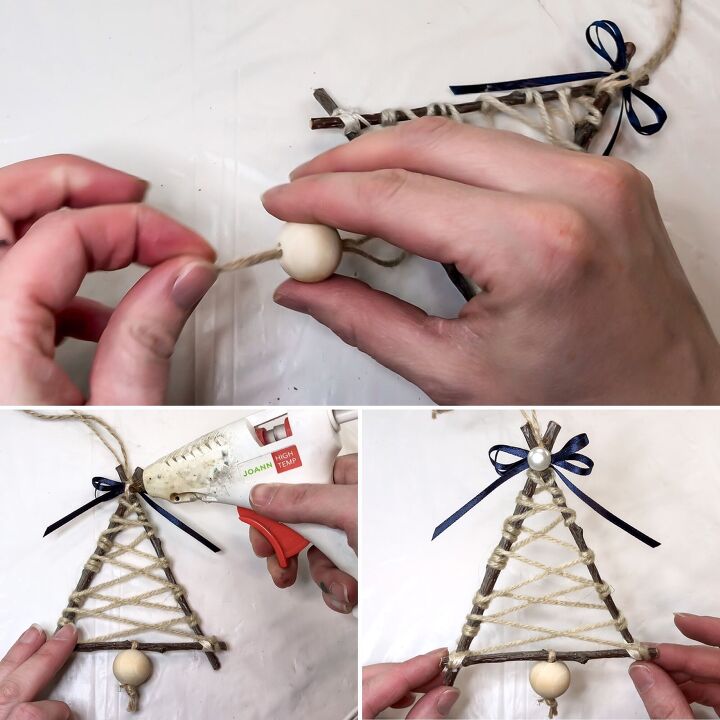
Add a large wooden bead at the bottom to resemble a bucket by tying a piece of twine around the bottom twig in the centre and then threading the bead onto that.
I add a flat back pearl bead and ribbon bow to the top for extra detail. Add whatever extras you like though.
I secure the bow in place by trapping it under the twine hanging loop. It's easier to see what I mean in my video but there are tons of different ways to attach simple bows such as just glueing then in place.
And that's tree 3 done!
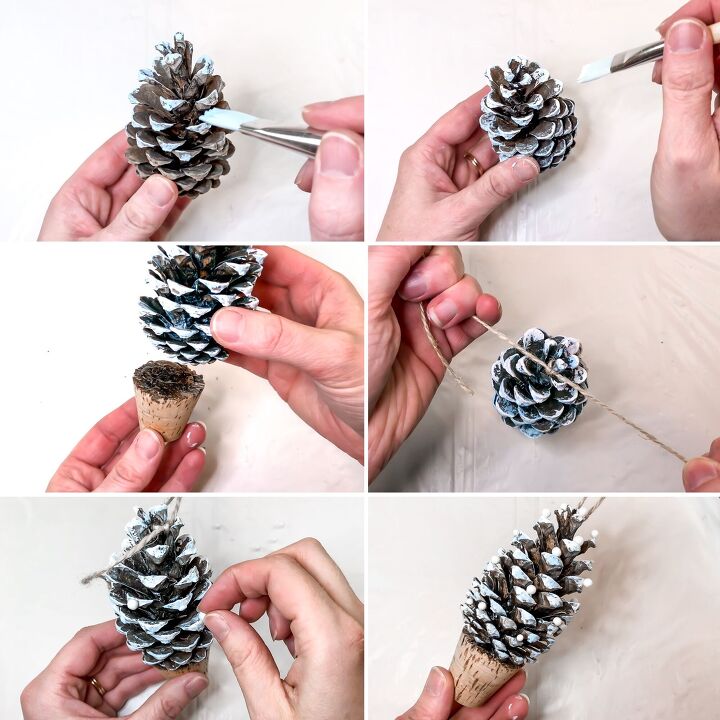
STEP FIVE - PINE CONE TREE
Paint large, full, triangular shaped pine cones frosty colours. First dust with a cool blue and then go over the top with white. I didn't do this but I think adding a bit of silver would look really nice too.
Use a truncated cone shaped cork for the bucket and hot glue this to the bottom of the pine cone.
Attach a piece of twine to the very top spike and tie the twine off into a loop.
That's tree no.4 done, super easy!
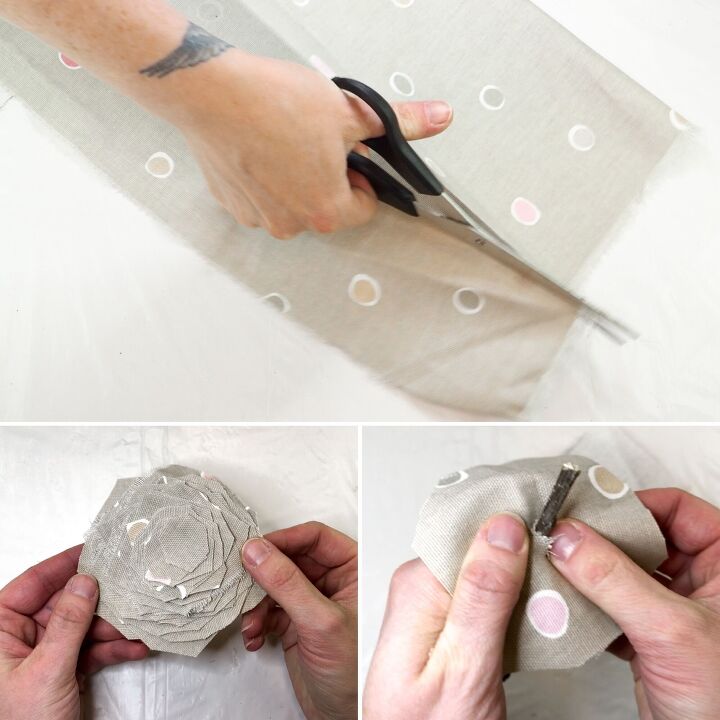
STEP SIX - FABRIC TREE
Cut up pretty or old fabric into very rough circular shapes, starting at around 3.5 inches in diameter and gradually getting smaller.
Cut a hole in the centre of each piece of fabric and slot each one on one-by-one to a 6 inch twig.
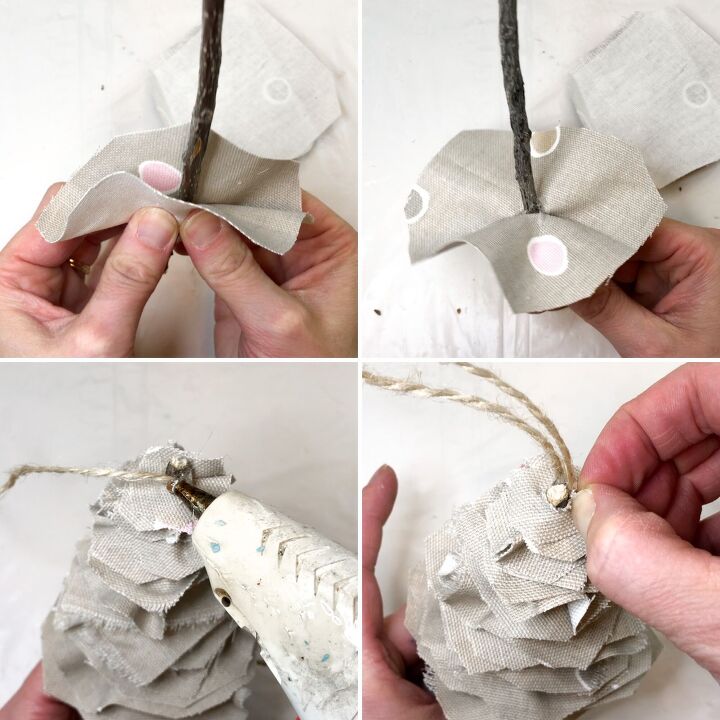
Add glue dots onto the fabric circles in a couple of places and pinch the fabric together to create puckers.
Do this with each circle to create frills all the way up the tree.
After adding the penultimate fabric circle, tie a piece of twine onto the twig for a loop. Add a small blob of glue over the knot and use this blob to pucker the last fabric circle that will also hide the knot.
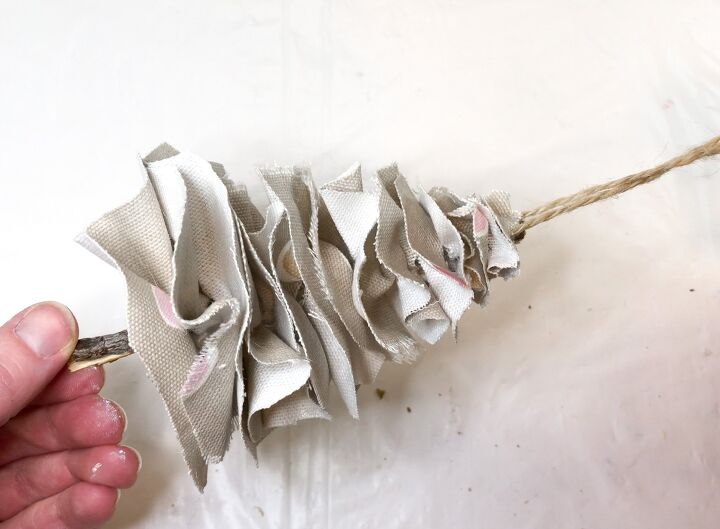
I think I should have added a bead to finish this one off but I forgot.
But that's it, that's all 5 tree-shaped ornaments done!
I hope you like these decoration ideas. I think they're so simple yet effective and I really enjoyed making them. Let me know what you think of them in the comments below.
Please remember to check out my YouTube channel and consider subscribing too. I love interacting with viewers over there so please feel encouraged to drop a comment for me and I'll happily comment back.
I also have an Etsy store where I sell lots of hand made goodies so feel free to have a little browse over there too.
Thanks so much for checking out this post today and until next time,
Happy crafting! x
💙


Frequently asked questions
Have a question about this project?