1.92M Views
Twinkling Fall Topiary With Lights in Just 30 Minutes!

by
Rob & Courtney M, Hometalk Team
(IC: paid contributor)
7 Materials
$50
30 Minutes
Easy
Fall has always been my favorite time of year -- between the crisp weather, the coziness of the season, football games, and good food, what's not to love?? More than all of those things though, I am a color girl -- I love color in my life -- so when the trees are turning, I start getting giddy! This project livens up my living room, and I'm so surprised of just how quick and easy it was. (I did this in just 30 minutes!)
We want to help you DIY, so some of the materials in this post are linked to sellers. Just so you know, Hometalk may collect a small share of sales from the links on this page.
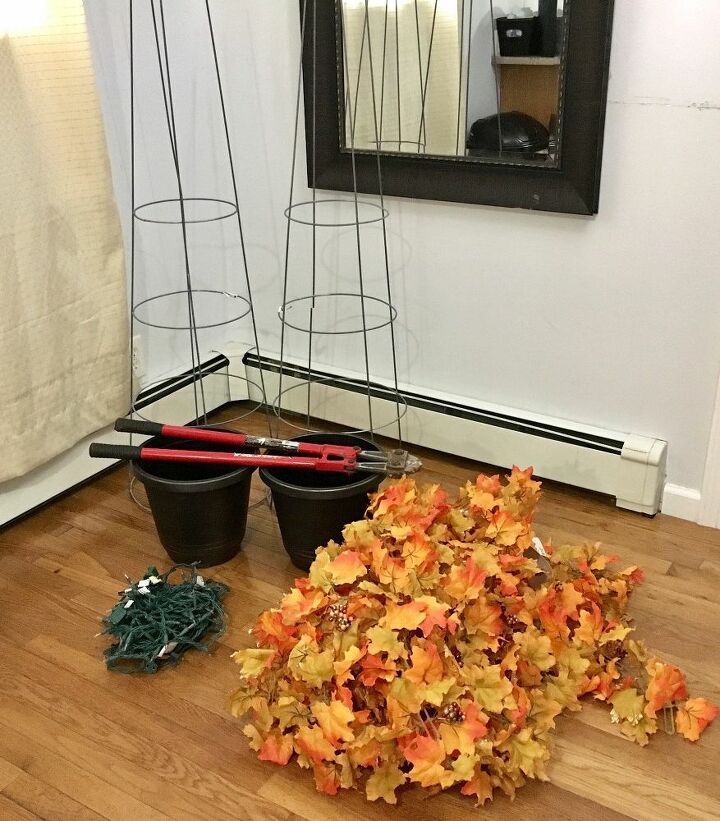
SUPPLIES: -tomato cages (2) -planter pots or urns (2) -bolt cutters (I'm not sure what else there is out there that can chop these super thick tomato cages but if y'all have suggestions, I'm all ears. These bolt cutters were easy to work with though, surprisingly. Rob had them in our garage from his mechanic days.) -Christmas light strands (2) -fall leaf garland (I used a total of 8 strands of garland -- 4 on each topiary -- my topiaries measure roughly 32" tall from the top of the topiary to the top of the planter.) Not pictured: -rubberbands (2)
STEP 1: Snip tomato cages First, I decided about how tall I wanted my topiaries to be and snipped my tomato cages using bolt cutters.
STEP 2: Place tomato cages on planters Then, I positioned my tomato cages on the planters -- you'll want to flip your tomato cage upside down to do this. If you want extra security, you can try hot gluing them, but mine fit on there fairly snug.
STEP 3: Tie top with rubber band Next, I took a rubber band and tied the top of my tomato cage together -- you can do this step with a zip-tie, bread-tie, or anything else that will keep the ends held together.
STEP 4: Wrap garland Once my tomato cage was set, I started at the top and wrapped my fall leaf garland around it. Once you get to the end of a strand of garland, take the little plastic end and loop it back onto the garland to hold it in place. Again, if you want to use zip-ties or bread-ties, feel free. Repeat until you reach the end. I was able to make my topiaries look full with just 4 garlands each.
STEP 5: Wrap lights Finally, I grabbed some Christmas lights I had on hand and wrapped one strand around each topiary. You can manipulate the leaves to hide the light strands -- I found it easier to rotate the topiary around while I held the lights instead of me going around the topiary and wrapping the lights. I went back and pulled any leaves forward that could hide the green cord.
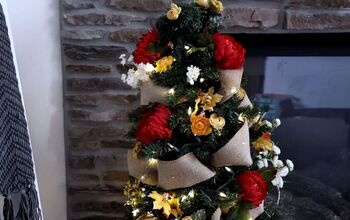
Aren't they pretty?! I am absolutely going to keep these up until Christmas --then I can always easily take the fall leaf garland off, replace it with Christmas greenery or some other sort of Christmas garland, and throw the lights back on them. My family and I switch off every year of them coming here to NY or us going down south, so this year is mine, Rob and Bo's year to travel which means we won't be getting a tree, however, these little beauties will be perfect for Bo to still be able to decorate! ...Now let's hope they stay this way without him trying to knock them down and mess with them. ;)
{
"id": "4093027",
"alt": "",
"title": "",
"video_library_id": "8202",
"thumbnail": "https://cdn-fastly.hometalk.com/media/2017/07/31/4093027/fall-topiary-with-lights.jpg"
}
{
"width": 634,
"height": 357,
"showRelated": true,
"noautoplay": ""
}
[{"sources":[{"type":"video\/mp4","src":"https:\/\/video-cdn-prod.b-cdn.net\/hometalk\/2022\/03\/04\/16442\/16442_source-406.mp4","label":"406p"},{"type":"video\/mp4","src":"https:\/\/video-cdn-prod.b-cdn.net\/hometalk\/2022\/03\/04\/16442\/16442_source-720.mp4","label":"720p"},{"type":"video\/mp4","src":"https:\/\/video-cdn-prod.b-cdn.net\/hometalk\/2022\/03\/04\/16442\/16442_source-1080.mp4","label":"1080p"}],"poster":"https:\/\/cdn-fastly.hometalk.com\/media\/videos\/2022\/03\/04\/16442\/thumbnail.jpg","media":{"video_library_id":16442,"thumbnail":"https:\/\/cdn-fastly.hometalk.com\/media\/videos\/2022\/03\/04\/16442\/thumbnail.jpg"}},{"sources":[{"type":"video\/mp4","src":"https:\/\/video-cdn-prod.b-cdn.net\/hometalk\/2021\/12\/09\/11933\/11933_406p_h264.mp4","label":"406p"},{"type":"video\/mp4","src":"https:\/\/video-cdn-prod.b-cdn.net\/hometalk\/2021\/12\/09\/11933\/11933_270p_h264.mp4","label":"270p"},{"type":"video\/mp4","src":"https:\/\/video-cdn-prod.b-cdn.net\/hometalk\/2021\/12\/09\/11933\/11933_180p_h264.mp4","label":"180p"}],"poster":"https:\/\/cdn-fastly.hometalk.com\/media\/contentmedia\/2021\/12\/03\/130545\/thumbnail.jpg","media":{"video_library_id":11933,"thumbnail":"https:\/\/cdn-fastly.hometalk.com\/media\/contentmedia\/2021\/12\/03\/130545\/thumbnail.jpg"}},{"sources":[{"type":"video\/mp4","src":"https:\/\/video-cdn-prod.b-cdn.net\/hometalk\/2023\/09\/27\/29875\/29875_source-406.mp4","label":"406p"},{"type":"video\/mp4","src":"https:\/\/video-cdn-prod.b-cdn.net\/hometalk\/2023\/09\/27\/29875\/29875_source-720.mp4","label":"720p"},{"type":"video\/mp4","src":"https:\/\/video-cdn-prod.b-cdn.net\/hometalk\/2023\/09\/27\/29875\/29875_source-1080.mp4","label":"1080p"}],"poster":"https:\/\/cdn-fastly.hometalk.com\/media\/videos\/2023\/09\/27\/29875\/thumbnail.jpg","media":{"video_library_id":29875,"thumbnail":"https:\/\/cdn-fastly.hometalk.com\/media\/videos\/2023\/09\/27\/29875\/thumbnail.jpg"}},{"sources":[{"type":"video\/mp4","src":"https:\/\/video-cdn-prod.b-cdn.net\/hometalk\/2022\/07\/26\/19457\/19457_source-406.mp4","label":"406p"},{"type":"video\/mp4","src":"https:\/\/video-cdn-prod.b-cdn.net\/hometalk\/2022\/07\/26\/19457\/19457_source-720.mp4","label":"720p"},{"type":"video\/mp4","src":"https:\/\/video-cdn-prod.b-cdn.net\/hometalk\/2022\/07\/26\/19457\/19457_source-1080.mp4","label":"1080p"}],"poster":"https:\/\/cdn-fastly.hometalk.com\/media\/videos\/2022\/07\/26\/19457\/thumbnail.jpg","media":{"video_library_id":19457,"thumbnail":"https:\/\/cdn-fastly.hometalk.com\/media\/videos\/2022\/07\/26\/19457\/thumbnail.jpg"}},{"sources":[{"type":"video\/mp4","src":"https:\/\/video-cdn-prod.b-cdn.net\/hometalk\/2022\/06\/09\/18362\/18362_source-406.mp4","label":"406p"},{"type":"video\/mp4","src":"https:\/\/video-cdn-prod.b-cdn.net\/hometalk\/2022\/06\/09\/18362\/18362_source-720.mp4","label":"720p"},{"type":"video\/mp4","src":"https:\/\/video-cdn-prod.b-cdn.net\/hometalk\/2022\/06\/09\/18362\/18362_source-1080.mp4","label":"1080p"}],"poster":"https:\/\/cdn-fastly.hometalk.com\/media\/videos\/2022\/06\/09\/18362\/thumbnail.jpg","media":{"video_library_id":18362,"thumbnail":"https:\/\/cdn-fastly.hometalk.com\/media\/videos\/2022\/06\/09\/18362\/thumbnail.jpg"}}]
Enjoyed the project?
Any price and availability information displayed on [relevant Amazon Site(s), as applicable] at the time of purchase will apply to the purchase of this product.
Hometalk may collect a small share of sales from the links on this page.More info
Published October 1st, 2016 1:29 PM
Comments
Join the conversation
2 of 551 comments
-
-
 San91539088
on Oct 17, 2023
I love the autumn garland idea. So pretty.
-









Frequently asked questions
Have a question about this project?
Beautiful ! I would love to make these, but I would like to know what size planter pots you used ?
$130.00 for just the garland???? They are lovely but plus the lights...pretty pricey diy for me
They are very attractive. You did a beautiful job.
I would think you could wrap the lights around first and then add the garland second. That way you're not having to tuck the lights string behind the garland since they will already be behind it. Also, you can just easily remove the fall garland and replace with a green or festive Christmas garland in one easy step.
Another thing you could do is wrap two different colored strings of light. One white color for any season/holiday and one more specific to a holiday or season. I know good fall colored lights are orange, purple, red, and yellow. Winter / Christmas colors are red, green, yellow (gold), blue (for Jewish holiday), and spring could be green or white. Essentially, you unplug the lights you're not using and plug in the string of lights that you are using for that season, seeing as outlets usually have 2 inserts for electrical cords.
I wouldn't put the tomato cage directly on the floor if you have real hardwood floor in case they end up scratching the wood. If you don't use a pot, consider poking the ends of the tomato cages into ping pong palls or tennis balls or ? to ensure they don't scratch your nice wood floors.
Otherwise, very festive and very multi-purpose!