How to Create a Gorgeous Ombre DIY Fall Leaf Wreath

I love everything about fall! I love the change in weather and the pumpkin spice scent in the air but mostly I love the colors!
I decided to DIY a fall leaf wreath using maple leaves in all the right tones to create an ombre effect!
This ombre wreath is something you need to have on your front door every fall!
If you want to learn how to make this stunning fall piece in just a few simple steps, this tutorial is for you!
Tools and Materials:
1. Remove Leaves From Stems
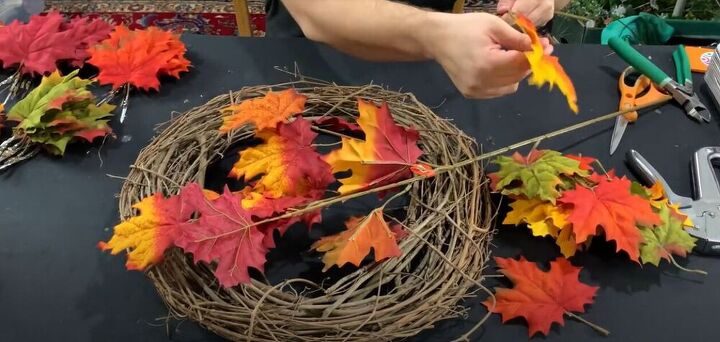
To make this amazing fall leaf wreath, I made sure I had maple leaves in all the fall colors. I used leaves from burnt orange to green.
I started by removing the leaves from their stems and organizing them into color groups.
2. Add Steel Picks
To secure the stems of the leaves, I added little steel picks. This just helps keep them firm and provides them with a bit more stability.
You don’t need to add these picks to make this amazing ombre design. Using just the hot glue will hold your leaves in place on your wreath.
3. Create the Ombre Effect
To get started on the wreath, I took one color of leaves and started dipping the stems in the hot glue skillet. I then placed them in the wreath.
One thing to focus on when designing this stunning wreath is making sure all the leaves are facing the same direction.
Working in the same motion, I moved from my brighter oranges to the more burnt red color. I made sure that there were no gaps between the leaves and that the wreath was just full of foliage.
If you don’t want to create an ombre look, you can always place the colors at random and that would create a gorgeous fall kaleidoscope.
I continued the ombre with the darker red and was so pleased with how the wreath was looking. If any of the leaves stuck out a little, I used another leaf to help compress them down.
Next, I started working with really pretty green leaves.
What’s so great about wreaths is that you can use other foliage as well. If you don’t want to work with leaves, you can always use sunflowers or other decorative pieces. No matter what you use, a great tip is to always buy a little more than you think you’ll need.
4. Fill in gaps
Once all my colors were in place, I made sure to fill in any gaps. I wanted the wreath to be full of color and life so I made sure there were no empty spaces.
5. Make a Bow
For an added, festive detail I decided to tie a neutral-colored burlap bow. I started by making a few of these little loops.
If you prefer the wreath as it is, feel free to skip this step!
If you want the bow to be a bit bigger and more eye-catching, you can make bigger loops with bigger tails!
To hold all my loops in place, I used a pipe cleaner and twisted it around, making sure all the burlap pieces were contained within.
To get a professional finish on my ribbons, I folded the tails in half and cut from the middle, outwards at an angle.
To attach the bow to the wreath, I fed the pipe cleaner through the grapevine and secured it from behind. Once it was safely in place, I fluffed up the loops to get the desired look.
More Thanksgiving Wreath DIY Projects
DIY Fall Leaf Wreath
I love this fall ombre wreath! It’s the perfect seasonal decor piece!
What other fall wreath ideas do you have? Let me know in the comments below!
Enjoyed the project?
Resources for this project:
See all materials
Comments
Join the conversation
-
 Dl.5660408
on Oct 15, 2021
Never would have thought of making an ombré wreath. It is simply gorgeous! The bow is a perfect addition too💕
-
-
 Rsi30009339
on Oct 15, 2023
So glad to see this - absolutely beautiful! Thanks for the inspiration!
-















Frequently asked questions
Have a question about this project?
Gorgeous! What a fantastic idea to separate the leaves like this to create such a beautiful wreath! Thanks for sharing!!
About how many leaves did you use?
Iam trying to find the leaves you used as the colors are what I want however when I click on resources for this project it goes to Amazon and they are not there, can you help?