Deep Fryer Stand

I don't know about you but I do a lot of deep frying. And I keep my deep fryer outside. The poor thing stays outside 365 days a year. So what I've learned is that when winter comes, I need to cover it before the rain starts. Even though it's under my patio cover, the wind will still get rain into the fryer. Then when I heat up the oil, I have an over flow issue due to the water and oil. So after ruining my stone counter top once, I came up with a plan to help in case I ever have that problem come up again. The goal is to not have it happen again but we will have a storm pop up out of no where during the spring (especially this spring).
So using some items I had laying around the house I was able to make a cool little stand for the counter top and it's working great.
My total cost for this project was less than $10 but again, I had all of this stuff laying around the house from left over projects. If you needed to purchase everything, I would say you could do this for around $50.
I couldn't find anything like this in a store.
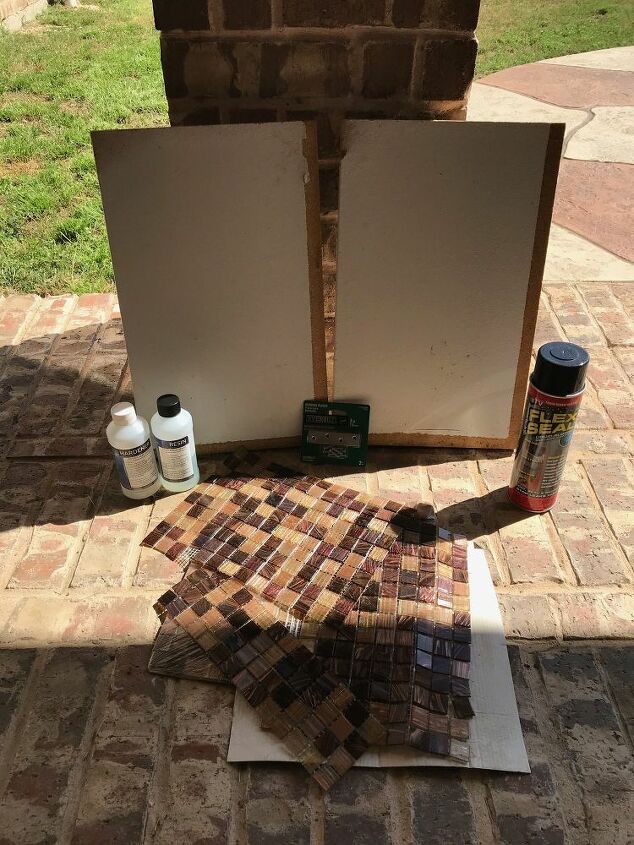
Here is everything that I used. 2 pieces of old shelving. You could also use any piece of wood, old cutting board, etc. Flex seal paint - Mine was going to be outside 365 days so I wanted something to make it completely water proof., two sheets of pre laid tile sheets. I got mine at Home Depot. Metal brackets to hold the two pieces of wood together and epoxy....I love epoxy. I used 16 oz.
first thing I had to do was to paint every side of the wood. This was the longest part of the project since flex seal paint is thick and takes a bit longer to dry than traditional paint. I put each piece in a box to help keep over spray to a minimum.
Here is the wood once it was painted. I had to make sure every inch of it was covered so no water would get into the wood.
I then added the brackets. I used a drill to make small pilot holes for the screws. If you do this, be very careful to not make them too deep as the screws will not tighten into your wood.
Weldbond is my glue of choice with things that are glass or plastic. It truly lives up to its name. As you can see this is not the cheapest item but a little goes a long way. I used this for the footers as well as attaching my tile sheets.
for my footers I had some left over glass tiles from another project. This keeps my stand up off the counter top. I put them on each corner and down the middle of the two boards.
I glued the sheets onto the wood using the weldbond. It's as easy as spreading peanut butter and then laying the tile sheets right on top. Let it dry completely before adding the epoxy. I let it dry in the sun for 12 hours.
I did need to use grout to fill in the lines between the tiles. this is super easy. Just follow the instructions on the container. Again, let this dry completely before adding the epoxy.
I did use painters tape to make a little border for my grout. Grout is ok if it's sloppy as you will be wiping all of it off the top once it's dry.
Once I mixed up my epoxy per the instructions on the the container, I was able to pour it into the middle of the board and I used a tongue depressor to spread it out over all the tiles. the epoxy will darken your grout so keep that in mind. If you want a lighter color grout, you may need to go up a shade when using epoxy.
Here is the finished project. I did add a few decorative tiles to the front edge but you really don't need to. It has room to hold the lid when I take it off, but most importantly it keeps any over spill on the stand and not on my counter top.
NOTE: I do know it works as there was apparently water in my fryer and all over flow was contained on the stand and didn't harm my counter top at all.








Frequently asked questions
Have a question about this project?