DIY $8 Holiday Wood Risers. Build And Decorate

Learn how to create stylish and affordable holiday wood risers for just $8. This DIY project will guide you through the process of building and decorating these festive and versatile decor pieces. Get ready to add a touch of charm and elevate your holiday decorations.
Hello everyone! I hope you are all doing well. I am excited to share with you another simple DIY project that you can try at home. This project is very easy and affordable, and I only spent around $8 to build my wooden risers. So if you're ready, let's get started and create something beautiful!
Be sure to check out the video tutorial.
Material list
Two 6.5'' wood circles
One bag of wooden doll heads (These are used for the legs) You will need 8 wooden doll heads.
Gold wire (Optional)
White paint, and black paint
Adhesive (I used E6000 for gluing the legs onto the wood circles)
Hot glue (This will be used for attaching the gold wire)
Wire cutters/scissors (Depending on how thick your wire is)
Paint brushes
Creating your risers
Start with taking some of your white paint, and applying paint onto both wood circles. I needed about three coats of paint to cover it completely, and to give it a smooth appearance.
Set your wood circles aside, and allow them to dry. I did not paint the bottom side of my circles, but you can if you would like to.
To make your risers, start by applying white paint to both wood circles. You'll need about three coats to cover them completely and give them a smooth appearance. Set the circles aside to dry. I didn't paint the bottom side of my circles, but you can do so if you prefer.
Next, take your wooden doll heads, and apply black paint on each of them. Set them aside, and allow them to dry.
Once they have completely dried, you can now take your adhesive and add them to the bottom side of your wood circles. Each wood circle will have four added to the bottom.
Take your gold wire, and cut three medium sections out. Once you have cut three sections, take the ends and twist them. You will do this on the two ends.
Once you have completed that step, take your gold wire, and use hot glue to add them on the top of your wood circles.
You will form a circle with your wire on the top, and glue them down. This is optional, but I love working with gold wire and just wanted that look on my risers.
Decorating your wood risers
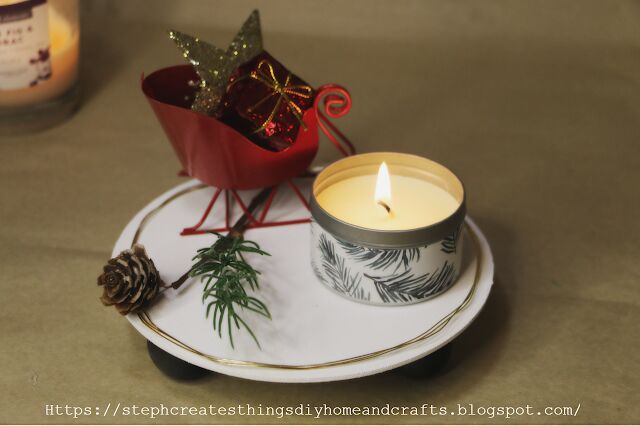
Once you have finished building your wood risers, it's time to decorate them. You can find most of the decorations at a discounted price. Add a candle, some holiday greenery, or a cute ornament to make your risers look festive. You may use any decoration that you like; mini LED lights, a glass candle design with twine, and cinnamon sticks can also be added to your risers to enhance their appearance.
You can use dried oranges and greenery to create a small glass jar and add a mini wreath to it. Don't forget to personalize your decoration and have fun with it.
Choose an appropriate spot to display your decorated wood risers and you're all set! I hope you find this simple DIY project enjoyable. Check out more of my crafts and feel free to share your thoughts in the comments below. I would love to hear from you.
I'll see you soon!
Pin/save/share
Enjoyed the project?
Resources for this project:
See all materials
Comments
Join the conversation
-
 Christine Ewing
on Nov 27, 2021
Really a cute idea.
-
-
 Mary Coakley
on Nov 28, 2021
Beautiful
-










Frequently asked questions
Have a question about this project?