


Easy Art for a Child's Room

by
Marlene
6 Materials
Easy
This idea started out as an Easter project but, as it came together, I quickly realized that the pastel colours and white frames I was using would look perfect in a baby or toddler’s room. Try this easy idea for adding artwork to a child's room.
Once you have your materials together and have chosen your colours, this piece of artwork goes together quickly and easily.
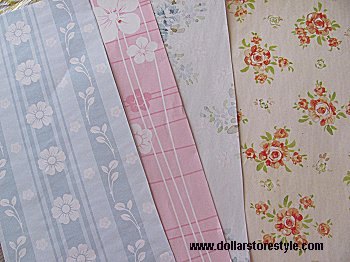
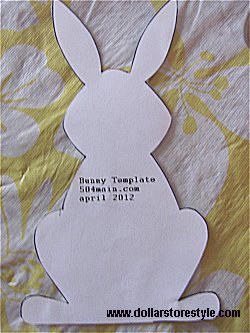
Once you’ve decided on the scrapbook designs you want to use, turn each sheet pattern-side down, trace around the bunny template and carefully cut out each bunny.
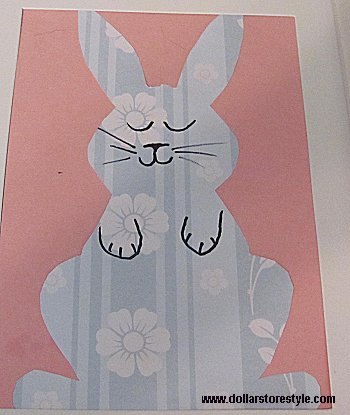
The idea of this particular template is that, if you don’t want to have to draw faces on each bunny, you just glue cotton tails on them so they look like they have their backs to you. I liked that idea but wanted to be a bit playful too, so I had my talented hubby draw a face on one bunny with the sharpie pen.

I ran out of the appropriately-sized white pom-poms, so one of the cotton tails is actually a piece pulled from a cotton ball and rolled into the appropriate size and shape. Glue the tails onto five of the six bunnies using a glue stick.
Next, glue each bunny to the appropriate background (for example, blue bunny on pink card stock.) Once each sheet of card stock has a bunny and a cotton tail (or a face) remove the backings from the frames one at a time and remove and set aside the glass. (You won’t be using it here.) Tape the card stock to the inside picture mat so that each bunny is centered and replace the frame backings.
I had 6 ½ by 4 ½ -inch card stock pieces on hand but you might want to use slightly larger pieces as I had to be very careful that the edges of the card stock didn’t show through the mat opening. Otherwise, they were the perfect size for centering each bunny in these particular frames.
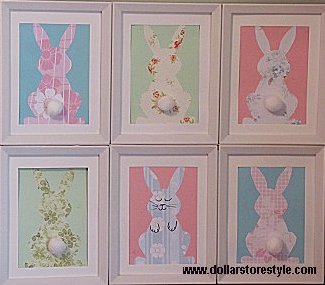
Line the frames up in two rows of three and shift them around until you're satisfied with the arrangement. You can put the bunny with the face anywhere you want; I chose to center it in one of the rows. When you are happy with the arrangement, use strong glue to attach three frames in a row, being careful to get them even. Do the same with the last three frames. Then, attach the two rows of three frames one on top of the other.
Visit my website, www.dollarstorestyle.com, to see more.
Want more details about this and other DIY projects? Check out my blog post!
Comments
Join the conversation
2 of 4 comments
-
This is adorable! I love the different patterns you chose

-
Thanks Nicolette. They were all chosen from my stash of papers for their bright colours.


Frequently asked questions
Have a question about this project?