


How to Etch Glass to Make Personalized Gifts and Home Decor

By Stacey Kelleher
The technique of etching involves adding semi-transparent patterns and designs to glass. Etched glass dates back to the mid-1700s where acidic chemicals and other abrasives were used to remove small amounts of glass, creating unique designs that appear like the glass is frosted or shaded.
Today, the look of traditional etched glass can easily be replicated using a few basic craft supplies. We will show you how to etch glass for custom art, gifts, and home decor.
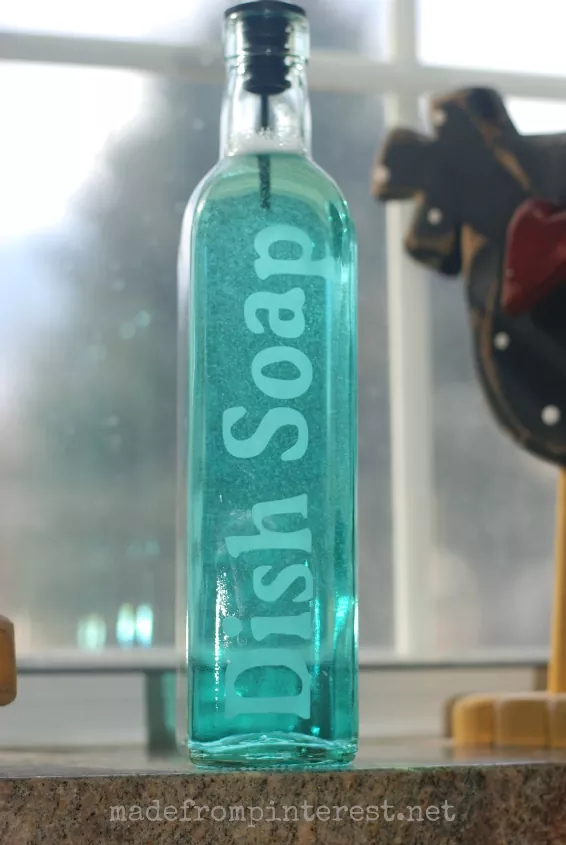
Photo via Made From Pinterest
How to Choose Glass for Etching
Nearly every type of glass is suitable for etching, with the exception of some Pyrex glass bakeware which has been tempered for high heat. Both clear and colored glass can be etched, and darker pieces of glass offer the most contrast.
The list of potential etching designs is really endless; here are a few DIY etched glass projects to inspire you:
- Etch a favorite family recipe on the bottom of a glass baking dish.
- Customize an accent mirror with an etched mandala design.
- Etch a loved one’s nickname on pint glasses for an original and personalized birthday present.
- Add a special quote to a glass picture frame for a meaningful gift.
- Etch designs on windows for privacy.
- Etch initials on a votive holder for a custom monogram.
- Etch a company logo on a promotional item.
- Make glass ornaments etched with snowmen for friends and neighbors.
How to Choose an Etching Stencil
Once you’ve chosen a glass item to etch, it’s time for the even more fun part: choosing a stencil for your project. Basic craft stencils available at your favorite craft store or hobby shop work well. You can also find pre-made or custom stencils on Etsy or make your own with a digital die-cutting tool like a Cricut. Or, you can use strips of painter’s tape applied directly to the glass to create linear designs. Adhesive stencils tend to work best for glass that isn’t perfectly flat.
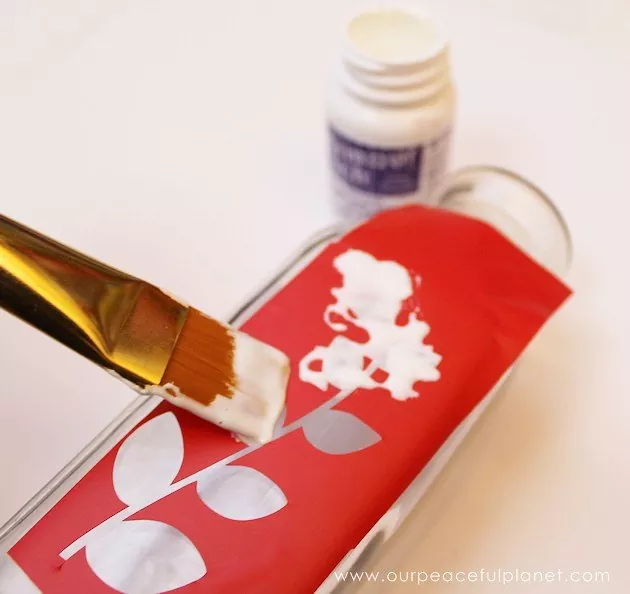
Photo via Nancy at Craft Your Happiness
How to Etch Glass with Etching Cream
Once you have your glass item and your stencil, it’s time to get started. Glass etching cream is the easiest way to achieve the look of frosted glass and is best reserved for small projects because it’s difficult to cover a large area without the cream drying as you go. If it dries too quickly in some areas, your design can turn out uneven.
Tools and Materials Needed:
- Glass cleaner
- Clean microfiber cloth
- Glass item
- Self-stick stencil
- Plastic scraper or old gift card
- Latex gloves
- Etching cream
- Disposable stirring utensil
- Application brushes (if not included with the etching cream)
- Water
Step 1: Clean the Glass
Begin by cleaning the glass surface. We suggest using a commercial glass-cleaning spray and a microfiber cleaning cloth because microfiber leaves behind minimal dust and lint. Let the glass dry completely.
Step 2: Apply the Stencil
Next, adhere the stencil to the wine glass. Use a plastic scraper or an old gift card to smooth out the stencil and remove any air bubbles.
Step 3: Paint on the Etching Cream
Some etching creams contain a chemical that can be slightly irritating to the skin, so put on protective gloves before using the product. Open the bottle and stir the cream well for a nice, even application. Use a small brush to apply a thick layer of etching cream over the stencil.
Step 4: Wait
Allow the etching cream to dry according to the product’s instructions. This usually takes one to three minutes.
Step 5: Rinse Away the Etching Cream
Rinse the glass with warm water to remove the excess etching cream.
Step 6: Remove the Stencil
Slowly remove your stencil to reveal your custom frosted glass!
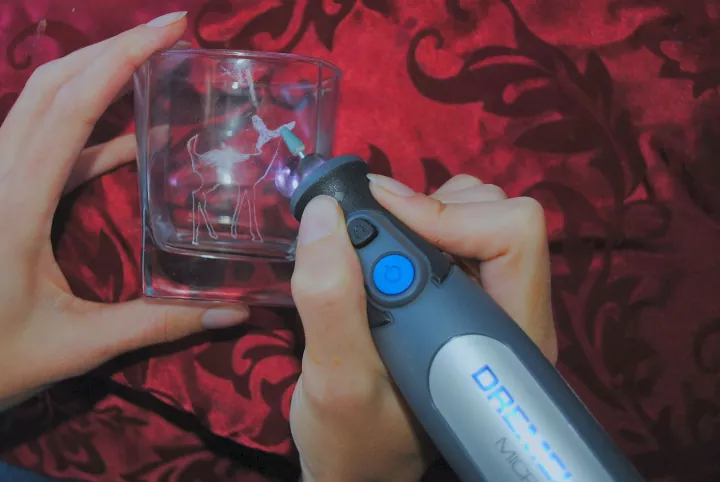
Photo via Ginger B
How to Etch Glass with a Rotary Tool
This method uses a rotary tool to etch designs onto glass surfaces. A rotary tool is an electric, handheld tool that has a small, pointed tip used to carve out small sections of glass to produce a design.
Tools and Materials Needed:
- Glass cleaning spray
- Cleaning cloth
- Glass item
- Adhesive stencil
- Plastic scraper or old gift card
- Safety goggles
- Respirator
- Rotary tool with appropriate bit
Step 1: Clean the Glass
Always clean the surface with glass cleaning spray and a clean cloth to remove dust, streaks, and fingerprints. Let the glass dry completely before proceeding.
Step 2: Adhere the Stencil
Carefully position the stencil to the work area, using a plastic edge to smooth it out and release air bubbles.
Step 3: Put on Protective Gear
This etching method actually drills off tiny specks of glass so it’s important to wear safety goggles and a respirator to prevent glass dust from getting in your eyes, nose, and mouth.
Step 4: Turn on the Rotary Tool
Place the appropriate bit accessory on the rotary tool. For glass, use tungsten, silicon carbide, or diamond tips. Check the product instructions for your tool model.
Turn the tool on and set it so the tip rotates at 15,000-20,000 revolutions per minute (RPM). If your tool has a 1-10 power setting, adjust it to 5 or 6. Higher RPMs could potentially crack or shatter the glass.
Step 5: Etch the Glass
Gently press the tip of the tool to the glass and drag it across to begin etching, following the lines of your stencil. Work from the outside of the design inward, using light pressure.
The diamond tip is ideal for making straight, sharp lines. The tungsten and silicon carbide attachments are good for shading in slightly larger areas.
Use a clean cloth to remove dust as you go, and wipe off the entire design when finished. Remove your stencil and you’re done!
How to Clean Etched Glass
Most etched glass designs are permanent and can withstand heavy use and washing. Here are some tips to keep your etched glass looking its best:
- To remove everyday dust and smudges, use a microfiber cloth and glass cleaning spray.
- Hand wash glass items that have been scratched or etched with a rotary tool. Never use a harsh cleaning tool like a scrubbing sponge or steel wool to clean your etched glass items, as they can damage your design (and the glass).
- Glass etched with etching cream can be washed in the dishwasher. These designs are permanent and won’t be damaged by heat.
- Keep in mind that once sections of glass are removed through rotary etching or engraving, they become porous and vulnerable to food stains. So if you are etching plates, cups, or jars, it’s best to etch the side of the glass that won’t be exposed to food and liquids.
Etching is a quick and easy way to turn a basic glass jar, bottle, or plate into a one-of-a-kind design that you can display in your home or give as a gift. What is your favorite DIY etched glass project? Share your ideas below!


Frequently asked questions
Have a question about this project?