How To Make An Awesome Rock & Wire Picture Holder

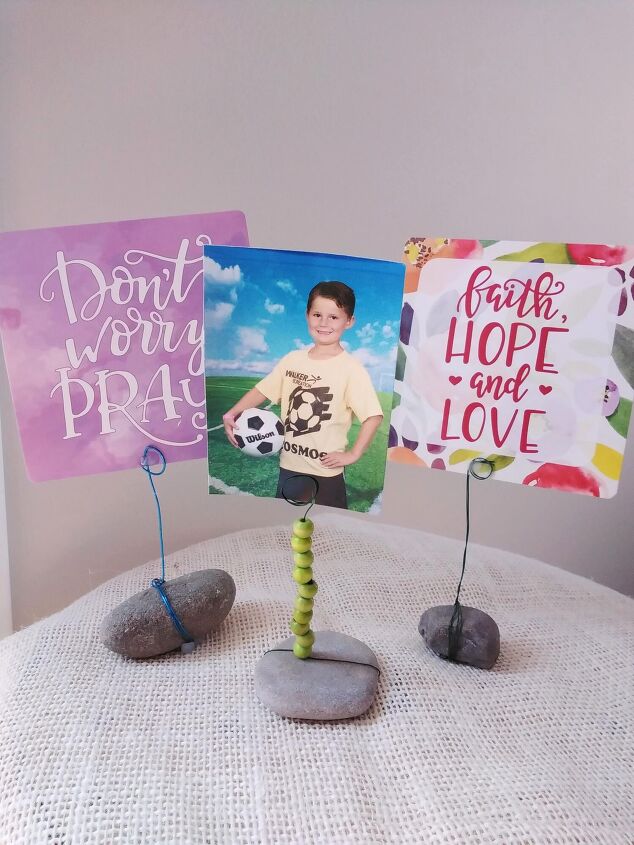
A garden rock and wire photo holder is a wonderful DIY project kids of all ages (and adults) will enjoy making! These cool photo holders are the perfect way to display your favorite family pics or give as gifts for Mother's Day, Father's Day, Christmas, and birthdays.
These super easy rock & wire picture holders can be customized to fit your style by painting the rocks, adding beads to the wire holder, or even using colorful wire.
Also, this project is easily adaptable so all ages of kids can make them too.
Garden Rock & Wire Picture Holder Craft For Kids
Supplies Needed:
- Medium-sized flat stone or rock (approximately 2" x 2")
- Craft or floral wire
- Wire cutter or pliers
- Pencil
- Acrylic paint & brushes (optional)
- Beads (optional)
- Photos or small inspirational cards to display
- Water-based spray sealer
Directions For Garden Rock & Wire Picture Holder
1. Clean your rocks or stones by scrubbing them with soap and water then let the rocks dry completely.
2. If you plan on painting your rocks make sure to cover the surface of your table with newspaper or a plastic drop cloth. After painting the rocks let the paint dry completely then spray a water-based sealant over the rock and let it dry.
*tip - if you are using dark rocks you may want to paint the rocks white so that it is easier to see the design and colors your child adds to their rocks.
If you choose not to paint your rock go ahead and get started with the next step.
3. It is time to add the wire to your rocks. Wire comes in a variety of different gauges and most wires will work great however if you are adding beads to the wire make sure the beads fit onto the wire.
(This step in the project might be challenging for younger children and it might be best if you or another adult completes this step.)
Depending on the size of your rock you will need to adjust the length of the wire as you start this step. Take the end of the wire and put it on the top of the rock adding about 2 inches of extra wire length. Wrap the wire underneath the rock bringing it back up to the top of the rock until the two sides of the wire meet in the center of the rock. If your wire is very thin you may have to wrap the wire around the rock a few times.
Twist the wires together with your fingers until they fit snugly around the rock then use pliers to finish twisting the wire so it doesn't slip off of the rock.
4. From the top of the rock stretch out the wire so you have approximately 7 to 8 inches of wire sticking up from the rock. Cut the wire at this measurement.
5. If you are adding beads to the wire string them on one at a time leaving about 3 inches of bare wire at the top.
6. To make the loop at the top of the picture holder take the end of the wire and wrap it around a pencil or marker three or four times. Slip a photo or a small card into the loop to display it.
Now your kids can enjoy displaying special photos, cards, or inspirational messages in their new garden rock & wire picture holders.
Make sure to visit MommySuburbia for more fun & easy DIY projects!
Enjoyed the project?


Frequently asked questions
Have a question about this project?