Asked on Feb 08, 2012
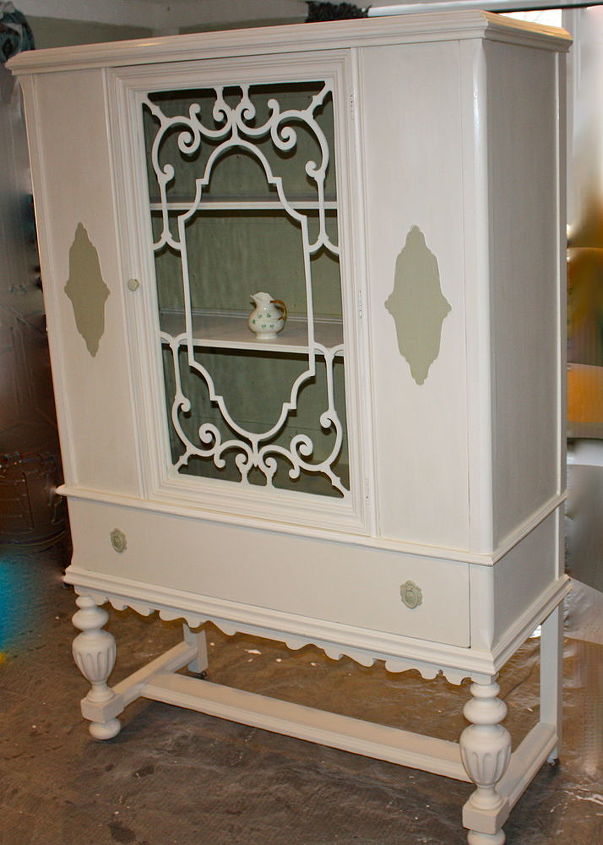
Any suggestions on how to take better pictures of my furniture? I'm using a canon slr

+11
14 answers
-
Shabby, This is such a beautiful piece. You can take some lovely pictures with a point and shoot as well. I use my SLR only when I do Interiors and that too use it in auto mode. Not a pro here. But I feel it is the angles you take make the picture. For example an angle should enhance an element. I never take front facing pics of my chairs as it makes the chair looks small and gives it a weird dimension. Try sitting down and looking up, try capturing a bit of the space around it as well. balance your image in the view and shoot. Also observe what professionals are doing with chairs and mimic that view. Try standing up higher on a stool or lower on the floor. Do you know the rule of thirds? Here are some basic tips for you - http://samirbharadwaj.com/blog/top-5-tricks-for-taking-professional-looking-photos-with-your-digital-camera/
 Yamini LEED AP at Urbanmotifs
on Feb 08, 2012
Yamini LEED AP at Urbanmotifs
on Feb 08, 2012
-
Thank you Yamini. In the straight on shot the color is so off. I don't have a point and shoot. I will be reading this article now. Thank you.
 Donna McCrummen
on Feb 08, 2012
Donna McCrummen
on Feb 08, 2012
-
Adjust your white balance (wb) to get a picture that's more true to color. Also a piece of furniture like this will look better photographed against a wall than in the middle of a room.
 Paula
on Feb 08, 2012
Paula
on Feb 08, 2012
-
Thanks Paula. It was too heavy to move myself. How do I adjust wb?
Donna McCrummen
on Feb 08, 2012
-
There should be either a button or menu option for wb, though you might have to scroll through a couple menus to find it. The fastest way to find it would be to check your user manual, for newer canons you can usually find the manual online. Once you know how to adjust it just try out the different options until you find the one that gives you the most natural look. With wb adjusted you shouldn't need the flash either. If the picture still won't come out right for whatever reason you can always do some touch ups with an editing program. I'd recommend downloading picasa, it's very easy to use and free :) I have the same problem of not being able to move things around easily, my usual method is to inch a bit of fabric under the legs to protect my floors and repeatedly body slam the piece into place hehe I'm a featherweight but I've moved some pretty big pieces this way! Of course if it's too delicate or you're not on very smooth floors I doubt this would work...
Paula
on Feb 09, 2012
-
Try some of the "natural light" light bulbs. I use a canon powershot SX100 and it does pretty well for what I shoot.
 HandyANDY - Handyman & All Repairs, LLC
on Feb 09, 2012
HandyANDY - Handyman & All Repairs, LLC
on Feb 09, 2012
-
Shabby...Modern Photography (ie: digital) is a lot more practical than the old school methods I grew up using. You can instantly get results and there is no "film" cost. That being said to get great results you have to master the main two stages of production. The first stage is the shot itself. Get a decent tripod and work with natural light. The tripod will allow you to take exposures with longer shutter speeds without camera movement. One concept many beginners do not use is "depth of field" here a small lens aperture will give a deeper range that is in focus. This smaller lens opening means less light...so longer exposures. Not sure what type a lens you have on your camera but a wide range zoom can give you a lot of flexibility. My Nikon is set up with a 18-135mm Some shots work better in the wide angle others in a more zoomed mode. The second main issue with digital photos is "post processing" here a basic or fancy photo editing software package can be used to tweak the photos parameters...I have been using Photoshop for over 12 years. What ever software you chose you should be able to work with the fundamental basics...ie: contrast, light + dark, and be able to shift the basic tones Cyan, magenta, yellow. I have done art photography for over 20 years and have taught my partner some fundamentals...her skills have skyrocketed since then. http://www.flickr.com/photos/torisaur/5200137613/in/set-72157625450720986 The above link is one I shot for some of our fairy furniture and houses. http://www.flickr.com/photos/kmswoodworks/6075293054/in/photostream/ http://www.flickr.com/photos/kmswoodworks/6074765441/in/photostream
 KMS Woodworks
on Feb 09, 2012
KMS Woodworks
on Feb 09, 2012
-
My Opinion: It's not necessarily the type of camera, the light, nor the fancy accessories that make the sparkle. I do think that the "angle" and "space" is everything. Instead of a straight-on shot, use angled shots to give the result more depth and that includes angling from about a squat position, upward (but DON'T take a picture of the ceiling - ugh) and from a stepping stool downward. Also, don't get too close to your subject/piece. Frame it with a little space so we can see the "big picture" of the piece. Showing some background or visual that will help our eye see the the size of your piece with our brain doing the sizing. (Stage a familiar object nearby).
 Ricardo B
on Feb 09, 2012
Ricardo B
on Feb 09, 2012
-
Oops... I forgot to also include the most important thing about your furniture... That is really great work, Shabby Daze! Lots of interesting detail. POW... that central focus really makes it for me. Wish I could do that!
Ricardo B
on Feb 09, 2012
-
Great points from everyone. KMS Woodworks is very accurate on his description of where to start. The camera is just a tool, and set in full auto mode, it has no idea what you are looking at and what goal you are trying to achieve. All of the automatic modes and presets are easy ways to help the camera try and better guess what you want it to do. That being said, to move the quality of image up, you will need to change from full Auto mode (Green Square mode on Canon) and slide into one of the more custom control modes, but still are semi-automatic in the settings. These modes will be labeled as Tv and Av. Tv mode let's you select the shutter speed, and Av mode allows you select the aperture. In both cases, the camera's computer chip does the final guessing and you just press the shutter. In these modes, the flash will not fire automatically. This is an easy way to keep it off. You want to keep the flash off because an on-camera flash will not evenly light the object, and will cause hot spots, glares, and major shadows behind the furniture. If you turn the camera vertical, the flash will create a shadow that appears on the side of the object. So, keep the flash off. Natural light, preferably a diffused light source, will be best. There are simply, inexpensive ways to achieve this for beginners. You can allow light from a window to come through a white curtain, creating the diffused light. If you cannot use a window, you can buy a couple inexpensive clamp-on floodlights at a local store, and clamp them on a chair several fee behind a bed sheet. You will need to figure out a way to hold up the bed sheet, but what you are creating is a large diffused light source that spreads the light evenly across a large area. As photographers, we use umbrellas, softboxes, and reflectors to control the light. The advantage of using lights that are always when learning is because you can see the reflections while looking through the camera and make any changes to placement before you start taking pictures. Off camera flash lighting is a major step up in cost and a steep learning curve. Continuous lighting is easier. You will also need a tripod to hold the camera steady. Without a high powered flash, the time for the exposure will be longer than you can handhold. Without the tripod, the photo will probably be blurry. So get a tripod. Also, try not to set up too close to the object and use a wide angle lens. The wide angle lens will create distortion on the straight edges. What you know should look like a straight edge on a bookcase may come out looking curved. Back up the camera and shoot from further away. Less expensive lenses usually are some of the worst at distortion on the wide angle side. From this point, have fun. Try different things, and share your tests and results. There are plenty of people here that will gladly continue to help with advice.
 Southern Trillium LLC
on Feb 09, 2012
Southern Trillium LLC
on Feb 09, 2012
-
Great tips - thank you all....I have some of the clip on lights and plenty of white sheets. I'll give this a try as soon as I get back from sunny Florida.
Donna McCrummen
on Feb 09, 2012
-
Another good item to have would be a very large roll of "back drop" paper this can be used to provide a neutral scene. I have also used large sheets of foam core mat board as "reflectors" to provide diffused lighting
KMS Woodworks
on Feb 10, 2012
-
Did you do the painting of this piece? It's lovely! <3 I have a similar hutch, and with the curly cue trim, I am wondering how you managed to paint it and keep your glass clean? My wood trim sits right on the glass door.
 Corinne A
on May 03, 2012
Corinne A
on May 03, 2012
-
Yes I did Corinne, Thank you! It is held in by little tiny very brittle pieces of moulding. I used a tiny computer size screw driver to pry the little tiny staples out. Being very careful not to break the very old thin glass. I painted it and put it back using the same pieces of moulding but I glued it in. I didn't want to chance breaking the glass with a stapler or hammer. I figured if I did break the glass I would just leave the door off and putty where the hinges where. Phew, all went well. Good Luck. If you would like to try the paint I sell it here: http://shop.shabbydaze.com/
Donna McCrummen
on May 03, 2012
Sign Up to Answer