


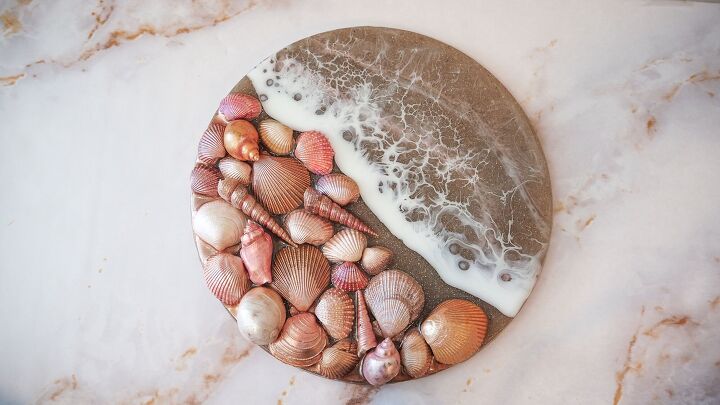
Sea Shells & Resin Ocean Display

Hello and thanks for taking a look at my post today!
I'm very much looking forward to the summer now that Easter is over so I'm straight on with the resin ocean pieces!
For the full YouTube video of this project, see below for the link and further details.
This project is also a great way to create a personalised souvenir of a beach vacation using real sand and shells collected from your trips.
WHAT YOU'LL NEED:
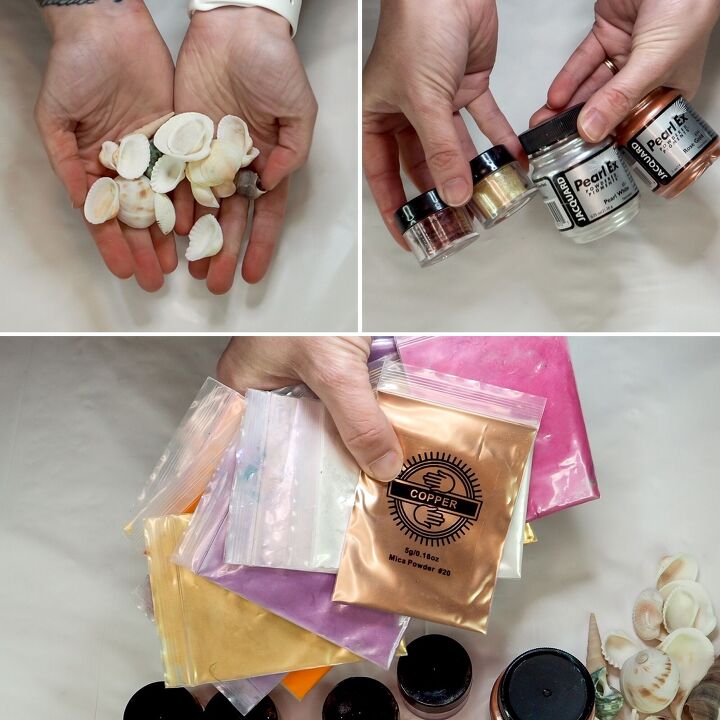
- Resin - For this project, I used JDiction resin. For 10% off use this link and my code HANNAH
- Mica powders (also JDiction) and pigments
- Shells
- Sand
- Glue
- Glitter
- 9 Inch silicone mold
- Liquid latex or painters tape
- Sandpaper
- Heat gun
- Mixing containers and sticks
*Always follow the appropriate safety measures when handling resin*
STEP ONE - WATCH MY YOUTUBE VIDEO
As I mentioned above, this project is up on my YouTube now to view, just click the video link above to watch.
Please also consider subscribing to my channel and check out the rest of my videos whilst you're there. I post a wide range of crafty content every week.
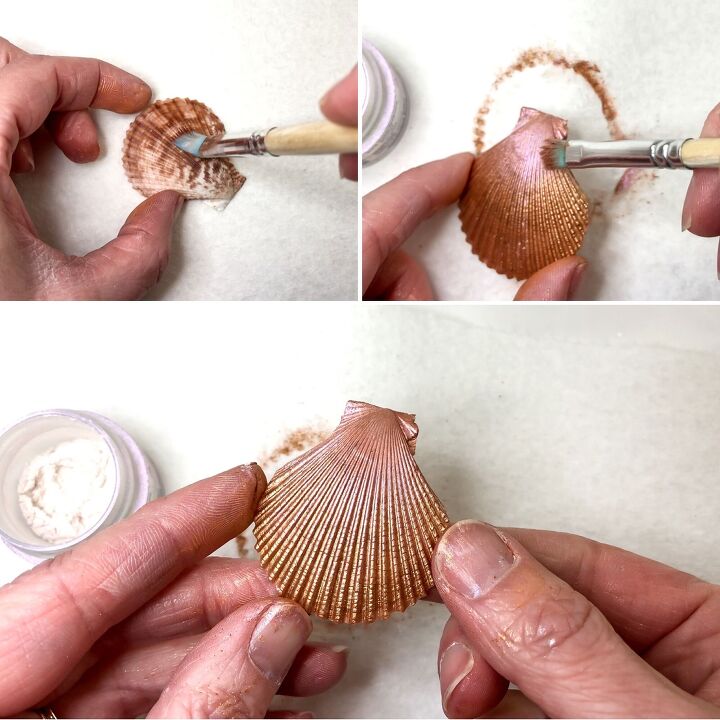
STEP TWO - DECORATING THE SHELLS
To decorate your shells with beautiful shimmery colours, first mix together a small batch of watery glue.
I added approx 5mls of school glue to a little mixing cup and mixed in approx 10mls of water bit by bit. This gave me a nice runny consistency.
Brush a thin layer of watery glue onto each shell and allow this to part-dry. You don't want the glue to be soaking wet but it does still need to be moist.
Pick 2 or 3 coloured mica powder pigments that work together and fit your desired colour scheme. Use a brush to dust the powder onto the shells and layer the colours up to create a multi tonal look.

The number of shells to decorate is up to you but I made enough to cover roughly half of my sand base.
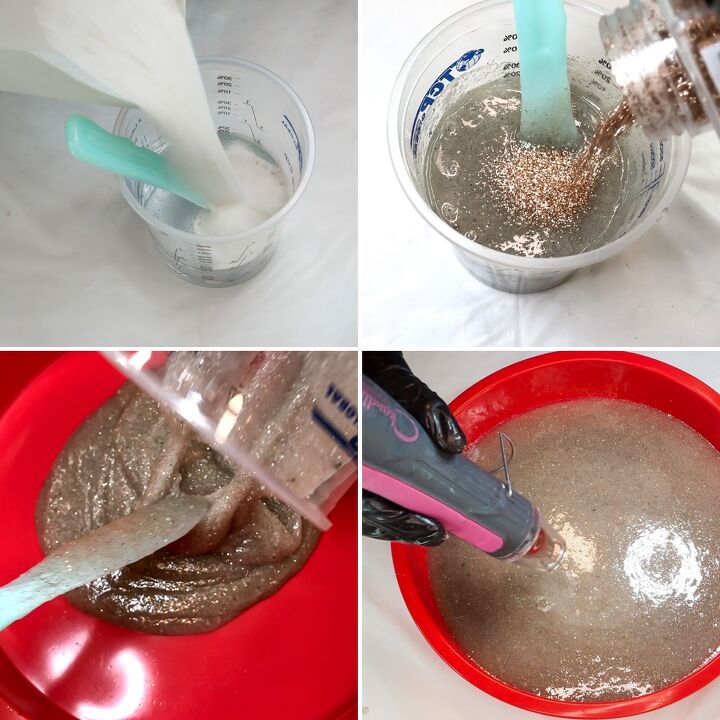
STEP THREE - CREATING THE SAND BASE
For a 9 inch round silicone mold, mix approx 200mls of resin.
Once fully mixed, add in enough sand to roughly double the quantity to around 400mls. Add the sand in bit by bit to make the mixing part easier.
Once the sand and resin have been fully combined, pour in a generous amount of glitter. Choose a colour that will compliment the scheme you are going for. Mix this in thoroughly too.
Pour the glittery sand out into the round mold and pop any little bubbles with a heat gun. Using a heat gun will also help level out the mixture.
Then leave the resin to fully cure.
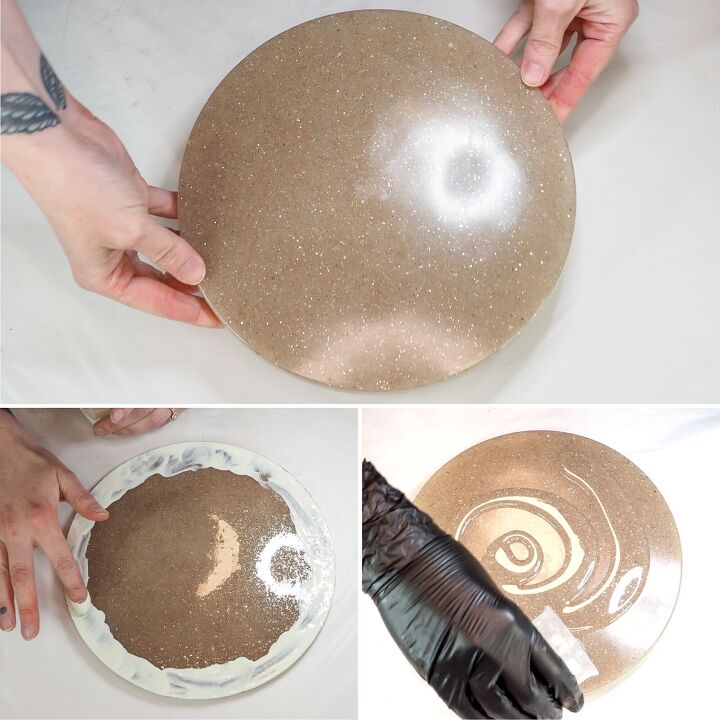
STEP FOUR - FIRST LAYER WITH SHELLS
Once cured, demold the sand base and turn it over so that it is wrong-side-up. This should be the side with the little lip.
Apply liquid latex all around the edges and allow this to dry. You can use tape to seal off the edges too. This is to protect the underside from resin drips later on.
Turn the base around so that it is back to being right-side-up and stand it up off of the work surface so that there is a gap between it and the work surface. I used a silicone coaster mold to rest my sand base on.
Mix together a small amount of resin, approx 100mls and separate out 3 small portions from this into mixing containers. Pour the remaining resin over the sand base covering it entirely including the edges.
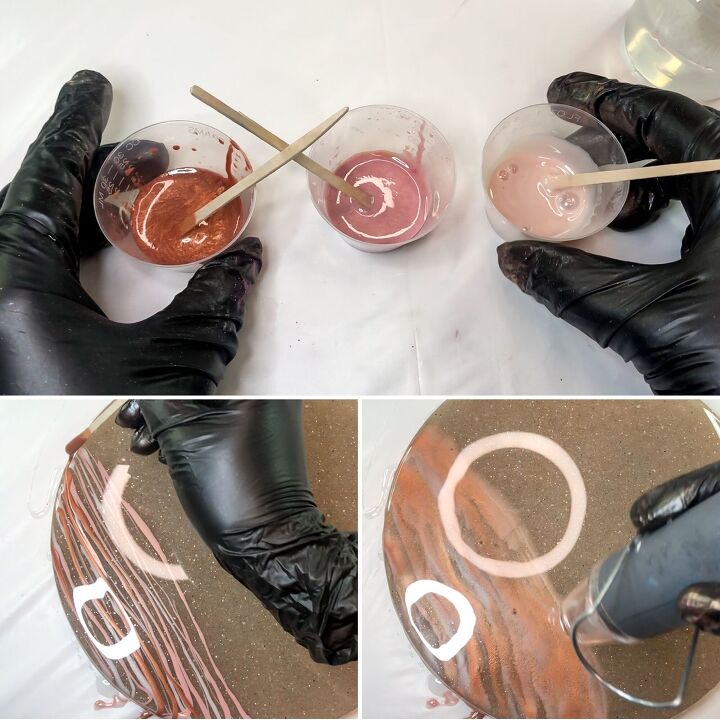
Colour the 3 small portions in different shades from your colour scheme using the powders and pigments from before.
Drizzle thin lines of each colour over one third of the base and then defuse the harsh lines using a heat gun. This blend of colour will act as the background for the spaces between the shells.
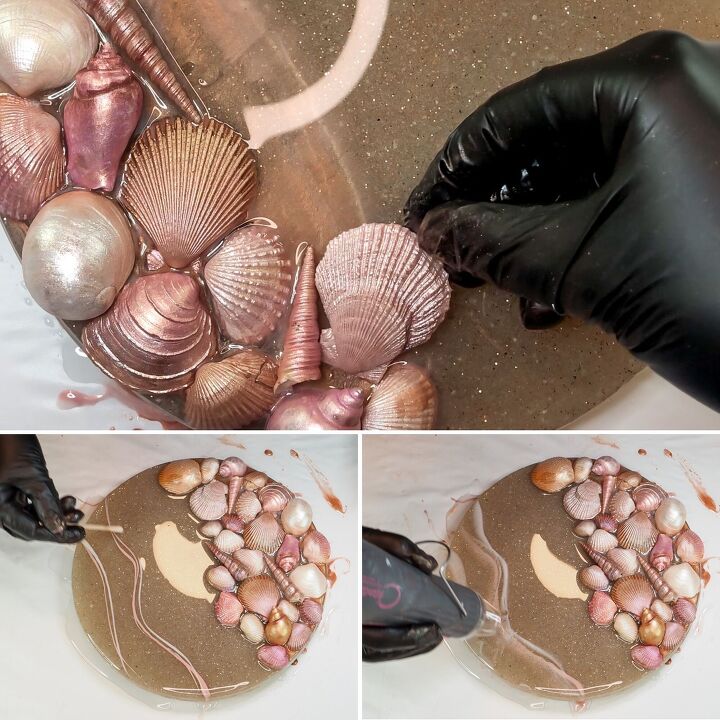
Place each shell onto the the base over the coloured third.
Once ever shell is in place, drizzle a few more wavy lines over on the opposite side of the sand base and defuse these with the heat gun like before.
These lines will act as colourful detail to lay beneath the white resin waves in the next step.
Allow the resin to fully cure.
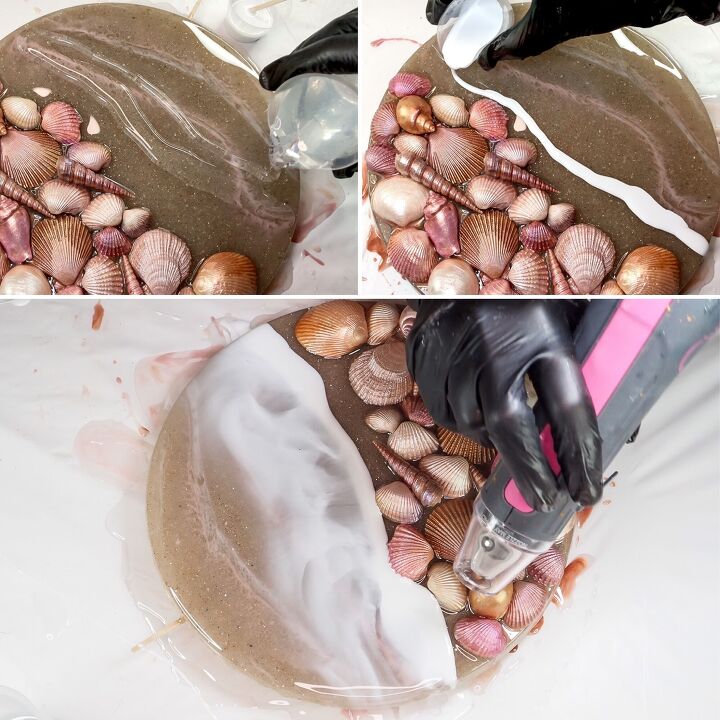
STEP FIVE - RESIN WAVES
With the first layer of resin cured, it's now time to add the feature wave.
Mix together another small batch of resin, no more than 80mls and colour a small portion of this white. If you don't have liquid pigments for resin, you can use a small amount of acrylic paint.
Pour the clear resin over the empty side of the base whilst leaving a good inch bare between it and the shells. Try to achieve a wavy line for the border rather than a straight one for a more realistic effect.
Pour the white resin directly in front of the clear resin border so that it is in contact with both the bare base and the clear resin.
Use a heat gun to blow the white resin into the clear resin to create those classic resin waves.

If your resin happens to misbehave like you can see mine doing (it doesn't want to split into little cells) you too can use this cheat.
If you have rubbing alcohol (decanted into a spray bottle) or liquid silicone spray (which is what I used), apply a very light misting over the white resin and the cells will magically appear.
Make sure you first cover up your shells with a piece of paper so that the silicone doesn't land on them too.
Once you have the look you want, allow the resin to fully cure.
STEP SIX - FINISHING TOUCHES
You can do one final top coat of resin if you prefer. I did, but that's maybe because I'm very picky, but it isn't necessary.
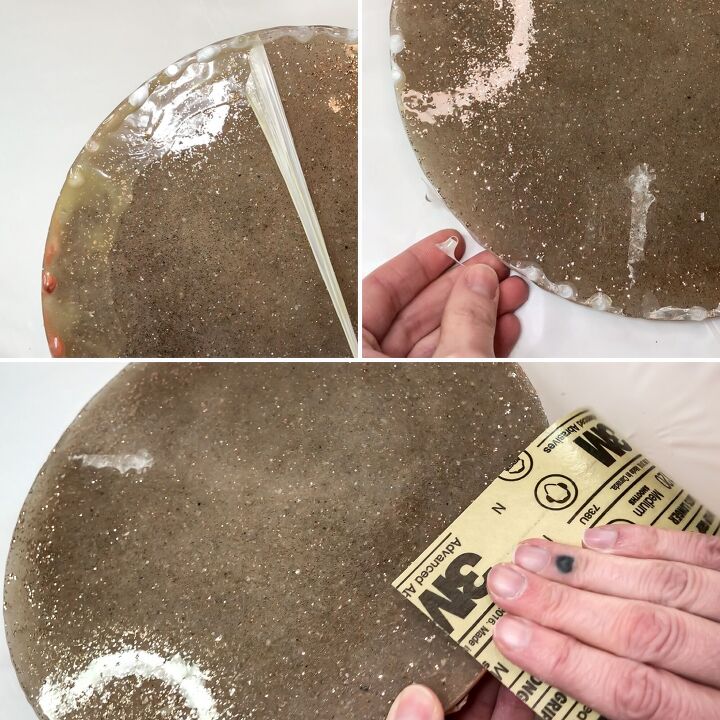
Once all the resin layers have cured, peel off the latex so that the resin drips can be easily removed.
Sand the underside edges if needed, for a lovely smooth finish.
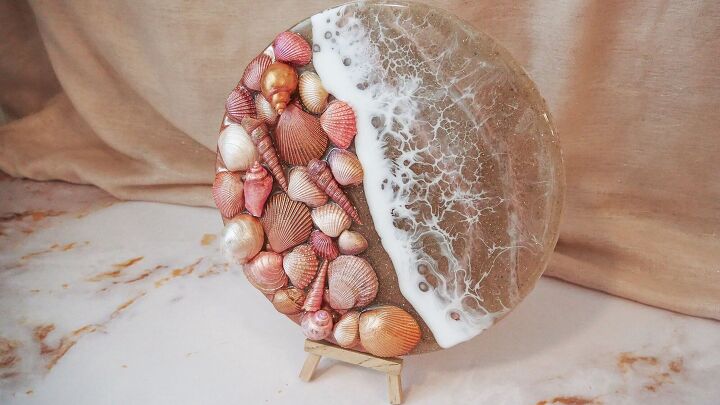
Now all that's left to do is to display your piece proudly.
I've propped this up on a small easel, however, you could drill a very shallow hole in the back of the base to use as a hook for the wall.
You could also use this as a tray for standing your skincare products on or hand soap. It's up to you ☺️
I hope you enjoyed this project. Let me know what you think in the comments below and if you have any questions then drop those below too and I'll get back to you ASAP.
I also have an Etsy store and I've added this piece to it incase anyone is interested in buying it. Just click this link to view.
Until next time, happy crafting! x

Resources for this project:
See all materials


Comments
Join the conversation
-
Really beautiful!
-
I really like these but you could take it one step further and set it in a polyurethane mold and have smooth surface over the ocean and shells and create a coaster.


Frequently asked questions
Have a question about this project?