


The Easiest Geodes Ever!

Hello all, I hope you are keeping well. If you’re in the resin game or brand new to it and want to know how to get perfect geodes EVERY TIME that look like mine, I’ve got it! I’ve finally worked out how to get this look and it’s so easy! I’m going to go ahead and say that I guarantee you’ll get the same results every time when following my method!!! Just keep on reading or check out my YouTube video below to learn how.
If you follow my projects on here or on YouTube then hopefully you have all the necessary tools to get straight on in there, but if not, have no fear, I’ll list everything I’ve used in today’s project below. I’ll also link the online resin store where I get my resin from. They do free delivery and if you use my discount code, you can get an extra 10% off any order with them!

VIDEO TUTORIAL
 For my step-by step YouTube tutorial, see below!
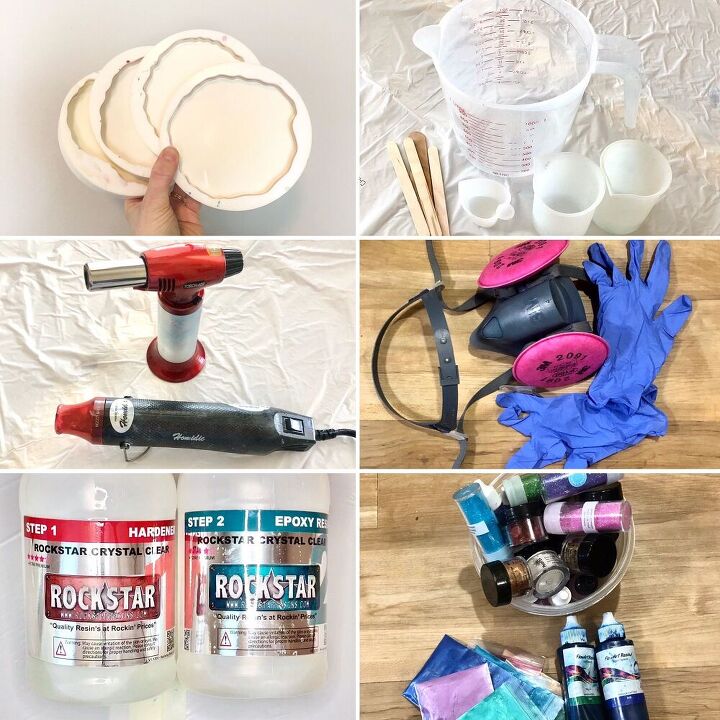
WHAT YOU’LL NEED
- Resin - 4 Star 1:1 Thin Coat resin from Rockstar Resins. Click here and use HANNAH at checkout for 10% off your entire order
- Silicone molds
- Mica & Liquid pigments
- Plastic mixing containers and sticks
- Heat gun
- Blow torch
- Gold leaf/glitter/gems
- Protective wear
VIDEO TUTORIAL
 Click above to view this tutorial via my YouTube!
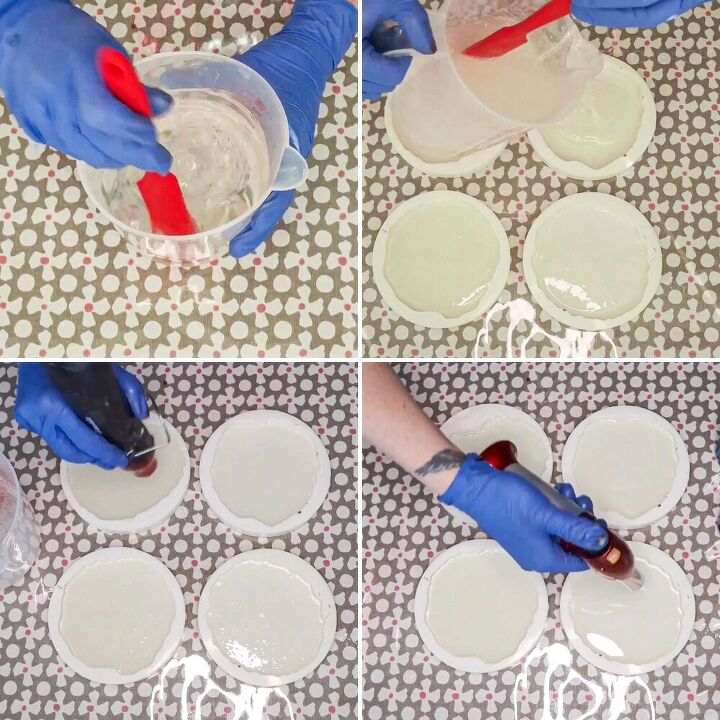
MIXING YOUR RESIN
I mixed together 400mls of resin. This amount will give you really lovely chunky coasters. Scale down your mixture if you prefer a more slim-lined look. I also had a small amount of resin left over from using 400mls but I always have other projects on the go and was able to use this up easily. If this isn’t you then I’d go for approx 300mls to start with and cut all future measurements by a quarter.
So, I added 200mls of resin into 200mls of hardener (whenever you buy ‘resin’ you will receive both parts, the resin and the hardener). Always add your parts this way around as it makes for an easier combination and a more throrough mix.
Next you want to combine the 2, stirring and mixing for at least 5 minutes. Really take the time to do this step to get a nice rock hard finish in the end.
Add around 50mls of resin to each coaster mold and keep the rest aside for the next part. Pop as many bubbles as you can using your heat gun and then the last few surface bubbles with your blow torch because applying too strong a heat for too long on your resin/molds may damage them.
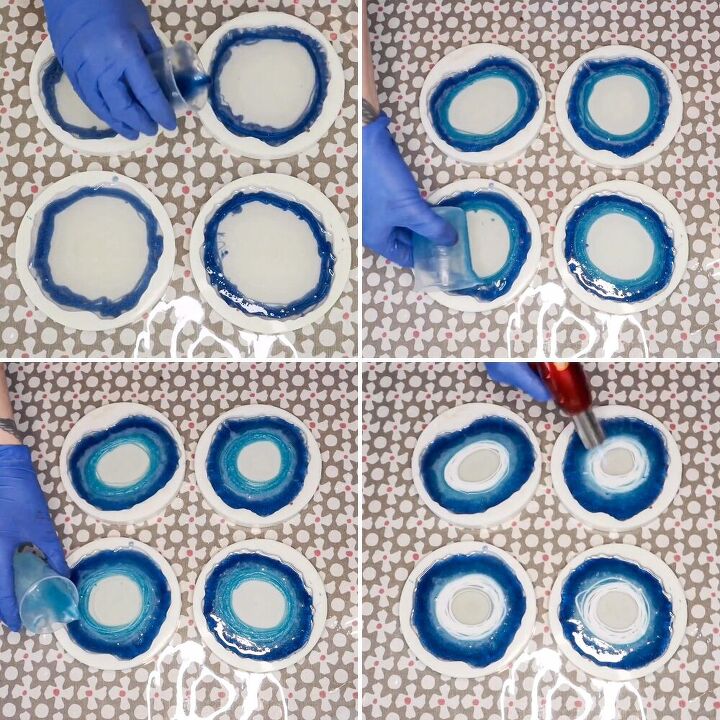
MIXING YOUR COLOURS
Use around 150mls of your remaining resin to colour how you like whilst following the basic rules as list below. These colours will be used to create your geodes.
- 1 Dark shade - using the largest portion of your 150mls of resin
- 1 Medium shade - 2nd largest portion of resin
- 1 Light shade - 3rd largest portion of resin
- A white - 4th largest portion of resin
- A centre like a glitter/leaf/gems etc - smallest portion of resin
I’ve used blues for all 3 of my shades but yours don’t have to be from the same parent colour if you don’t want. I just like the gradient this creates.
Once all your 5 portions are mixed, start adding rings of colours to your molds, starting with the darkest shade. Each time you add a new shade/colour, over lap this one slightly with your last. So for example, I then added rings of my medium shade and made sure that the outer ring of my medium shade and the inner ring of my dark shade overlapped slightly. I then added my lightest shade doing exacting the same thing over my medium shade.
After the 3 shades have been added, add your white in a very similar way but make the overlap on the lightest shade a little bigger and make the white rings a little wider.
This is extremely simple but probably a lot easier to see in my YouTube video so I do recommend watching it (linked above).
Pop any surface bubbles that may have appeared using your blow torch.
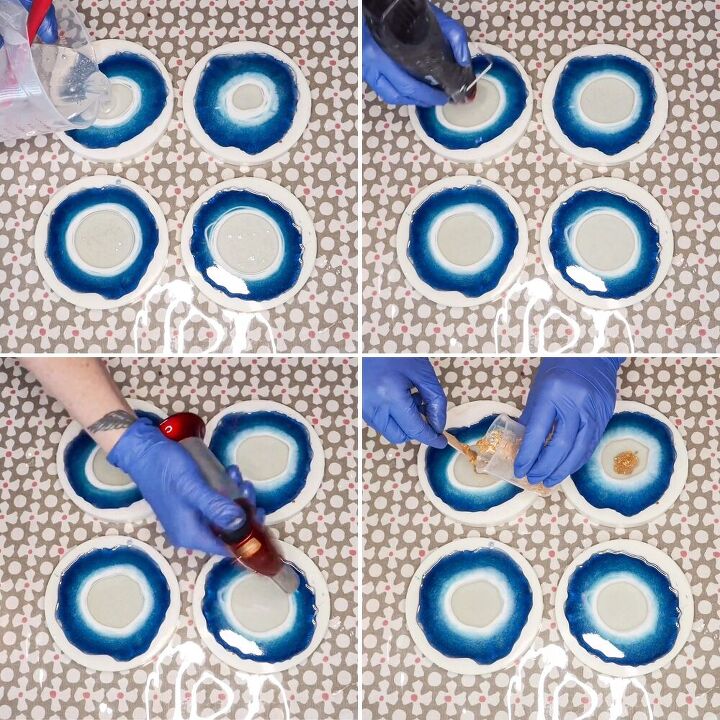
ADDING THE CENTRE
To add the centre, we must first prep the resin in the molds by pushing it back towards the edges as you may have noticed it starting to keep towards the centre of the mold. We want this ‘creeping’ to happen eventually but not just yet.
To ‘push the resin back’ we add more clear resin to the centre of each mold, right in the middle of our rings. Divide up the remaining clear resin you have left at this point between the 4 molds, and watch the rings push outwards. Not only does this give us room in the centre to put our gold leaf/glitter/gems, but it also does something awesome to layers of resin and creates that crashing wave effect that you can see in mine geodes.
Use your heat gun to pop deeper bubbles that may have arrived and also to blend the rings together a little, this aids the ‘crashing wave’ effect. Then get the surface bubbles with your blow torch.
Now we can finally add little dollops of gold leaf/glitter/gems, whatever you picked, to the centres of our mold. Only a small amount is needed in each as it spreads during the curing process.
Keep an eye out for any newcomer bubbles and get them with your torch but other than that, it’s now time to leave your geodes to cure. The resin I have used (linked above) takes approx 12 hours to cure so I try to do lots of work in the morning so that I can demold the same day....because I’m very impatient!

DEMOLDING
You’ll have noticed those rings crept back into the middle and probably smooshed right up to your gold leaf like I mentioned earlier which will make for a beautiful unveiling!
Demold your beauties and admire your work.
At this stage you have perfect geodes ready to shoulder the responsibility of protecting any surface from dripping mugs, however, if you want to know what further finishing touches you can add if you’re a perfectionist like me or someone who also sells their work, then this is what I did.
I painted on gold edges using an enamel paint, added liquid latex to the reverse edges of my geodes and then gave them a lovely shiny top coat of resin. Once cured and the latex has been removed, my geodes are ready to sell!
I think this finishes them off perfectly and if you’re interested in watching how I do this finishing technique then check out my YouTube channel where I have many videos of this process.
Like I mentioned, I sell all my work on Etsy and these coasters are currently still for sale. Visit my Etsy store by clicking here if you’re interesting in purchasing them.
Thanks so much for taking the time to check out my project. I really hope I’ve inspired you to give it a go and please feel welcome to drop any questions or comments below and I’ll happily get back to you.
Until next time


Comments
Join the conversation
-
These are amazing! You make it look so simple! Can I ask where you got your gold leaf?
-
These are incredible, Hannah! Well done!


Frequently asked questions
Have a question about this project?
Isn’t there a kit out there with molds, etc?
So beautiful! Did you have any difficulties unmolding your project?