


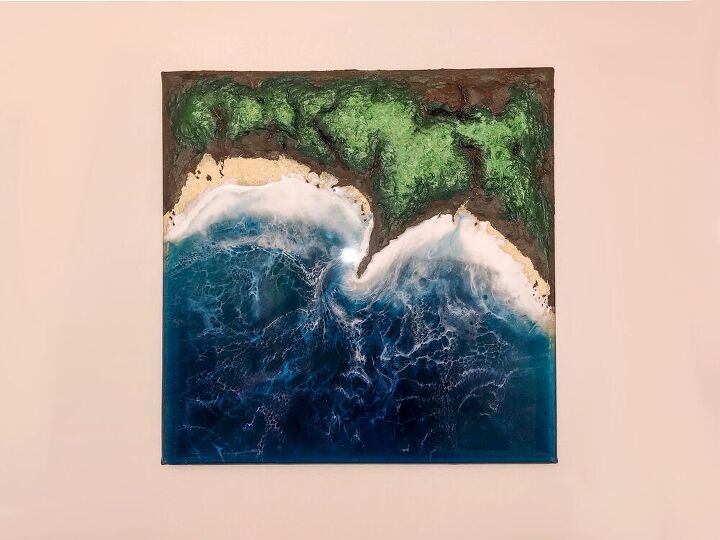
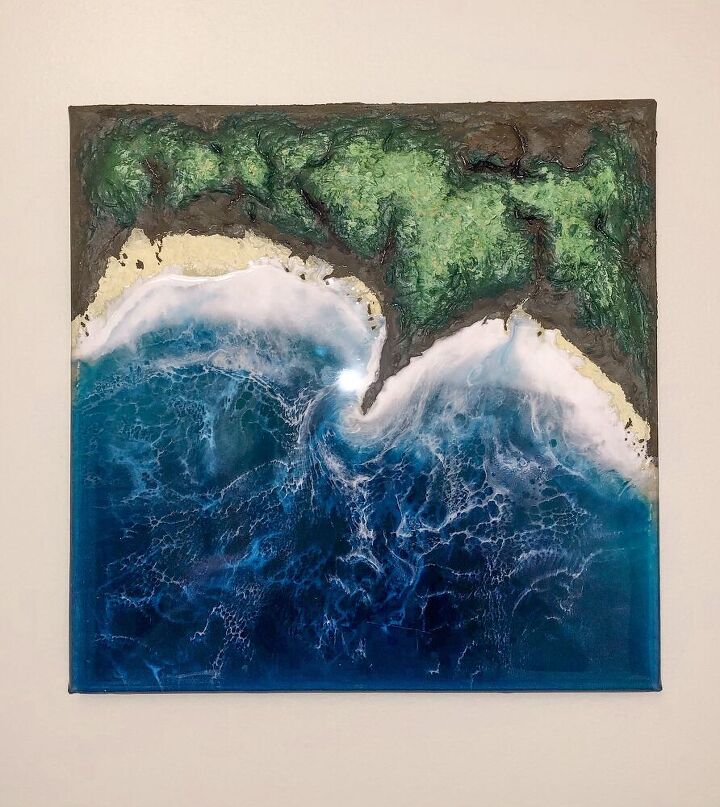
3D Desert Island Picture

Hello, I hope you're all well ☺️
Another fun modeling paste project today that's so cheap and easy to do.
I've of course added resin waves to my island but if you don't want to or don't have any resin then I have an alternative for you!
I also have a YouTube video of this exact project up on my channel now. Details and link below 👍🏻
WHAT YOU'LL NEED
- Canvas - Mine is 10 x 10 inch (a wooden board would also work)
- Acrylic paints and brushes
- Glue (PVA, school, Elmers, Mod Podge)
- Baking soda
- Mixing containers and sticks
- Resin (optional) - As always, feel free to use my code HANNAH for 10% off resin with free shipping using this link
- Heat gun (optional)
- Blow torch (optional)
- Tape (optional)
*If using resin, always use protective wear and follow the necessary safety measures*
STEP 1 - WATCH MY YOUTUBE
Yes, I have this exact project up on my YouTube channel for you to watch now 🎥
So if you're like me and prefer to watch tutorials instead of read them, click the video link above. Please also consider subscribing to my channel for all the crafty content I upload 👍🏻
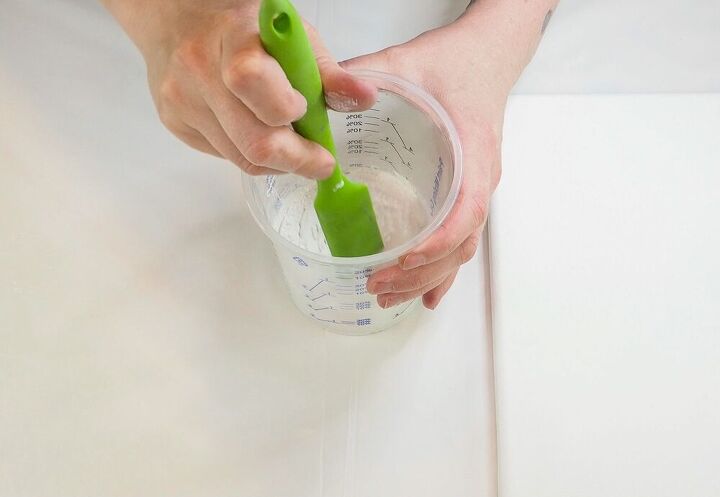
STEP 2 - MAKE YOUR MODELING PASTE
This is the easiest, cheapest paste around! Well, I don't know for sure but neither do you! 😂
Mix 1 part glue, 1 part white acrylic paint and 3 parts baking soda, that's it!
I follow that recipe and then if the paste isn't stiff enough (a frosting-like consistency) just keep adding baking soda until you're there.

STEP 3 - MAKE YOUR ISLAND
I had a rough idea/shape for my island in mind before starting which I found really useful. You'll have a generous work-time for your modeling/texture paste before it starts to dry out in the container, about 2 hours maybe, especially if you keep it moving, but I recommend planning out your island shape too if you're a relaxed or indecisive worker like me ☺️
Spread on your paste and start shaping the grassy-rocky areas of your island.
If you have the time (or patience), apply your paste in layers and let each layer dry before applying the next. You can also use a heat gun to speed up this process. I think this will give you a much better overall look and texture and will make the paste much easier to handle.
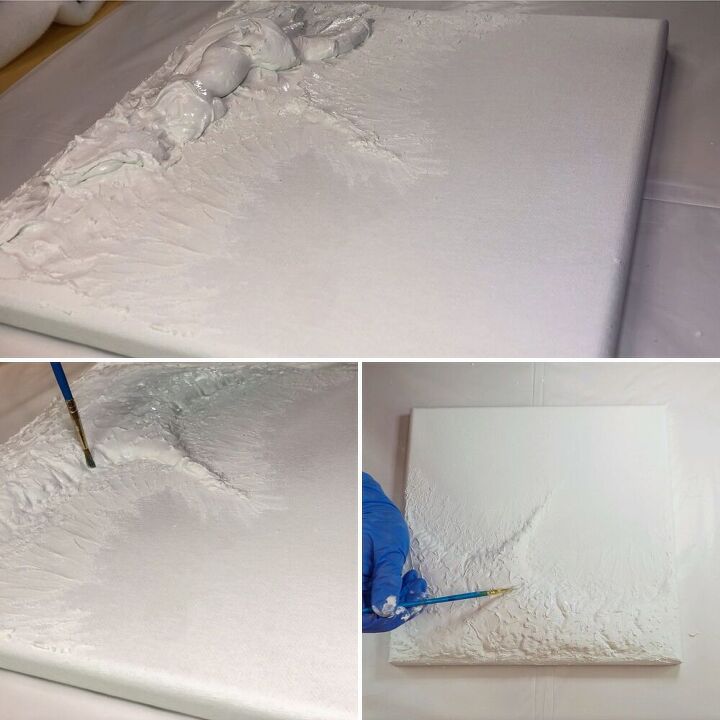
Being new to modeling paste at the time, I didn't do layers and rushed the process a little. I struggled to control the thick wet paste as I built up my island shape. I still managed though by using a heat gun and keeping an eye on everything.
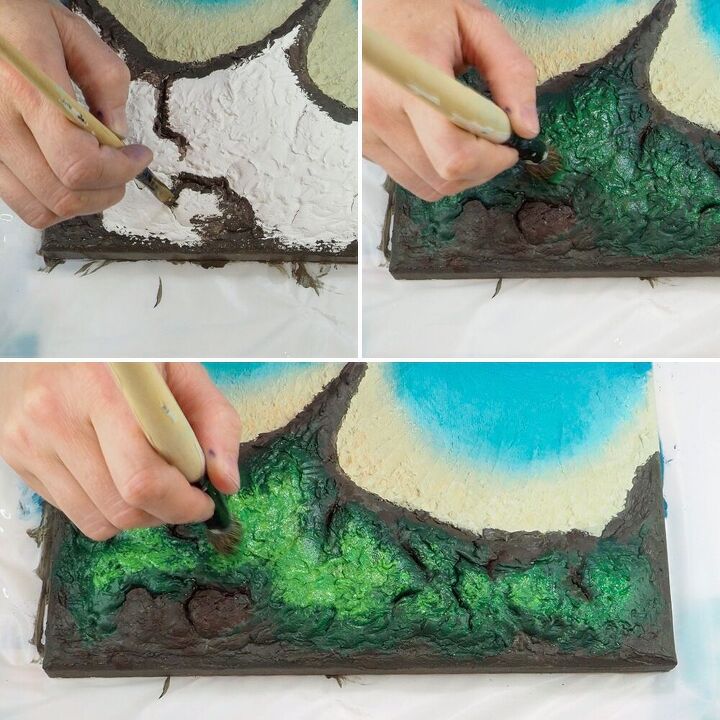
I also used a small paint brush to stipple on details to look like trees, grass and sand. A good little trick.
Now this is where the option to not use resin needs to be considered.
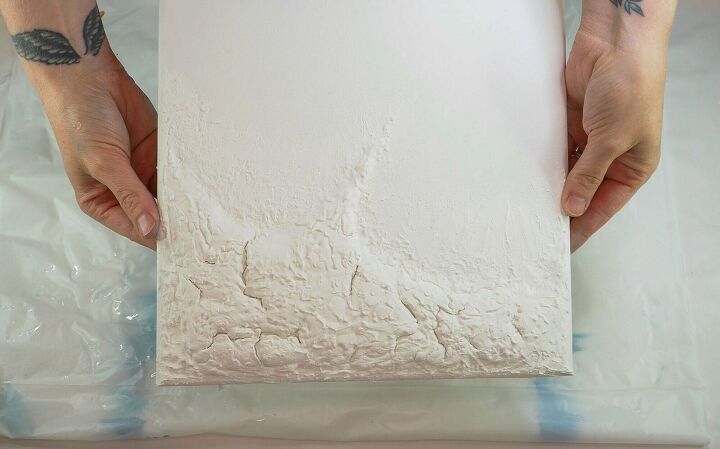
If you don't have or don't want to use resin, use your modeling paste to also create texture in the sea part. I left my sea plain and flat as I knew I'd be pouring resin over it later. Without the resin detail, you want to make sure your sea is as interesting as your land.
Use your paste to create waves, maybe soft gentle ones the further out you go and some more foamy ones around the sandy shoreline.
I might need to make another one of these islands just so I can make this non-resin version as I think it would be a lovely alternative.
Once you're happy with how your desert island is looking, leave it to dry out fully. I left mine unchecked for 24 hours and it was dry when I came back to it so it may even take less time than this to dry out.
STEP 4 - PAINT YOUR ISLAND
This may also be the last step if you choose not to use resin.
Paint your island however you like but if you're stuck on how to do this, I also have a video up on my YouTube channel specifically dedicated to how I painted my island.
Boy, my YouTube channel sounds amazing.....
😅
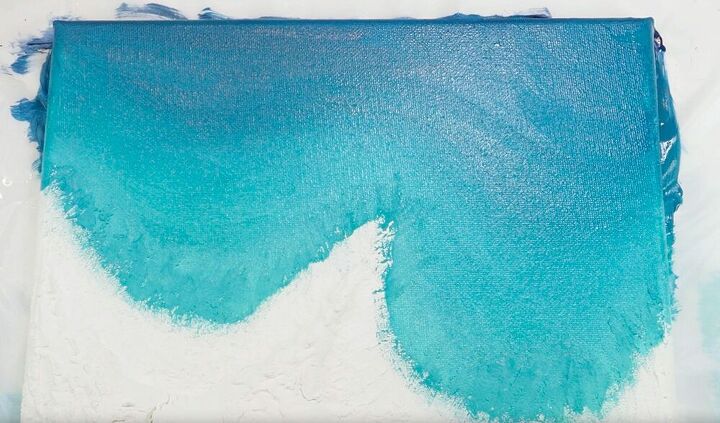
In a nutshell, I use blues and greens for the sea and a beige colour for the sand that I blended into the blue where the 2 colours meet.
I then paint the perimeter of my island a grey-brown that I made by mixing a medium-dark brown with a dark green. I also used this colour inside the cracks I made in my island to look like coves.
I then use greens in progressively lighter shades to colour the central area of my island. Gradually going from dark green to light green helped create a depth in my land.
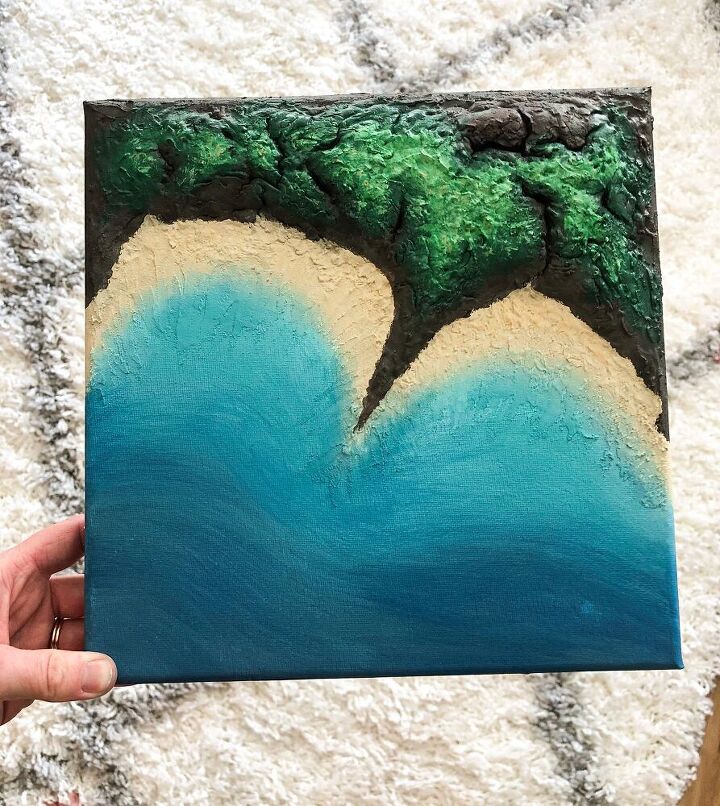
If you aren't using resin, you will also want to colour your foamy shoreline white and add detail that enhances your paste ocean waves.

STEP 5 - MAKING THE RESIN WAVES
Tape off the back of your canvas or wooden board to protect it against the resin drips.
Mix a small amount of resin, approx 100mls (based on a 10 x 10 inch canvas). I coloured mine as follows:
- Dark blue - 35mls
- Light blue-green - 35mls
- Clear - 20mls
- White 10mls
If you would like help estimating how much resin to use for your sized canvas/board, I'd be more than happy to try and advise.

Add the resin to your picture starting with the dark blue furthest to the back edge of the canvas, then the lighter blue in front of the dark blue. These 2 colours will look more natural if you criss-cross them over each other where they meet in the middle. Use a mixing stick or a gloved finger to blend these 2 colours together for a subtle ombre effect.
Then add a line of clear resin to the front of the blue resin 'sea'. This clear resin will go between the 'sand' and the blue resin. Make sure the clear resin isn't just poured into the blue resin but is actually in front of it.
Finally, add a line of white resin in the same way that you added your clear. Add this in front of all the other resin, so between the clear resin and the sand, and make sure there is contact between the white resin and dry canvas surface.
The reason I say 'make sure there is contact' is only so that the shoreline has a crisp, clean white line. If the white isn't in contact with the canvas when you start to blow out the waves, you'll see the white drift away from the shoreline and leave a clear patch behind. That's all.
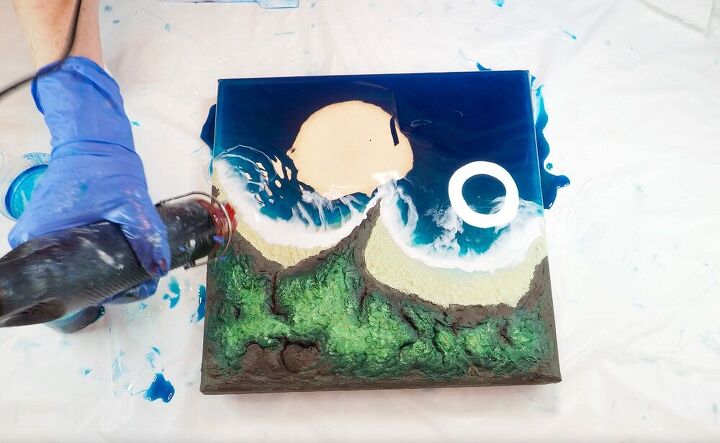
Using a heat gun, blow heat onto the resin in the direction shown in my picture. You're trying to create a ripple in the resin that the white becomes part of. When the ripple relaxes, it leaves behind the white waves pattern.
To help bring out the foamy cells in the white ripples/waves, use quick blasts of a blow torch. The higher heat causes the resin to split and form those cell shapes. Only use short blasts to avoid scorching the resin.
You can choose to do one layer or as many as you like. I chose to do 2 so I left my resin to cure and then repeated these steps with another layer of resin waves.

STEP 6 - FINISHING DETAILS
Once fully cured, remove the tape from the back of your canvas. This will also take any resin drips with it. If the drips are being difficult, simply warm them up with the heat gun and they will break away from the canvas much easier.
I then added tiny bits of painted detail with a fine brush to look like little rocks along the shore.
I usually sell the pieces I make because my apartment is rather cluttered with homemade decor now, but I just had to keep this one too ☺️
If you're interested in taking a look at my Etsy store anyway, then just use this link.
Please also remember to check out my YouTube channel and drop any questions of comments you may have down below and I'll get back to you asap.
Thanks so much for your time!
Happy crafting x

Comments
Join the conversation
-
I have a product made by DecoAr Americana, called Triple Thick. It gives a brilliant gloss glaze. I would try that if I'm not using resin. Your project looks nice and realistic. I like it.


Frequently asked questions
Have a question about this project?