


My “Woman Cave” Sign Updated With Unicorn SPiT and Epoxy
2 Materials
By Laurie Crews Brennan of LaurieBrennanCreates
*This post is sponsored by Unicorn SPiT, but all statements and opinions are mine. **
I received a wooden sign to hang in my studio for Christmas. The sign said “Woman Cave” and I loved it, but being a lover of embellishments, I asked the person who gave it to me if they would be offended if I “jazzed it up” with Unicorn SPiT. Knowing me as they did, they told me they would expect nothing less. If you are not familiar with Unicorn SPiT, you are in for a treat once you try it and if you already use it, I hope I will inspire you to try some new techniques in your projects. Unicorn SPiT is a non-toxic, zero VOC wood stain/glaze that requires an oil based sealer. I find new ways to use it every day and it’s properties never cease to amaze me!
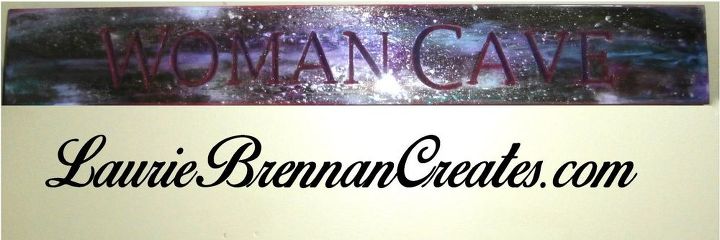
After
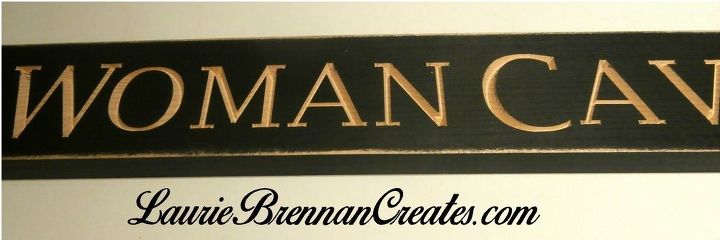
"Woman Cave" Sign
I felt that the bare wood on the routed letters and distressed edges would be enhanced with Unicorn SPiT and that the new SPARKLiNG STAiN would look beautiful over the existing black paint, so I set out to experiment. These are the products I used for this project. I Used regular Unicorn SPiT in White Ning and Pixie Punk Pink, SPARKLiNG STAiN in Flaming Rosie (first prototype which was a bright pink), Dove’s Cry, Finchi Fran (oops..I missed that in the pic) and Grace C. Hummingbird. I also used Pearl FX mica powder in silver and car metal flake in purple. Famowood 2 part epoxy Glazecoat was my topcoat of choice for it’s glasslike finish (used in a couple of ways in this project).
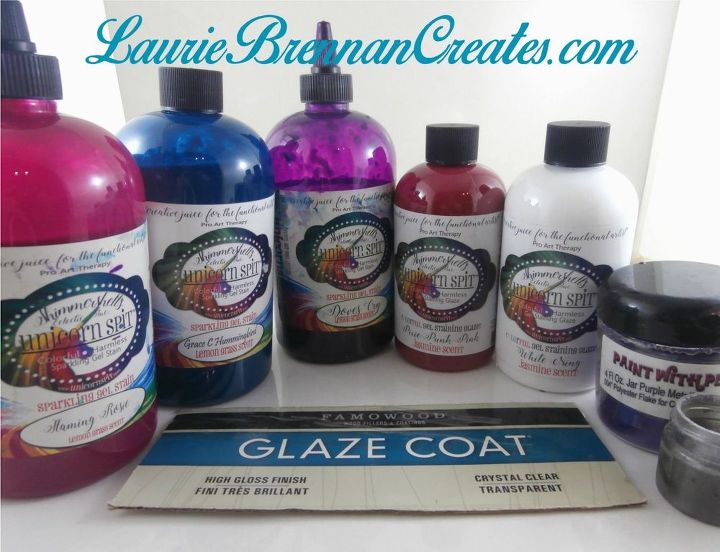
Products I used in this project
I started by painting a layer of my Flaming Rosie SPARKLiNG STAiN right over the whole sign. The prototype I have is a previous version which was bright pink, similar to the new version of Susi Flamingo. The sparkles showed up beautifully over the black and made the bare wood pop with a burst of colour.
Adding "Flaming Rosie" SPARKLiNG STAiN
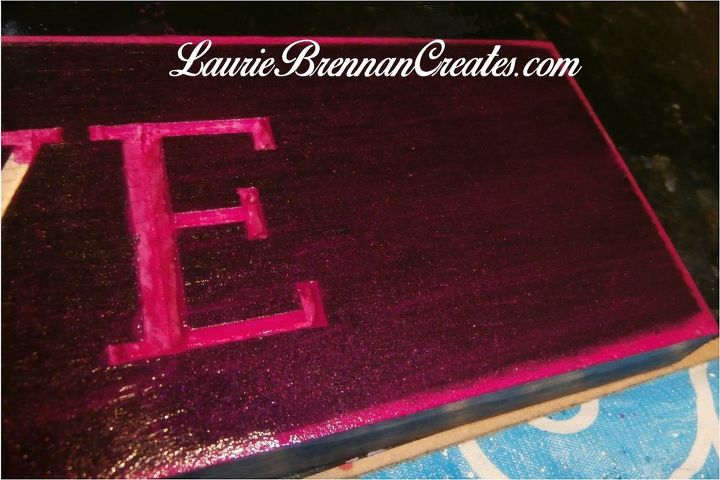
I had an idea that I hadn’t tried before that I thought might work for this project. Famowood Glazecoat is a 2 part epoxy. You mix together equal parts of A and B for the recommended mixing time and then apply it to your piece. It gives you the equivalent of 70 coats of varnish and unparalleled shine and durability. I mixed up a small amount of Famowood Glazecoat (about an ounce and a half) and added about half a teaspoon of car metal flake to the mix. Car metal flake is what they use on the super sparkly paint jobs you see on some cars, but you could also use fine glitter or mica powder for the effect. I mixed my glitter into the clear epoxy and then used a syringe I had on hand to suck it up. I “injected” the purple sparkly epoxy into the routed letter areas. If I had a little overflow of the epoxy, I just wiped it back with a cotton pad of isopropyl alcohol and the uncured epoxy came off without removing my underlying pink SPiT (as long as I didn’t rub hard). I also cleaned out my syringe with alcohol as soon as I could so I didn’t end up with hardened epoxy in it.
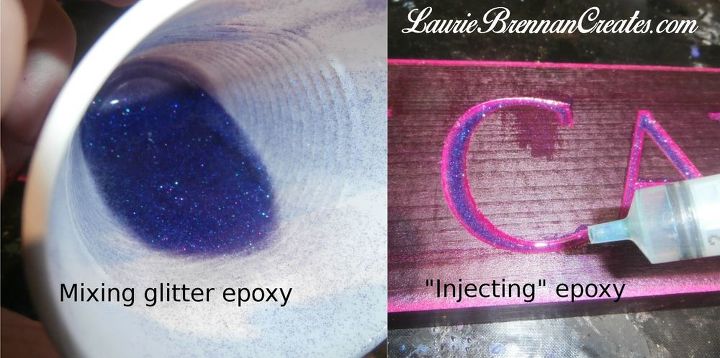
Glitter Famowood epoxy Glazecoat
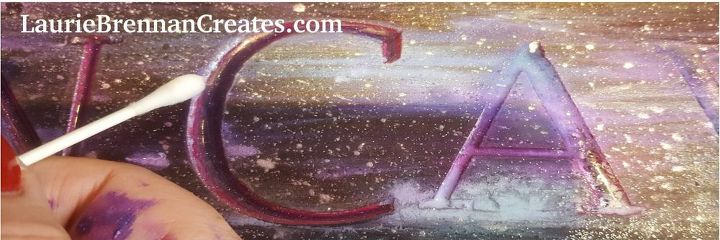
I let my epoxy dry for a full 24 hours before continuing on with my next step. My next step was my favourite thing to do with Unicorn SPiT…a galaxy! I randomly squirted on various colours of SPiT..in this case Dove’s Cry, White Ning, Pixie Punk Pink, Finchi Fran and Hummingbird. I spritzed with a light mist of plain water and then placed a thin sheet of plastic over top. I then spritzed with water again on top of the plastic (to make my hands glide across the surface) and began blending the colours into each other until I liked the look. Be careful not to over blend your colours or they will become one muddy mess. I removed the plastic sheet and added stars to my galaxy. I did this by mixing a very small amount of silver mica powder into a few drops of water and flicking the mixture on to my galaxy with an old toothbrush.

Galaxy Steps
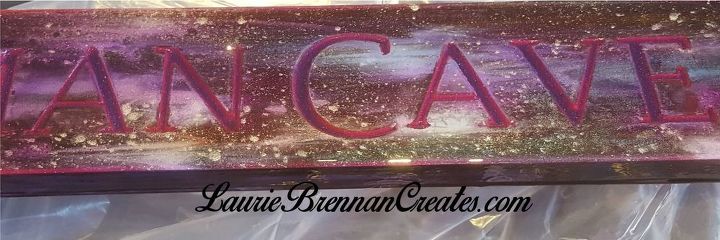
You can see that the epoxied letters became covered up with the Unicorn SPiT from my galaxy process. This was very easy to fix. Because the letters were already sealed with epoxy and the galaxy SPiT was not yet sealed, I was able to clean up the letters easily with a damp cotton swab. Be sure to do this step before proceeding on to the final sealer!
Cleaning up the letters before final epoxy
The project is now complete except for the final sealer. I again used Famowood Glazecoat in it’s natural state (no glitter mixed in). Famowood gives Unicorn SPiT an incredible 3D look, but if you do not want to take the leap into epoxy, any oil based sealer would work for this topcoat. I have placed my project up on cups so that the excess epoxy will run off and protected my work area well with plastic for this step.
Final epoxy clear coat
After allowing the final epoxy coat to dry for a full 24 hours, my project is now complete and I am happy with the results. My sign now hangs proudly in my studio:
Here are the before and after shots. I hope you will give this versatile product a try!
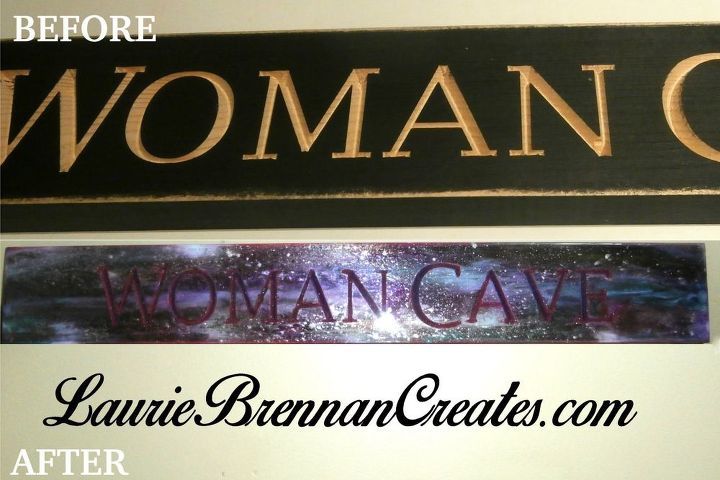
Before and After


Want more details about this and other DIY projects? Check out my blog post!
Comments
Join the conversation
2 of 12 comments
-
Gorgeous Laurie, a woman's cave belongs in the universe of creativity and you NAILED it!!!
-
Thank you Michelle....we all need one..lol!


Frequently asked questions
Have a question about this project?
Wondering..can you apply epoxy to unicorn spit before the spit is dry?