


Composting in South Texas

Composting is one of the best things you can do for your garden. However, it kind of gets a bad rap. So lets get all of the misconceptions about how to make compost, shall we?
Misconception #1 - It smells funny! Done right, compost does not stink. Good compost should smell like fresh dirt. If it stinks, there is something wrong which is usually too much water or a lack of air flow (oxygen). Turning the pile occasionally helps introduce oxygen and helps the pile stay moist but not wet.
Misconception #2 - It takes too much work....wrong. Setting up the bin takes the most work. After that, add ingredients and Mother Nature does all the work. The pile can be turned often for accelerated decomposition or it can sit for months on its own....though turning the pile occasionally to prevent stinky compost is recommended.
Misconception #3 - Isn't there an exact proportion to it?...not exactly. To optimize compost production it is recommended to use a healthy mix of both green (nitrogen) and brown (carbon) materials. However, there is no need to stress about the proportions. If organic material is left long enough, it will eventually break down.
Misconception #4 - Composting is for hippies!...you wouldn't believe how many times I have heard this one! I can tell you, composting our garden was one of the best things that we have done. Our veggie plants are very healthy and are producing a great crop. Plus our kitchen trash is much less stinky as the organic stuff gets thrown onto the pile every evening. If that makes me a hippie, then oh well!
So now that all of that is cleared up, where do you store it while it is cooking?
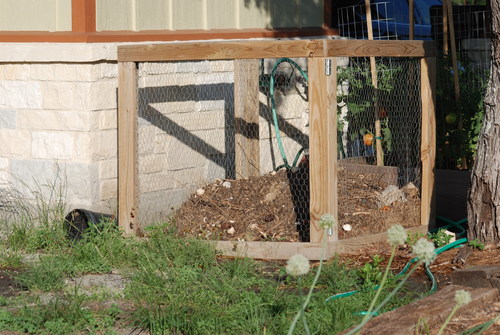
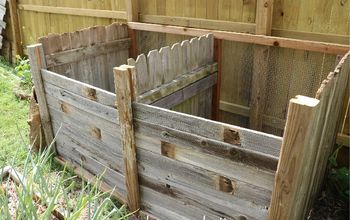
We have had two different designs for our compost bins. When we built out first bin, we were both skeptical if we would actually use it so we didn't want to invest a whole lot of time or money in it. We used plain untreated yellow pine 2X4s and made four squares (each one was 4'x 4'). Then we stapled chicken wire onto each square and screwed all four of the sides together (one side had hinges for a gate). We added some bracing to the bottom to help hold it together, and VOILA! Our first compost bin. It is just a simple cube without a bottom or a top but it has worked well for the first year or so we have had it. I consider it more of a long term bin because it is so huge and the compost takes a while to cook.
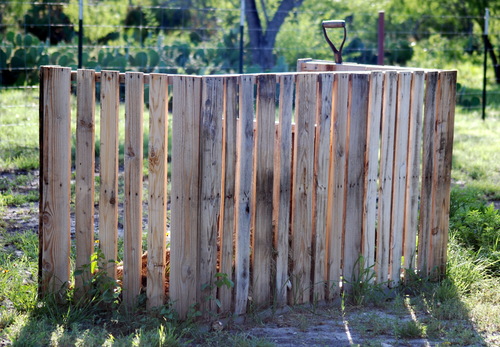
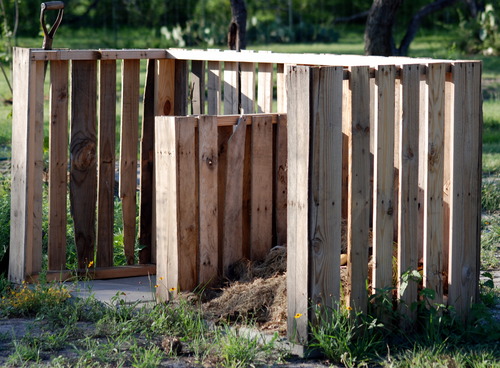
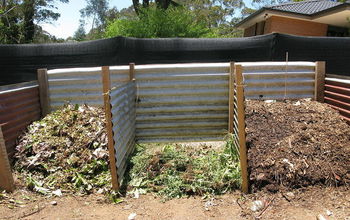
Later on we discovered the two bin system we use now. I cannot take credit for this design. This idea came from Old World Garden Farms' (OWG) blog. Basically it is a two bin system made from torn pallets that we cut apart using a reciprocating saw with a 12 inch demolition blade (OWG also has a good post for this as well). With this system, I have quickly made compost that can be used within a few weeks if needed. We set this bin on top of some cheap pavers just to make turning it a little easier. You'd hardly notice its a compost bin. It turned out kind of pretty!
Now, what goes into this glorious gardening concoction? Well, I have used all of the following in mine:
•Shredded Cardboard (plain brown not the painted stuff - toilet paper rolls work well)
•Coffee Filter and Coffee Grounds (oh the plants love coffee grounds)
•Egg shells
•Fruit and Veggie Peelings
•Leaves (we don't have a lot of trees that drop leaves around us)
•Grass Clippings (try to avoid putting seeds if possible)
•Straw
•Cow Manure (any herbivore manure works well, avoid pet manure though as most of their food has chemicals in it)
There are numerous articles written about the composition of the pile, nitrogen content, and other items that make composting seem like a daunting task. However, we keep it simple. We add items as they become available. With our morning coffee, daily vegetable peelings/ends, egg shells from breakfast, etc., we tend to fill up our little compost can (i.e. an old coffee container) in a few days.
I try to keep the pile about as wet as a wringed out sponge and I add a little dirt every once a while to help keep the microorganisms going and also provide a little help in maintaining the moisture.
So now that you have compost, what do you do with it? As planting season draws near, it is a good idea to add a 2 inch layer to the garden to help add nutrients to the soil and keep it loose. It can also be used in flower beds. Compost adds life back to the soil. I even put a layer of it around our trees to keep the soil around them healthy. I have also read of others using it as a mulch as well.
My other favorite use for compost is to make compost tea. Now I know what you're thinking...and no I don't drink the stuff...that would be awful. Everyone has a different recipe for their own version. However, I use about half a five gallon bucket of compost and then fill it to the top with water. I stir mine daily for about a week then use a strainer to separate the liquid out into another bucket. I bought a cheap fine mesh colander off Amazon.com for this as there was no way the wife was going to let me use her kitchen colander...imagine that! Then I take the strained liquid put it into a watering can and use it to fertilize the garden. You can pour it all over the leaves (the leaves soak up the nutrients via foliar absorption) and also around the root base. Compost tea is an awesome early fertilizer when trying to get the plants get established. I did around three applications (one per week) when planting the garden this year with awesome results. However, if you recall misconception #1 regarding too much water...adding the amount of water necessary to make a "tea" will yield some pretty stinky results...but it is well worth the smell. Just be sure to put it down wind!
Comments
Join the conversation
-
Great post, and here's to putting an end to misconceptions.


Frequently asked questions
Have a question about this project?