


New & Improved Recycled Soda Bottles/Hanging Seedling Rain Chains

$2.00
30 Minutes
Easy
Well here is round 2. I decided to improve my previous creation by switching the straws with plastic tooth brush holders.The added bonus was that the tooth brush holders already have the holes evenly spaced in the top and bottom for me to run the wires through.This change provided more stability to the hanging soda bottle tops that are holding the soil and the seeds.If you missed the previous posting you can check my posts for it but I am going to put the instructions here as well.
Here goes:
1.) Take your empty plastic bottles and cup the top half off. I use a serated bread knife and I left the caps on while I was sawing.I used 3 bottles to make 1 hanging seedling holder/rain chain.Remove the caps for recycling.I haven't figured out anything to do with the caps yet.You can trim any rough edges with a pair of scissors.
2.) Take a 6'(72") piece of 22 guage floral wire or whatever wire you might have on hand and bend it in half. Do not cut the end.You can straighten out any kinks in the wire by taking a folded paper towel and just running it down the wire and this will straighten out all of the kinks.
3.) Next feed 2-1.5" buttons with two or four holes onto the wire through the holes to the loop at the end of the wire.Depending on the thickness of your buttons you might only need to use 1 button for this step.Mine were thin so I needed to use 2.
4.) Feed 1 of the top portions of the soda bottles that you just cut in step 1 onto the wire through the opening in the bottle to make a recepticle for your soil and seeds.
5.) Feed another 1.5" button with 2 or 4 holes through the wire into the neck of the soda bottle and give the wire a couple of good twists.
6.) Next feed 1 of the tooth brush holders onto the wire through the holes in the top and bottom.I found it was easier if I took my holders apart to do this part and then put them back together again.
7.) Repeat this process two more times and when you are done you will end up with buttons at the top. You can decide how many you want to use for decoration.
8.) Take the excess wire at the top and make a doubled loop and wrap any excess wire through the loop to give it more stability to hang it from the coat hanger.
9.) Fill with potting soil and plant your seeds according to the manufacturers instructions and water accordingly.
10.) All you have to do now is watch and wait for your seedlings to grow large enough to be transplanted.
I am not a professional gardener by any means and I only did this as a experiment to see what would happen. I love to watch things grow and last year I tried to plant lettuce seedlings inside my house and my 20 lb cat decided to walk through them and smooshed them and then he proceeded to eat them.Live and Learn!:) Not this year my darling pet!My yard is very shaded at different times of day due to a lot of mature trees so this allows me the luxury of being able to easily move my seedlings around to find the sun. Hopefully this will expedite their growing process!If you have any questions or comments please drop me a message and I will be happy to answer you.
Thanks for taking the time to read this and best of luck to you in your growing adventures!

This pic is of my new and improved hanging seedling rain chain and it only has 3 cups instead of 4 like my original one.
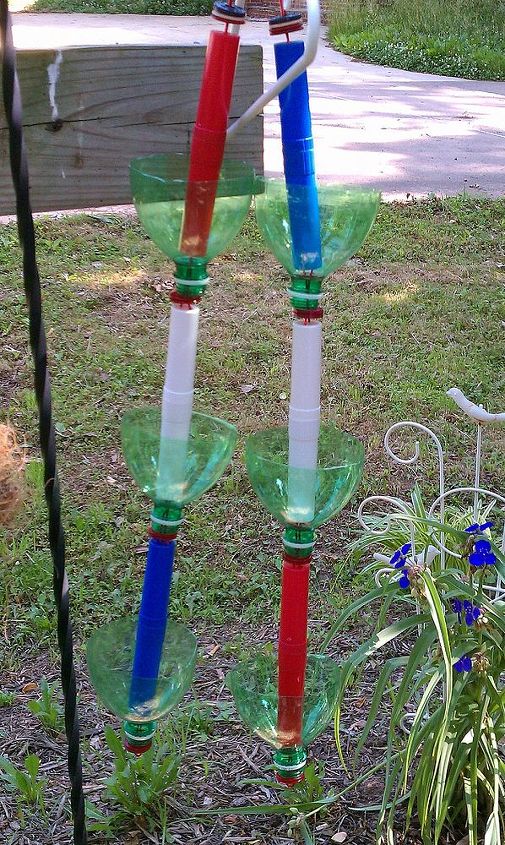
Here is a close up of my new & improved hanging seedling/rain chain with 3 cups instead of 4 like my original one.

OK here we are with soil and seeds planted and waiting for them to grow.I will keep you up-to-date on their progress.
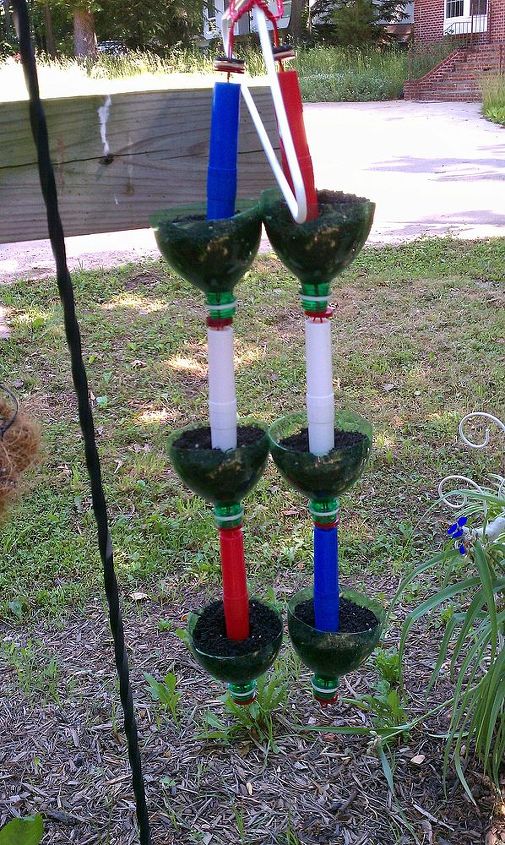
Here is another pic of the soil and seeds planted & waiting for them to grow.I will keep you updated on their progress.
Comments
Join the conversation
2 of 8 comments
-
Hey ScattyLady! I had to look up what a cloche was. I had never heard of that word before.This new and inproved hanging seedling holder is definitely working better than my original one.We have had several days of steady rain here and this holder has held up better than my first one.I hope this works out for you.Part of the reason that I did it like this is because I couldn't find the larger straws in any of our local stores and when I went to the dollar store they had a package that contained 3 toothbrushes as well as the 3 holders so I thought it would work out great. Who could complain about the price?I bought 30 packages. I wasn't quite sure what to do with the 90 toothbrushes so I donated them to the people in Oklahoma,USA that just had a terrible tornado and killed a lot of people.I feel so bad for them.Best of luck to you.
-
Don't get it, do we need to watch the first post? And if so, could you give us an easy link?


Frequently asked questions
Have a question about this project?